Showing posts with label flower on stem. Show all posts

Saturday, March 18, 2023

Frilly Flower Notecard

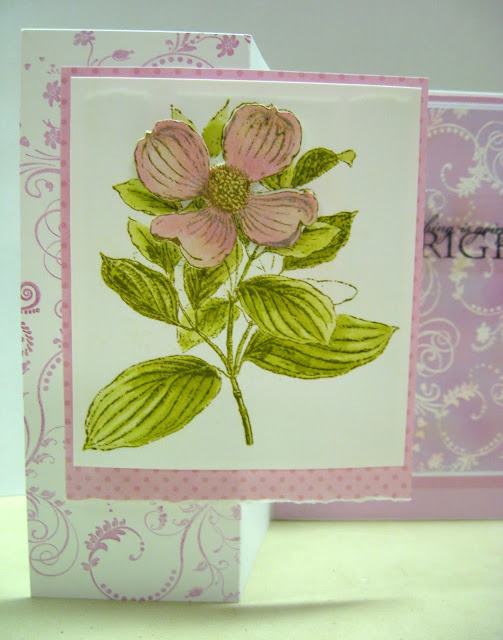
 Hello from design team member, Heidi.  Today, I could use your help. I don’t know what this flower stamp is.  I have a feeling I should know, but I don’t.  I am pretty sure it isn’t an orange flower, but I really wanted it to be orange, and that is the power of stamping, you can really do as you please. 


I stamped three flowers and colored them with alcohol markers. I fussy cut them out, but I really didn’t feel I needed to be too careful with it.  I then added a bunch of glitter glue to the flower.  It looks so pretty when it dries down on the orange.  

I did a simple arrangement for the flowers over an oval die cut and then added a sentiment strip and die cut butterfly to ground the card together.  


This flower stamp is so affordable and so pretty!  

It is called Flower on Stem at the Blank Page Muse shop.

The sentiment was taken from a large sentiment set called Everyday Phrases, and this one is at the I Brake for Stamps shop.

If you know the flower, or think you might, please comment!  It is one of the things that drives me nuts!

Thanks for visiting today!

You can also find more inspiration at the links below:

The Blank Page Muse- https://blankpagemuse.com/

FB Fan Page- https://www.facebook.com/groups/blankpagemuse/

Instagram Shop- https://www.instagram.com/blankpagemuse/

Instagram Blog- https://www.instagram.com/blankpagemuseblog/

Twitter- https://twitter.com/BlankPageMuse

Pintrest- https://www.pinterest.com/blankpagemuse/boards/

Sunday, July 21, 2019

Tri-Fold and Seal Stationary

Hello!  Susie here with another Snail Mail project!

Did you ever have a pen pal? My cousin Rebecca was my pen pal for a while when I was a tween and I distinctly remember the stationary I used.  It was a tri-fold that you wrote on one side and then closed and sealed to mail.  It was more than a postcard but less than a card & envelope set.  It brings back happy memories that I want to recreate today.

Time to play...


Supplies:
Flower on Stem Art Rubber Stamp my Terri Sproul SC0033-10
Watercolor paper
Permanent, waterproof black ink- Ranger Archival was used for this project
Pigment inks - ColorBox Blends from Clearsnap were used for this project
Paintbrush
Water
Purple Tape
Stamping platform
Scoreboard
Craft mat

Begin with a piece of watercolor paper that measures 8.5"x 5.5". Score it along the long edge @ 2.5" and at 6.5" creating 3 sections. The middle section becomes the front of the tri-fold stationary. Then add a 2.75" piece of  the purple tape where the address would go.


Place it on the stamping platform with the 2.5" section at the bottom and positioned the flower stamp so that it would slightly overlap the Purple Tape. Stamp with black waterproof permanent ink.


Next stamp the flower on a separate piece of paper and trim this out so that it can be used as a mask.  Once it was in position, cover the front of the tri-fold with a light application of Golden ink, using a pouncing motion and an applicator to create a mottled coverage.
 Before removing the mask and the tape, ink around the edge of the tape to create a more solid border for the address box.


Watercolor the flower with Melon, Frog and Leaf inks.
 I love this flower stamp!  It is such a beautiful image of a dogwood flower!


I also inked along the edges and the score lines before folding it up and adding a seal.
  (Do you recognize the faux postage stamp I shared in my last post?)


And that is all there is to it!  A quick and easy idea to build up your stationary reserves!  I like to use watercolor paper but this could just as easily have been created using any cardstock.  You can get (2) tri-folds out of each standard piece of 8.5"x11" cardstock.  And don't forget to create some coordinating seals to use!

Thanks for stopping by and I hope you find some time to play today!
Susie


Looking for more inspiration?
Click the links below!


Friday, April 12, 2019

To Be Loved By You

Hello all you Bank Page Muse stamp fans. Cathy N here with a Mother's day card for you!
 I was cleaning up my desk and I had a scrap of paper that I didn't use from last months project. 
So I thought, let's use that in this months Mothers day card.
Enjoy!

Stamps used:
Raindrop background
Flower on stem 
Fancy border with butterfly & bird

Other items used:
watercolor pigment
white embossing power
white, black & glitter cardstock
copic markers
black ink
versa mark ink
blue ink

1. Make a watercolor background. This one was done cleaning up the leftovers from another project. Stamp Raindrop background with blue ink so it blends into the background.
 2. Grab Flower on stem  and some versa mark ink ( or embossing ink ) and stamp Flower on stem  on the front.

 3. Emboss Flower on stem  with white embossing power.

 4. Color Flower on stem  with Copic markers.

5.  On top of panel stamp Fancy border with butterfly & bird with black ink.

6. Layer it on a black cardstock piece and then on some blue glitter cardstock piece. 
Add a sticker sentiment to the front and add it all to a white card base.


(save 15% with my code BPMDtCathy2019)

The Blank Page Muse- https://blankpagemuse.com/

FB Fan Page-  https://www.facebook.com/groups/blankpagemuse/

Instagram Shop-  https://www.instagram.com/blankpagemuse/

Instagram Blog-  https://www.instagram.com/blankpagemuseblog/

Twitter-  https://twitter.com/BlankPageMuse

Pintrest- https://www.pinterest.com/blankpagemuse/boards/

Saturday, May 13, 2017

Embossed Resist Card Background

Hi There!
I love creating unique backgrounds because it is so much fun to emboss and then watch as the image pops out once you apply ink over it. You can easily create beautiful backgrounds by repeatedly stamping a single design and then heat embossing the image. Use a sponge applicator to add 2-3 shades of pigment inks over the embossed design. Go ahead and have a little playtime...you can build up a stash of backgrounds to pull out when you need that last minute card.
Supplies:
  1.  Art Journaling #2 Rubber Set (Sin City Stamps) 
  2.  Inhale Exhale Art Stamp Sheet (Sin City Stamps) 
  3.  Flower on Stem Art Rubber Stamp (Sin City Stamps) 
  4.  Watermark Ink Pad
  5.  White Embossing Powder
  6.  Heat Gun
  7.  Anti-Static Bag- or cloth bag of cornstarch
  8.  Pigment Inks / Sponge Applicator
  9.  White & Pink Cardstock
  10.  Pattern paper scraps
  11.  Water Color Paints / Waterbrush
  12.  Dimensional Foam Pads
  13.  Permanent Black Ink Pad 
  14.  Transparency (vellum)
  15.  Card base (5x7")
Directions:
1. Fold the front panel of a white card base in half vertically. (Z-Fold Card)
Stamp the flourish repeatedly on the left half of the card front with pink pigment ink.

2. Adhere pink cardstock to the inside panel leaving a narrow white border.
3. Wipe white cardstock with an Anti-Static Bag (or cloth bag of cornstarch) to prevent static cling attracting stray grains of embossing powder to speckle the paper. Stamp the flourish stamp repeatedly with Perfect Medium. Be sure to overlap the edge of the paper and to rotate the stamp with each new impression to fill the page with a random design. Apply white embossing powder, remove the excess powder, and heat set.

4. Stamp the flower image twice with green pigment ink. Use watercolor paints to shade the leaves on one image. Next, paint the petals of the second image and fussy cut. Assemble the flower with dimensional foam tape and matte with patterned paper.  Tear the lower edge of the matte.
 5. Apply pigment ink over the embossed design with a sponge applicator. Matte with white cardstock.
(TIP: After applying ink over the embossed design, wipe the entire image with a facial tissue to remove any small beads of ink that are clinging to the heat set powder. The slick plastic surface of melted powder will resist absorbing the ink and will remain wet leading to the possibility of transfer to your fingers or smudging and ruining your project.)
6. Adhere the matted flower image by applying adhesive only to the left front half of the panel.

7. Use permanent black ink to stamp a sentiment onto transparency. Apply a small amount of adhesive to discreetly attach it. (TIP: Cut the transparency longer than the image in order to fold the excess, add adhesive to the flaps, and attach it behind the stamped background panel.)


A Closer Look:


Sin City Stamps:

To purchase these stamps, please visit www.sincitystamps.com

For more inspiring paper-craft projects from the Design Team, be sure to visit us at the

Sin City Blog  and follow us on Facebook.
You can also join our Fan Page HERE.

To learn more about our designer Karen, please visit her blog, Art & Soul.
Thanks for visiting!

Monday, April 10, 2017

Dream - Journal page

Hello Everyone, Shilpa here,
Today I am sharing a art journal page.
Enjoy!

Supplies:


Step by step Tutorial


1. Adhere Dictionary paper and few washi tapes on your blank journal page, then randomly apply the  gesso.


2. Stamp flower with  black archival ink onto the page.


3. Color the image with watercolors.


4. Finish off your page with a pretty piece of trim and a few buttons.

 
To shop Sin City stamps please visit:  http://sincitystamps.com/ 
and share your idea's on our Fan Group!

Thanks so much for stopping by!

Copyright Text

Blank Page Muse 2018 Sin City Stamps 2013