Friday, January 22, 2021

Believe: A Sparkly Layout

 Good Morning! Today I have a layout out to share with you using stenciling, embossing, and lots of stamping! Christmas has come and gone, but, if you're like me, you have many photos ready to be scrapbooked! So, are you ready!? Let's get inky! 

Start with a solid color cardstock and your accent paper. Here you see some of the fabulous paper from Pam Bray's Watercolor Line. Using an edge distresser, distress the edges of the pattern paper. Now put aside and get those inks out! 

Using the Star Slimline Stencil and Distress Ink, stencil the stars on the on your card stock. Then outline them using a fine black marker, ZIG is my go to. 

Now for a little splatter fun! Choosing spray inks in blues, greens, yellows, and red, splatter droplets onto your layout. To do this, screw off the spray nozzle and gently tap over your layout. This technique allows you a little more control over where your spray inks go. 


Using the tree from the stamp set Starbright Gnome Wintery Tree and a little embossing powder, create the tree accent at the bottom of your layout. Embossing never gets old, it is like magic every time! You can use whatever embossing color you have on hand, or if you have little empty containers, you can mix up your own color, like you see below. 


Next, grab the stamp set Classic Christmas Art and black embossing powder. Using the Poinsettia, stamp in Versamark on the scrap pattern paper and emboss with the black embossing powder. Using embossing powder made for fine detail works the best. 


Using the Pine Leave Branch from the Classic Christmas Art , stamp a grouping of Pine Leaves in the top corner of your layout. You can and some sparkle accent with a variety of glitter pens. Fussy cut your embossed Poinsettia, and using a pop dot, adhere to the layout. 


Stamp another Poinsettia on white cardstock and color. You can see here, where I colored Poinsettias with Copics recently. Using kraft cardstock, create the mat for your photos. Then start piecing your layout together. Add the pattern paper from the first step. Using pop dots, added your mat with your photos, and then using another pop dot, add the gorgeous Poinsettia you colored! 

Using kraft cardstock, write out your title, "Believe" and fussy cut. Draw a heart, and finish your title. Fussy cut it out and, once again, use pop dots to add to your layout. For the journaling above the photos, grab a piece of coordinating paper from your scrap bin, cut down to size, add a little ink to the edges and your journaling and you now have a beautiful layout! 


I hope your New Year has started off with blessings and joy and when times get tough, remember, always have hope and believe beyond what you can see. ...and always know that you can find your peace when you sit down and take a moment, or a day, and spend it creating. Below are several places you can go to look for inspiration. Also, make sure you are a member of the Blank Page Muse Fan Page on Facebook so you can connect with crafter's all over, be inspired, and make new friends. 

Until next time.... Happy Creating! 

Christine


Thursday, January 21, 2021

Mini Vintage Gift Cards!

 Hi Blank Page Muse Stamps Fans!

Hope you are all enjoying our "Vintage" theme this month and that you have been able to join our current challenge - there is still time to play along!

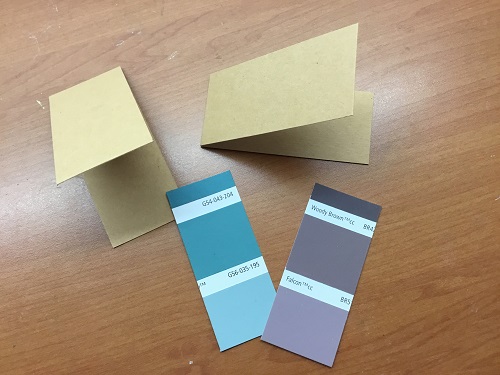
Today I am sharing some mini gift cards - you may remember a few months ago I created some cards with paint chip sample backgrounds and collage elements - well I really hate throwing out even the tiniest of scraps so I decided to use the excess paint chip pieces and make some similar cards but on a very small scale! Great for using up scraps of plain coloured card too!

I love that you can also use this idea for mini cards for any occasion!

Supplies:
Blank Page Muse Stamps: Background Grunge Set
Scrap Card any Colour cut to size and folded in half
Paint Chip Sample Off Cuts cut to just smaller than mini card front
Embossing Pad & Embossing Powder
Collage Images - "Art Tea Life" collage Sheet used for these cards
Small Embellishments & String, Ribbon or Fibre
General: scissors, glue, ruler, heat gun, hole punch

Instructions:
Use your scrap base card to make mini cards that are slightly smaller than your scrap paint chip samples.


Start by stamping and embossing your paint chip samples.


Adhere the stamped and embossed paint chip to your mini card front and punch a hole n the top corner.


Add a small collage image and small stamped sentiment and any tiny embellishments.


Punch a hole in the top corner of the mini card and add some string, ribbon or fibre to use to attach to your gift or xmas tree!

Thanks for joining me today and I hope 2021 brings you lots of time for crafting!

Have fun creating!

Sharon


Don't forget to check us out at all of our social media sites
The Blank Page Muse- https://blankpagemuse.com/

Tuesday, January 19, 2021

Vintage Perfume Greeting Card


Vintage Greetings!  Today I am excited to share this card I created  to play along with this month's Any Thing Goes and Vintage Challenge here at Blank Page Muse! This car was so fun to create and feature 4 different stamp sets! 


Vintage Greetings!  Today I am excited to share this card I created  to play along with this month's Any Thing Goes and Vintage Challenge here at Blank Page Muse! This car was so fun to create and feature 4 different stamp sets! 

The four stamps sets featured include


Other supplies needed to recreate this card include:
card stock- white and pink , kraft card base, paper doily, patterned paper, distress inks, kraft tag, paper bag, stamp punch, water color markers and water brush, adhesive (regular and dimensional) , ribbon, flower 

Cut the pink card stock slightly smaller than your card base. Stamp the Blank Page Muse Sequin Waste Light Art Rubber Stamp by Terri Sproul onto the pink card stock with distress inks. 


Stamp the script text from Blank Page Muse Correspondence Pens, Ink & Postage Art Rubber Stamp Sheet by Katy Leitch, repeatedly onto your tag with distress inks. 


Layer patterned paper onto your stamped card stock. Add paper doily then adhere tag to card. 


Stamp Blank Page Muse Vintage Scents Perfume Ephemera Art Rubber Stamps onto white card stock and cut out image.  Color image as desired with water color markers. 


Add paper bag to card.  Add stamped bottle to card using dimensional adhesives. 


Punch out stamp from white card stock.  Stamp feather from Blank Page Muse Flower & Bird Sketches Art Rubber Stamp Sheet Set in multiple colors.  Tuck stamp under bottle. 


Finish card with ribbons and a bow. I hope you enjoyed this project and are inspired to get creative with your Blank Page Muse Supplies. 

Be sure to follow us at 


Monday, January 18, 2021

A Vintage Inspired Alice in Wonderland Tag

 Hi all, Monique here for today's inpsiration using Blank Page Muse Rubber Stamps.

My first introduction with Disney, other than Mickey and Donald, was Alice in Wonderland. My mother had 2 Disney books saved from her childhood, one was Snow White and the other was Alice. They were old books and a special edition from a Dutch Magazine in 1955, they had the Disney movie illustrations in them , decorated with gold leave, very pretty. They where kept at my grand parents house and when I was old enough to be able to read them , they where given to me.

 Although I liked Snow White, I absolutely loved the weirdness of the Alice book. From that moment on I was an Alice fan.

When Alice was re released on video tape and later DVD , the love for Alice was passed on to my daughter, and we both like to collect Alice in Wonderland books and items. 

So when I saw the Alice in Wonderland stamps at Blank Page Muse they had to be in my collection :-). I chose set 1 because it also has the Dodo on it. (I also looooove Dodo's lol)

Blank Page Muse has quite a collection of Alice stamps, there is also a wonderful set by Rick St.Dennis,  a Steampunk set by Emily Grant, and of course  set 2 of Alice in Wonderland Characters.  The one I used is set 1 .

 The vintage vibe of these Alice sets is perfect for this month's theme, so I decided to use them to make a tag.


Supply list:

Blank Page Muse stamp sets:

*Art Journalling SC 0021 by Terri Sproul

*Alice Wonderland Characters set 1 (SC50)

*Background Grunge by Pam Bray Designs (SCPBR 001)

*Background Roses by Pam Bray Designs (SCBR 002)

Distress ink in Victorian Velvet, Spun Sugar, Barn Door, Aged Mahogany, Vintage Photo and Walnut Stain.

Waterproof stampink in black

Lace/ Charms/ Ribbon/ Embroidery Floss/ Cheese Cloth

Paperscraps (e.g. patterned paper, book paper, tea died paper)


For detailed instructions, see video:


Enjoy making your own tags, they are perfect little craft objects to use as decoration or bookmarks. I hope you liked the video and can't wait to see your entries in this months challenge, it's anything goes, Vintage is optional.

For more inspiration or information see links below.


Friday, January 15, 2021

Rice Paper Collage Card

Happy New Year!  Betty here starting 2021 with an Asian-inspired card. Today I am using rice paper as the background for my card. The rice paper being used today for arts and crafts is not made out of rice. It is made from bark fibers of a mulberry tree. This rice paper is very thin, but strong since it is fibrous and makes a beautiful background. Add a stamp from Blank Page Muse and you have this gorgeous card! This red rubber stamp is called Geisha Collage and when stamped with black ink, it just makes it pop! This card will fit in an A7 size envelope.

This month's challenge theme is Vintage/Classic. This card is easy to make and can be done in less than an hour, but it looks like you spent hours making it. Try making one and entering it into the challenge to win a prize!


Supplies:
  • Blank Page Muse Stamp: Geisha Collage
  • Rice paper: Stamperia, Branch & Writings
  • Kraft cardstock (base card): 6"H x 4-5/8"W
  • White cardstock (card front): 5-3/4"H x 4-1/4"W
  • White cardstock (lining inside card): 5-3/4"H x 4-1/4"W
  • Black cardstock (card mat): 4-3/8"H x 5-7/8"W
  • Black ink pad (dye or hybrid)
  • Glue stick - ensure it drys clear (do not use liquid glue on rice paper)
  • Scissors
  • Distress ink - Vintage Photo
  • Distress ink applicator
  • Your favorite adhesive
  • Embellishments (optional)
    • D-ring picture hanger - I used Stampin' Up's Hodgepodge Hardware that has been retired. You can buy picture hangers at the hardware store that come in brass. Color it with a brown alcohol marker to make it look vintage.
    • Brad
    • Chinese coin - Purchased from my local craft store. You can find coins on Etsy.
    • Brown twine - 6 inches
    • 3 Black plastic rhinestones or enamel dots
Instructions:
  • First determine what part of the rice paper you want as the background. Place the white card stock underneath the rice paper to assist placement. Fold the rice paper over the cardstock to mark it or use a pencil. Do not cut yet!

  • Put an even layer of glue with the glue stick onto the white cardstock (card front). Cover the entire cardstock.
  • Adhere the cardstock onto the backside of the rice paper where you marked it.

  • Trim the rice paper leaving 1/2" all the way around.
  • Miter the corners by gluing them down (use glue stick) as shown below.

  • Glue (use glue stick) the edges down
  • Press down gently on the rice paper with your fingers to make sure the paper is adhered.
  • Stamp your image onto the rice paper. I used a stamp positioner to ensure the image is very dark.

  • Distress ink the edges of the rice paper.

  • Using a paper piercer, poke a hole into the card to add the picture hanger. Secure the picture hanger with the brad.

  • Using the twine, tie the coin to the picture hanger

  • Using your favorite adhesive, adhere the card front to the black cardstock then adhere onto the base card. Adhere the white cardstock to the inside of the card, add the rhinestones, and you are finished! 


I love using rice paper and will be making some more in the future. It's quick and easy and makes beautiful cards. I hope you will give it a try!  

Thank you for stopping by and have a great day! ~Betty~

Wednesday, January 13, 2021

Dimensional Cactus Window Card

 I love to add unique elements to my cards.

 Today I have a cactus window card using the Southwest Cactus Succulents Potted Cluster stamp.


Loving all the color and dimension created for this colorful card.


Check out this sweet grouping! I colored the images with Copic markers and duplicated the three pots on the left to use on the front of the card.


The base was created using the Block Pattern Stencil, distressed inked and shifted to create this pattern. I used a circle die cut to cut through both the patterned paper and an A2 card base.

I have a short video documenting the process:


When I don't have the right sentiment, I create one on my computer and print on matching paper.  The card was assembled by trimming the Block Pattern piece to 3.75 x 5.0 and attaching to the base. The cactus piece was attached on the inside first so the trio of planters could be attached to the front. I did fussy cut the trio plus a blank white set for the inside.  The sentiment finishes the card nicely!


Thanks so much for stopping by today! I'd love to have you follow/subscribe on my social media sites Instagram, Facebook, Blogger and You Tube.  Be well. Be creative!

Looking for more Inspiration? Click the links below!

The Blank Page Muse Shop https://blankpagemuse.com/
FB Fan Page
https://www.facebook.com/groups/bla...
Instagram - Shop
https://www.instagram.com/blankpage...
Instagram - Blog
https://www.instagram.com/blankpage...
Twitter
https://twitter.com/BlankPageMuse
Pintrest
https://www.pinterest.com/blankpage...


Tuesday, January 12, 2021

Sugar Skulls Matchbox with Surprise!

 Hello, on the blog today with Blank Page Muse Stamps, a wonderful red rubber company with lots of awesome stamps! I decided to use the sugar skulls stamps in several creative ways this month, there are all kinds of images in this set allowing you to come up with all kinds of uses!

Supplies - 

Versafine Clair Nocturne Ink
Tombow Markers in various colors
Ranger Archival Ink in various colors
Matchbox
Black Paint
Red Glitter
White glue


First of all, paint the matchbox with the black acrylic paint and let dry. As the box dries, stamp out the flowers (2 small and 1 large) from the Day of the Dead set in various colors of ink, stamp the sugar skill with black ink and then color with the markers. Stamp the heart icon and color with the markers. After coloring all of the images, fussy cut them out.


Next, glue the flowers to the top front of the matchbox and then using foam tape add the skull slightly below the flowers, so there is a ring of flowers around the skull, set aside. 


Now using foam tape, build up the back of the heart icon, set it aside. 


Now, add some glue to the bottom left corner and add lots of red glitter to the inside of the box. Tap excess glitter out of the box, then add the heart icon to the box.


Here is the finished project! 


 Looking for more Inspiration? Check out the links below! 
The Blank Page Muse Shop 
https://blankpagemuse.com/ 
FB Fan Page 
https://www.facebook.com/groups/bla... 
Instagram - Shop 
https://www.instagram.com/blankpage... 
Instagram - Blog 
https://www.instagram.com/blankpage... 
Twitter 
https://twitter.com/BlankPageMuse 
Pinterest 
https://www.pinterest.com/blankpage...


Copyright Text

Blank Page Muse 2018 Sin City Stamps 2013