Showing posts with label plate. Show all posts

Monday, March 24, 2014

#PetLove


Hey there!  It’s Robin Redd, back with you to show you my second project with Sin City Stamps and Composimold.  I have to tell you, I’ve been having fun playing with my gel plate that I made with Composimold for my previous post.  I have even melted it again and made a new gel plate in a different size!  That’s another thing that makes Composimold so desirable!  If I happen to cut into my plate or gouge it with a sharp edge, all I have to do is make a new one with the same product.  Within MINUTES, a new plate will be ready to go!

Today I made some more collage papers using a lot of pretty colors from Art Anthology 
and some of my fun stencils I have.

Here’s a pretty feather stencil from Julie Balzer and The Crafter’s Workshop.

Look at this pretty Cotton Candy Dimensional Paint from Art Anthology!

Here’s a sampling of the pretty collage papers I made.

Now, to show you how I put some of those pretty, gel-plate, collage, papers to use.  I started by painting a strip of some Cotton Candy paint from Art Anthology down one side of my 12” x 12” ‘canvas’.

I stamped the Romantic Background Stamp a few times on a piece of white sketch paper.

I free-hand cut quite a few scallops out of the stamped images.   
I made these various sizes, heights and widths to give my layout a whimsy look.

Next, I simply applied the scallops along one edge of my layout, 
next to my painted pink strip, using Liquitex Matte Medium.

With some coordinating collage papers I had just made 
I made a few layered, free-hand drawn and cut flowers.
1.        Cut three large circles out.
2.       Adhere a circle on another collage paper.
3.       Draw petals once then twice over the same petals to continue the whimsy look.
4.       Cut around petals.

I hand-drew the title of my page, #Pet and stamped Sin City’s stamp Love next to that.  
 I use that ‘hashtag’ when posting pictures of my pets on Instagram.

I’m pretty sure this ‘hello’ flair is from Recollections.

The scallops at the top were painted on with Limeade Dimensional Paint from Art Anthology.  
 I outlined them with a Scarlet Lime pen with works great when writing over paint.  
 I embellished the scallops with Queen’s Co Candy Stripers.

Be sure to use a permanent ink such as India ink when doodling 
so that the ink does not bleed when applying flowers or anything with matte medium.

This pretty pink bow is from Freckled Fawn.  I believe the enamel dots are from My Minds Eye.

And, here, is my completed layout featuring the loves of my life, Tootsie, Harley and Roxy….ha-ha!

Until next time…

Monday, March 10, 2014

Mono-Printing Fun!

Hey Stampers!  This is Robin Redd, here, with today’s post.
SinCity Stamps is partnering up with Composimold this month.  I was stumped with ideas on what to mold with this product.  After much research I found the perfect alternative to molding with Composimold.
I made my own mono-print gel plate!   
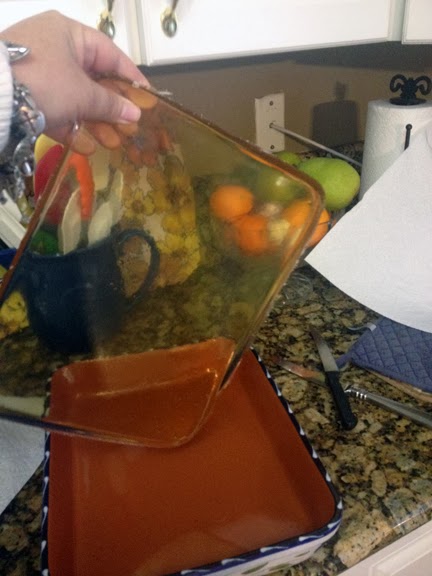
I simply heated the Composimold in the microwave for 3 minutes, poured it into a casserole pan that had no markings on inside so the mold would come out completely smooth.
I had forgotten to put in a release agent, but it came out of the pan super easy.  
 This one measures about 8” x 11”.

This is a great project to use up some of those acrylic paints you might have around in your stash.
Simply pour a couple colors of paint onto the plate and smooth out with a rubber brayer.  You can use some other kind of tool, like a spatula, as long as it doesn’t have any sharp edges.
I used some old sketch paper and laid it over the plate and smoothed it out with my hand.   
When I lifted the paper, this is what I got!
Next I placed a stencil on the plate, put paper on top of that, 
smoothed it out with my hand and got this fun print.
I removed the stencil from the plate, laid another piece of paper on it and came up with yet another print.
Now, onto a new color.
I got this pretty print with some residue of the previous colors on it.  I like this one!
I had this fun die-cut sheet of paper I place on the plate and made this beautiful print.
Here’s the residue on the plate from the last print made.
I picked up the rest of the paint onto this paper.
I love dots and circles!  I placed a stencil on the plate and spread paint over it.   
Lifted the stencil and this is what I got.
I placed an already printed paper over the painted stencil (can’t waste paint!), and got this print.   
You can get so many different looks.  The possibilities are endless.
When you are finished, just wiped down with water and a paper towel.
But, what to do with all these pretty prints?  Well, you can use them as background on a layout.   
Cut shapes out of them and put them on a card.  Tear them up and use them on a collage.
Me?  I made envelopes with some of my prints!   I took a thin piece of patterned paper and made an envelope with We R Memory Keepers Envelope Punch.
I trimmed down some papers that I had printed up on my new mono-printing gel plate 
and decorated my envelope.

I added some doodle lines along some defined shapes.

I, then, used some Project Life cards for address labels.

Now, I have some envelopes ready to send out for some happy mail.  

I can’t wait to play with my new mono-printing gel plate again.  And!....if you want to use the Composimold to make a mold, just tear up the gel plate, place it in the container, reheat it to use it as a molding compound.  Then you can make a gel plate again, when you’re ready for some more monoprinting.

Amazing….simply amazing!

Until next time...

Copyright Text

Blank Page Muse 2018 Sin City Stamps 2013