Friday, August 20, 2021

Paper Dolls

 Hello crafty friends! Kelly Parker on the blog today with Blank Page Muse using several of their people and photobooth stamps which are listed below.  I love using people and face stamps, they are so versatile and a fun way to make all kinds of projects!

Supplies -

Various pieces of collage papers
 - gelli prints
 - magazine pages
 - old book pages
 - washi tape
 - stickers
White Cardstock
Versafine Clair Ink

Stamp out the images onto the white cardstock, draw a body and cut out the images. Stamp the Vintage Lady and Steampunk Gentleman, cut out the wings for use on the dolls. 


Glue assorted papers to the bodies of the dolls and embellish with stickers, lace, washi tape, sequins, and hats. At this stage, you can use anything you want to decorate and embellish your dolls. You can also use a paint pen to create more texture and marks on each doll. When you are finished, you can ink the edges with a crayon, ink pad or pen or even do some stitching on the body of the doll. 


Here is each doll up close, Enjoy!!


Wednesday, August 18, 2021

Vacation Cabin

 Hi everyone, Steph Ackerman here with a vacation  card to share.

I would love to take a vacation about now.  It's been a long time since I've been able to travel due to the COVID lock down, but I am so ready.  This cabin looks like it would be the perfect place to stay and relax, don't you think?


The full tutorial can be found on my blog.  


Thanks for stopping by.


Looking for more Inspiration? Click the links below!
The Blank Page Muse Shop https://blankpagemuse.com/

Monday, August 16, 2021

Steampunk Card

Hi everyone, Monique here with another Steampunk post, this time in a more traditional way :-)

If you ever want to make a masculine card, the steampunk theme always works. Well I think so anyway, the traditional steampunk colors will give the card a masculine look even if there are no machines, or men in top hats included. For this card I used brown in different shades. I didn't add a sentiment, because I like to have some cards ready to use for any occasion. As soon as I know where I need a card for, the sentiment is all I have to add and it is ready to send.


supply list:

Blank Page Muse stamps used:

Knock On Wood SC 0031-00

Steampunk Circus

Octopus Time Steampunk Art SC 91

Art Journal SC 0021 by Terri Sproul

Craft cardstock card base

white cardstock

Archival ink in Jet Black, Sepia and Vintage Photo

Masking paper

Gear dies 

Distress inks in browns, black and broken China

Deco art Metallic Luster in Copper Kettle and Brilliant Turquoise

foam tape


For detailed instructions see video:


here a closer look


Thank you for stopping by and have a great day! I'd love to have you follow/subscribe on my YouTube channel


Saturday, August 14, 2021

Steampunk Time of Weird Inventions

 Hello everyone, Monique on the blog today, with an art journal page in steampunk style.

Most people think of brown, rusty colors when they think of steampunk, but in this post I would like to show that steampunk can have soft colors too.

The idea came when I saw the octopus stamp with the weird flying thing attached to it's head, wat is that called? Rotors maybe? Anyway, the idea of a sky filled with flying Octopuses 
(I checked guys, octopuses is correct lol ) was so funny I decided to make a page in my art journal full of flying Octopuses.

To make the sky I used blues and purple distress inks, they came out like pastel colors but it is still steampunk. Everything is possible in a time of weird inventions, even flying Octopuses in a pastel sky.


supply list:

Blank Page Muse stamps and stencils used:

Octopus Time Steampunk Art SC91

Cloud Stencil

Gesso

Distress ink in: Dusty Concord, Faded Jeans, Peacock Feathers, Broken China

Stamp Ink in Black and Vintage photo (waterproof)

Faber Castell Pit pen in dark Sepia


For detailed instructions see video: 


her some more pictures:


Thank you for stopping by and have a great day! I'd love to have you follow/subscribe on my YouTube channel


Thursday, August 12, 2021

Vintage Bird lady Greeting Card

 Greetings!  Chris here and today I am excited to share this steampunk themed greeting card I created using one of my favorite Blank Page Muse Stamps. The Vintage Lady with Wings Birdcage Red Rubber Art Stamp  is a long time favorite stamp!  As a bird owner I love this "bird lady".  To add to the vintage-y feel I stamped my image onto ledger style patterned paper. 


To recreate this card you will need:

Blank Page Muse Supplies

Vintage Lady with Wings Birdcage Red Rubber Art Stamp 

Hop on over to my blog for all the details on how I created this card. 


I hope you are inspired to get creative with your Blank Page Muse Stamps. 


Tuesday, August 10, 2021

Steampunk Card - Distance is just a test...

Hello BPM Fans! It's Betty here with a steampunk card. I donate many of my cards to the Cards for Soldiers Program. The majority of them are birthday, missing you, holiday, and get well cards. The soldiers that are in long distance relationships may need some long distance love cards so I created this card.

I wanted my card to keep with this month's theme, "Steampunk." This card uses stamps from Blank Page Muse's Vintage Transportation Steampunk Art Rubber Stamp Sheet set. This set comes with many stamps and sentiments.  You can make other occasion cards by just changing it to another sentiment. I also used a couple of background stamps from the  Background Grunge Art Rubber Stamp Sheet designed by Pam Bray

Please visit my blog for a complete tutorial on how to make this card. 

        The Blank Page Muse Shop https://blankpagemuse.com/


Sunday, August 8, 2021

Salty Steampunk!

Hi BPM Fans!


We have a "Steampunk" theme this month here at the Blog. 
I always love to have fun creating with this theme in mind - just love the industrial but science fiction feel characters and elements!


Today I've created a card with a focal stamp designed by Dead Sea Toons - I couldn't resist using the "Top Hat Nautilus" from the Midnight Creepy Cute Collection and making my Steampunk "Salty"!!
Wording is also available in the store - Follow Your Heart Sentiment along with the Small Cogs and Gears stamp used on the card background.


You can pop over to my Blog to see how I made this card just CLICK HERE

Looking for more inspiration then click on the links below!

The Blank Page Muse- https://blankpagemuse.com/

Friday, August 6, 2021

Vintage Perfume Tag

 Happy Friday Creative Loves! Christine here and today I have a special project to share... it was the first thing I created in my new art studio! It has been a labor of love renovation and getting lost in there and creating again was absolutely fabulous and I am so glad to be sharing this project it with you. You can see all the steps over on my blog, Scrapbooking Techniques


The stamps I used to create this little tag were: 


I look forward to seeing you over on my blog to see how to make this tag and make sure you check out the links below to find so much inspiration and to connect with other creative souls around the world. 


Happy Friday and Happy Creating! 

Christine

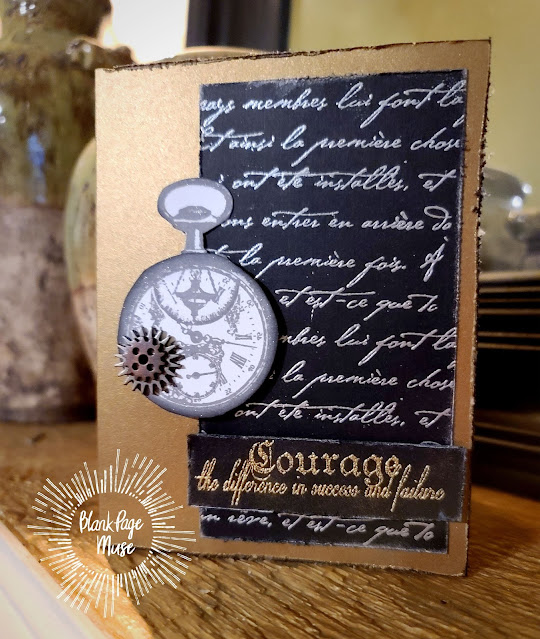
Courage, Silver & Gold

 Good Morning! Today I have a card to share using one of my favorite techniques... Embossing! I don't think watching Embossing Powder melt into the design. For this card I used Metallic Silver on Black Paper. I love how it pops off the paper! 


For this card you will need the following stamps: 

Stamp the Handwritten Note using Versamark down the black strip of paper. Sprinkle with Embossing Powder and melt with a heat gun.


On a separate piece of paper, stamp the Pocket Watch, twice. Then fussy cut them out and use pop dots to adhere one on top the other. 


Stamp the Courage stamp on Black Paper and use Gold Embossing powder. Now, put your card together. Use pop dots to adhere the Courage Stamped Image to the card. Distress the edges of the card and ink the edges with Silver Ink. 

Click the links below for more inspiration and to connect with the Blank Page Muse Community! Until next time.... Happy Creating! 

The Blank Page Muse- https://blankpagemuse.com/


FB Fan Page-  https://www.facebook.com/groups/blankpagemuse/


Instagram Shop-  https://www.instagram.com/blankpagemuse/


Instagram Blog-  https://www.instagram.com/blankpagemuseblog/


Twitter-  https://twitter.com/BlankPageMuse


Pintrest- https://www.pinterest.com/blankpagemuse/boards/


Wednesday, August 4, 2021

Sunflower Card

 Hi everyone, Steph Ackerman here with a bright and cheerful card.


With the sun in full summer mode, the flowers are blooming, the days are warmer/hotter  and gentle breezes flow.


Stamps:  Blank Page Muse Butterfly Breezes Clear Stamp Set


The full tutorial can be found on my blog.  


Thanks for stopping by.


Looking for more Inspiration? Click the links below!
The Blank Page Muse Shop https://blankpagemuse.com/


Monday, August 2, 2021

Altered Book with Photo Stamps

 Hello friends! Today, I am on the blog with Blank Page Muse and I have created an altered book using an old book and stamps along with paint, stencils, and papers. 


Supplies used - 

Several Sentiments stamps from Blank Page Muse
Old book
Handmade paper
Assorted papers
Stapler
Art Glitter Glue
Gesso
Paintbrush
Acrylic paint in various colors

First of all, you will need to prep the book. To start this process, I tear out every other page so that the spine is not overloaded with pages, then glue two pages together for a less tear-resistant surface to work on. Coat each page with gesso and let dry.

While the pages are drying, stamp the images onto a mix of papers. I generally just stamp out my images onto several colors of paper then I have them ready when I am working on building the pages. 

After the pages are dry, paint them with acrylic paint in a variety of colors, let dry, then make some marks with tools such as a credit card, stamps, pens, etc. with a contrasting color of paint. Let this dry. While your pages are drying, look over your assorted images and papers and start to piece them together in layers for the book pages. These pieces can be stapled or glued together or even stitched on before placing them in the book. 

Now that the pages are dry, using large stencils and white or black paint or your choice of color, stencil over the book pages. 
For the orange page above, I used the Water Cloud Masks by taping them down with painter's tape. After the stenciled pages are dry, keep adding marks, splatters, dots, and more. At this stage, the pages are ready for the images and papers that are layered. You can use ink on the edges or a water-soluble pencil and draw along the edges for emphasis. Also, add any sentiments that you like at this point. Your book is now finished!

Here are the finished pages. Just remember that if you don't like a page or colors you used, just keep adding layers! 


Here is the cover, it had been painted with acrylic paint then crackle medium then layered with acrylic paint again to create the crackle, then using archival ink on the edges along with a glaze of paint over the top. 

Thanks for stopping by!!

Copyright Text

Blank Page Muse 2018 Sin City Stamps 2013