Wednesday, March 10, 2021

Floral Background with One Stamp

 Hello friends. Today I am presenting this gorgeous purple floral card for Blank Page Muse!


The stamp is from the Fairytale Fantasy Figures Art Stamp designed by Terri Sproul.  


Stamp the background first with an alcohol marker compatible ink. I use Gina K Almagon ink. Remember to always start with a center image first so you can work your way out to the edge and stamp small portions to fill in the blanks.


Chose your colors and  make the images come to life!  I used my favorites purple and a muted green. Once the coloring is complete, trim down so you can mount on black paper and then on an A2 white base. I elected to do a landscape oriented card. The black frame really picks up the  floral outline.

Use a label die cut to cut the base for the sentiment Bloom Where You are Planted. The label is popped up with foam tape to provide depth.  The black and white twine provides a pop of interest. Be sure to attach the twine before adding the card base. I tape the ends securely on the back to be sure.


Thanks so much for stopping by today! I'd love to have you follow/subscribe on my social media sites Instagram, Facebook, Blogger and You Tube.  Be well. Be creative!

Looking for more Inspiration? Click the links below!
The Blank Page Muse Shop
https://blankpagemuse.com/
FB Fan Page
https://www.facebook.com/groups/bla...
Instagram - Shop
https://www.instagram.com/blankpage...
Instagram - Blog
https://www.instagram.com/blankpage...
Twitter
https://twitter.com/BlankPageMuse
Pinterest
https://www.pinterest.com/blankpage...


Tuesday, March 9, 2021

Grumpy Glitter Cat

 Hello crafty friends! Kelly on the blog today with Blank Page Muse creating some Grumpy Cat and Glitter Cat cards! I love cats, my beautiful Chessie is a long-haired black and white cat. 

Supplies used - 

Distress Oxide inks 
Versafine Clair Nocturne ink
Colored Pencils
White Cardstock 

Use a white card base and tape down the cloud masks. Then using several colors of blue ink, create the background.
Stamp and color the cats with colored pencils and fussy cut them out. 


For Grumpy Cat, use small ink pads and drag them across the card stock to create come bands of color, then add some washi tape for the cat to stand on. 


For the envelopes, I just stamped the cats on the front to create some interest when it is mailed!

 Looking for more Inspiration? Check out the links below! 
The Blank Page Muse Shop 
https://blankpagemuse.com/ 
FB Fan Page 
https://www.facebook.com/groups/bla... 
Instagram - Shop 
https://www.instagram.com/blankpage... 
Instagram - Blog 
https://www.instagram.com/blankpage... 
Twitter 
https://twitter.com/BlankPageMuse 
Pinterest 
https://www.pinterest.com/blankpage...

Monday, March 8, 2021

Blessed Baby Card

Hi everyone, Steph Ackerman here again with a  sweet baby card.  


Supplies:
Blank Page Muse Stamps: Cat Nap Sweet Sleeping Boy
Copic Markers
Cardstock
Die Cuts


Stamp the image with blank ink.  Color with Copic Markers and fussy cut.  I wanted a card for a new baby boy, but change up the colors to create a baby girl card.  Or if you don't yet know the gender, think of coloring the image in yellows or greens.


Next, add liquid pearls around the stars for additional dimension. 


Create a card from black cardstock and select a pattern paper for the background.  Again, I choose a blue background, but match your paper to the colors in your image.  Add a white circle in the center of the card and place the stamped image on top.


Finally, surround the image with flowers and brads and add a die cut sentiment.

Thanks for stopping by.


Looking for more Inspiration? Click the links below!
The Blank Page Muse Shop https://blankpagemuse.com/

Sunday, March 7, 2021

Floral Patterns

                                                                        Hi BPM Fans!

Hope you are all well and enjoying our month of floral inspiration!

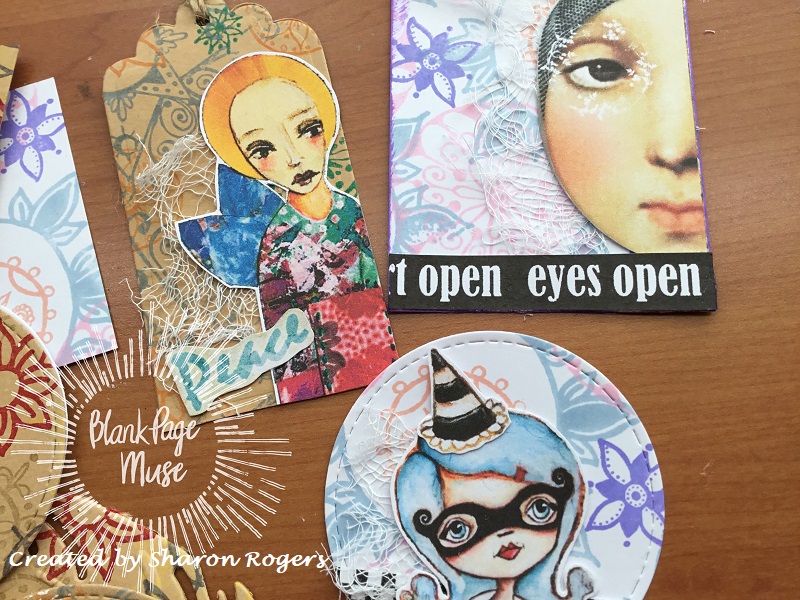
Today I am sharing an idea for making background patterned card for your atc's, ATcoins, tags, envelopes, card fronts - whatever you need a patterned background for!

You only need a few supplies so let's get started!


Supplies:
Blank Page Muse Stamps: Petals & Flowers Set designed by Michelle Frae Cummings
Blank Page Muse Stamps: Medallions Ornate Patterns & Flowers Set designed by Michelle Frae Cummings
Coloured Ink Pads
White and/or Kraft Card 

Instructions:


Use your stamps and ink pads to create a patterned background on your card - use complimentary colours and different size stamps to cover the entire piece of card.


You can get so many great effects - and you can be neat or messy with your stamp placement!


You now have some great patterned background card for creating with. Use a die cut machine to cut tags, trading coins etc. for use on any project! Add collage elements and embellishments!


Thanks for joining me!

Keep checking back here for more DT inspiration!
And remember to share your creations at our Facebook Group - we love to see what you are doing with all the fabulous stamps available in the store!

Happy crafting!

Sharon


Don't forget to check us out at all of our social media sites
The Blank Page Muse- https://blankpagemuse.com/

Saturday, March 6, 2021

Spring Bunny Postcard

Spring Equinox in the Northern Hemisphere will start at 4:37am on Saturday, March 20th (central time) This is the first day of spring, this means our daylight hours will become longer and the temperatures warmer. In the Southern Hemisphere the very opposite is happening.


Rubber stamps used:

Additional items needed:
  • Imagination
  • Scissors
  • Alcohol markers
  • Paint brush
  • Water colors
  • Ink
  • Craft Foam
  • Water color paper
  • Glue 

1. Cut your water color paper to size. I made mine into postcards 4" x 6." If you want white edges like mine. Tape the edges down with washi tape.


2. Then wet the paper. Use a flat (square looking) brush. Take your water color in nay color you choose. Then choose whatever color you wish for the strips. I'm using green in the sprite of spring and St. Patrick's Day. I also splashed/flicked some gold on the background.

3. I then drew a silhouette of a bunny on scrape water color paper and cut it out.


4. Using this Ombre ink I stamped flowers to the bunny. Once the ink dries I slashed/flicked water color all over the bunny.

5. Glue you bunny in place and in black ink. I stamped the quote "Bloom where you are planted" to the top. The quote comes for the Flower & Bird Sketches stamp set.


Hope you enjoyed this Spring Bunny postcard. If you plan to mail these without an envelope make sure you use really strong glue. If you have any questions feel free to message Lasheet and if you choose to make your postcard tag her and Blank Page Muse. Thank you, happy crafting!! ♥


Looking for more Inspiration? Click the links below!
The Blank Page Muse Shop https://blankpagemuse.com/

Thursday, March 4, 2021

Birthday Greeting Card Featuring Zoe

Today I am excited to share this super cutesy Birthday Card I created!  I love making birthday cards and having them ready at a moments notice! I also love mixing and matching all my Blank Page Muse Stamps. 
This card features the super cute Blank Page Muse Zoe I hope your day ... words art rubber stamps designed by Magda Polakow.  I chose to mix it up and use a grungy rose background from the Blank Page Muse's Background Roses 4"x 5" Red Rubber Stamp by Pam Bray .  

To recreate this card you will need the following:


Choose your color theme ( I chose red/pink) and grab Card stock, patterned papers, bakers twine and ink. 

Other supplies needed include white card stock, decorative edge scissors, markers, black ink, and a white tag.

Banner cut your Birthday greeting and mat onto patterned paper and set aside. 


Cut around your stamped "zoe" into a rectangle shape. Bring Zoe to life by coloring with your favortie markers.  Mat onto patterned paper.


Stamp Blank Page Muse's Background Roses 4"x 5" Red Rubber Stamp by Pam Bray  onto your card stock with your coordinating ink color. 

Trim edges with decorative edged scissors. 

Add a large triangle of patterned paper under your rose background and add to your card base. 


Add Birthday greeting and colored Zoe to your card, tucking a small tag behind your "Zoe" 

Finish by adding a coordinating bakers twine bow!

I hope you are inspired to try mixing and matching your stamp sets. For more inspiration be sure to follow Blank Page Muse at:

Wednesday, March 3, 2021

Create Your Own Collage Paper with Stamps

Hello! Today I have an art journal page to share with you. I have recently been watching lots of videos online and it sparked an idea... creating my own collage paper with my stamps! So, off to the studio I went. For such a complex looking project, it really was quite simple and only used a minimum of supplies and lots of stamping fun!


Start with deli paper, your favorite Blank Page Muse stamps, and an Archival Black Ink pad. 


The stamps I used are pictured below and you can find them at the links listed here: 


Stamp the deli paper. Keep in mind you are creating collage paper. Select several stamps, overlap them, stamp them over and over again to create larger images out of the single stamp. 


Using Matte Medium Gel, adhere you collage paper to your art journal page. Let it dry completely and then, using Clear Gesso, coat the top of your collage paper. This will create a good canvas for the next steps... 


Now grab a circle stencil and a waterproof black pen/marker and draw circles in different sizes on your journal pages. You can see here how I used some of the circles to highlight my stamped images. 


All those videos I have been watching, I learned about a new art supply and I, well, I caved and ordered them... and I am so glad that I did! May I introduce you to the Woody 3 in 1. Advertised as a children's art supply, but used by many adult artists as well. 


Using the technique of wetting the paintbrush and picking up color off the the Woody Pencil, start coloring in your circles. 


Continue coloring your page. Use the Gold to color the background and then the black to add the shading to the circles. The light pink is perfect for adding highlights as well. 


Pick out your lettering and use a label maker for your journaling. ...and wa-la! 


This is one of my favorite art journal pages I have done! I hope you have fun experimenting with new techniques and supplies. Make sure you check out the links below for lots more inspiration: 

Tuesday, March 2, 2021

Lotus Flower Beauty

 Hello BPM Fans! DT Betty here today! 

The lotus flower is one of the most significant flowers in the Chinese culture. The lotus flower grows in muddy waters, but it will rise and bloom into a beautiful flower. This symbolizes perfection and purity of both the heart and mind. In addition, the lotus represents long life and honor. For this reason, it's a perfect flower to put on a birthday card. Today I am sharing a card I made using a stamp from Blank Page Muse Art Rubber Stamps called "Lotus Flower on Stem with Small Dragonfly." This is a red rubber stamp. This is a single flower stamp, so I stamped it twice. I used the Happy Birthday Phrase Stamp for the sentiment.

Supplies:

  • Blank Page Muse Stamp: Lotus Flower on Stem with Small Dragonfly and Happy Birthday Phrase
  • White cardstock 6" x 6" for card base
  • Black cardstock 5-7/8" x 5-7/8" to mat card base
  • Patterned paper 5-3/4" x 5-3/4" to mat card base. Use any paper to match the colors of your flower.
  • White cardstock 4" x 4" to stamp image
  • Gold cardstock 4-1/8" x 4-1/8" to mat stamped image
  • Black cardstock 4-1/4" x 4-1/4" to mat stamped image
  • White cardstock 3"W x 1/2"H to stamp sentiment
  • Gold cardstock 3-1/8"W x 5/8" H to mat sentiment
  • White cardstock 3-1/4"W x 3/4"H to mat sentiment
  • Masking tape: 4" x 4"
  • Scrap bond paper or light weight cardstock: 4" x 4"
  • Embellishments of choice - I used Pearl rhinestones
  • Your favorite adhesive
  • Stamping block or stamp positioner
  • Your favorite coloring medium. I used Copic alcohol markers.
    • Flower: Pink - R85, R83, R81
    • Flower: Yellow - Y17, Y15, Y11
    • Flower: Brown - E1, E15, E13
    • Dragonfly: YG13, V25, V22, V20
    • Background: B000
Instructions:
  • Stamp the lotus flower stamp onto the 4" x 4" white cardstock
  • Put the masking tape over the scrap bond or light weight cardstock and stamp the lotus flower. 

  • Fussy cut the flower, then place the mask over the stamped image


  • Ink the stamp then wipe the ink from the dragonfly using a baby wipe or wet paper towel. Only one dragonfly is stamped on the card. 
  • Stamp over the exiting lotus flower that has been masked and then remove the mask. The flower that was just stamped will appear behind the first flower that was stamped.

  • Stamp the Happy Birthday sentiment 
  • Color your stamped images with your favorite coloring medium
  • Adhere all the layers as shown with your favorite adhesive
  • Adhere the pearl rhinestones and the card is finished

Thank you for stopping by today and I hope you give this card a try. It is a very versatile stamp so you can use it for many occasions. Have a creative day! 


Copyright Text

Blank Page Muse 2018 Sin City Stamps 2013