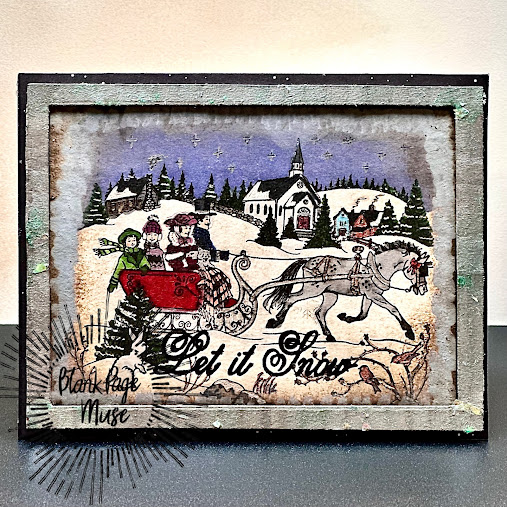
Hi, friends! It’s Walter on the blog with you today with another Christmas in July. I've always loved the art of Currier and Ives. It's so nostalgic, folksy, and pretty. Each piece is so full of detail that it's so easy to tell a story with it. It seems like there is a book in every print! That was my inspiration for this week's card - a similar type of of look and feel and one that tells a story. I want to jump right in and live here!
Items used to create it:
- Sleigh Ride Rubber Stamp
- Let it Snow with Snowflakes Word & Image Art Rubber Stamp
- Lost Shadow Distress Oxide Ink
- Antique Linen, Tea Dye, and Vintage Photo Distress Inks
- Alcohol Markers
- Gel Pens
- A2 White card base
- A2 Navy card panel
- 3.75"x5" white card panel
- 4"x5.25" sized piece of cardboard
- Sizzix Silver Luster Wax
- Brutus Monroe Coastal Mint Cosmo Glaze
Here's how I made it:
I began by adding Lost Shadow splatter to the Navy card panel. To do this, I smooshed the ink pad onto my glass crafting surface, spritzed with water, mixed it with a paint brush, and then flicked that mixture onto the card panel. Once dry, I adhered the panel to the card base.
I created a frame from the cardboard using two nesting rectangle dies. I used one that was approximately 4"x5.25" and one two sizes smaller than it. I ran this combination through my die cut machine to cut out the center. I then rubbed the frame with Sizzix Silver Luster Wax to give it a nice silver metallic look. An alternative is to use Brushed Silver cardstock for the frame; however, I think that the Luster Wax gives it more of a vintage look. I then spread some Brutus Monroe Coastal Mint Cosmo Glaze across certain portions of the frame to give it the look of a patina being formed on the frame. This is to age it and make it look more vintage. You may achieve a similar look using Vintage Patina Distress Oxide ink. The difference is that the Cosmo Glaze has little bits of glitter in it that give the patina a bit of sparkle.
Once happy with the coloring, I wanted to add a border around the outside of the ink to make it look like the print was painted without clear borders and a jagged edge. I created this effect by using a small blending brush and adding Lost Shadow Distress Oxide ink around the edges to blur them. I then added varying degrees of vintage grunge to the image using Antique Linen. Tea Dye, and Vintage Photo Distress Inks.
To finish the card, I adhered the stamped panel to the card base and then adhered the frame around it.
This was such a fun card to create and I am very happy with how it turned out. All of the detail and aging really helps make it stand out vs. a more simple stamp and color process. As a bonus, the recipient may choose to frame it and use it as a Christmas decoration. It's exactly what I would do if I received it!
Thanks for spending some time with me today. I’ll see you again next week with my final Christmas in July project. Until then . . . be well!
Be sure to visit our social media sites for more stamping fun!
The Blank Page Muse- https://blankpagemuse.
FB Fan Page- https://www.facebook.
Instagram Shop- https://www.instagram.
Instagram Blog- https://www.instagram.
Twitter- https://twitter.com/
Pinterest- https://www.
Walter Zemrock Social Channels - https://linktr.ee/zemstones.by.walter


No comments:
Post a Comment
Thank you for visiting and leaving your kind words!
~~~
A note regarding the GDPR and EU ePrivacy Regulation:
Those leaving a comment on any post on this blog do so on the understanding that their name and personal details will be visible to anyone who visits this blog.
People entering a piece of artwork into any competition or giveaway promoted here, they do so in the knowledge that their name and blog link are visible to all who visit this blog and in so doing have published their own personal details and consented to our use of that personal information should it be selected as a winner.
Thank you.