Showing posts with label rubber stamping techniques. Show all posts

Tuesday, April 28, 2015

Faux Metal Etching Technique

Hello again my dear fellow stampers!  I hope everyone had a fun-filled weekend.  So, are you ready for some fun?

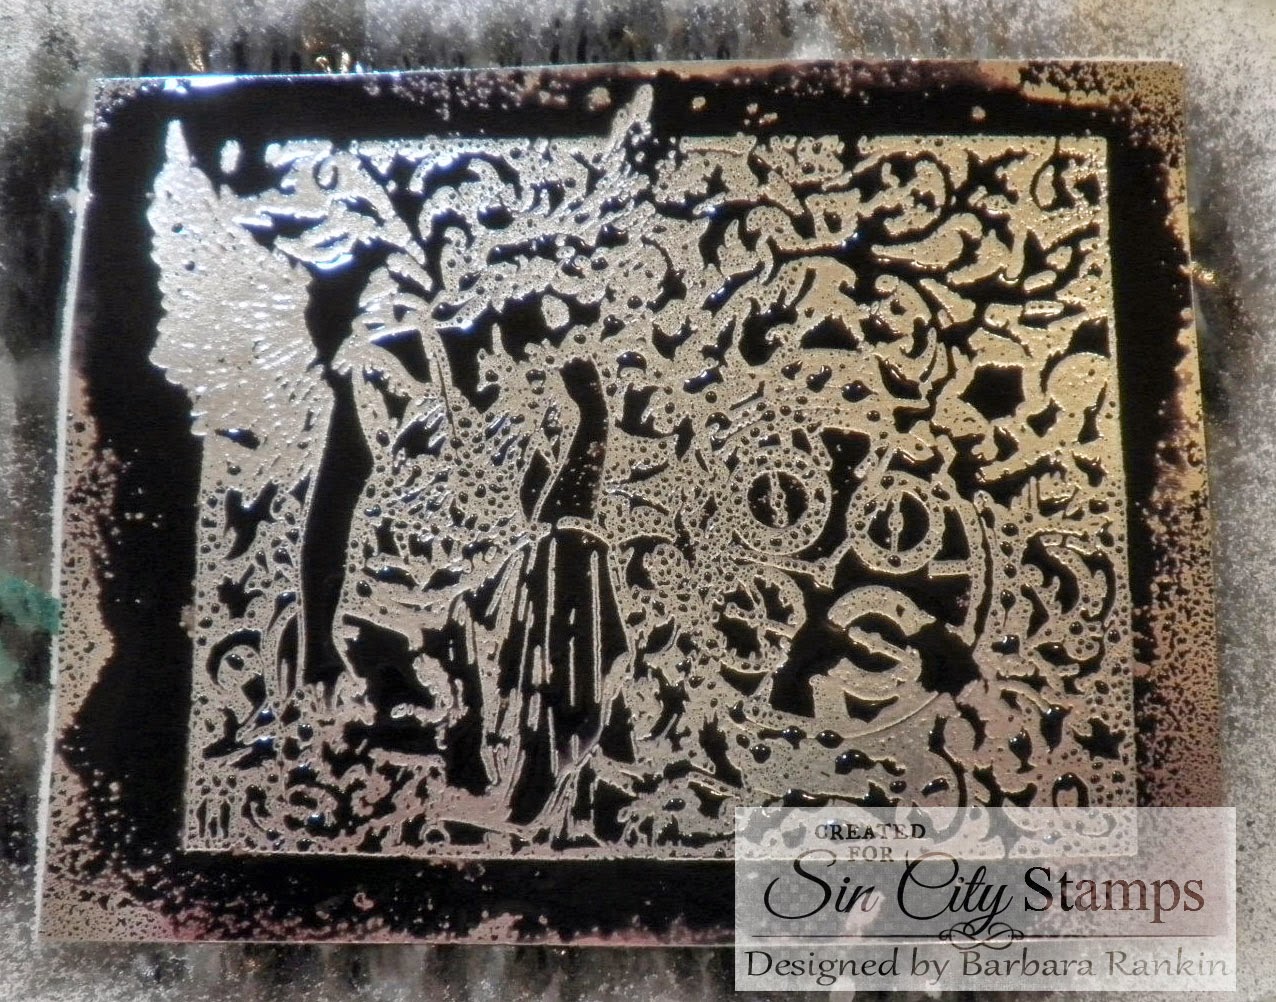
Today I want to share a simple yet fun technique that I believe has been around for a long time, but is sometimes forgotten.  It is a faux metal etching technique.  This technique is a bit different from faux embossing, as the results are not raised as much as in embossing.
The first thing you need is a piece of silver glossy metallic card stock and a rubber stamp, of course.


Ink the angel collage stamp with Versamark, or any embossing ink.  Heat emboss with detail clear embossing powder.
Heat emboss image.  I used detail embossing powder since my image has lots of detail, and it also is what gives the etched effect, rather than embossed.
Apply a coating of black ink, let sit for a few seconds.
Wipe away the excess.
The ink will remain in the crevices and give depth and dimension to the image.  I also like the antiqued effect from the ink.
I did a little pen work pen on the image with a Copic black to get more depth and dimension and help the image show up a little better.  It sounds like a lot of work, but it was very relaxing and I probably spent no more than ten minutes doing that.  I think the result was well worth it.
Trim around the image, leaving a small border and cut out around the wings.  Layer onto  4" x 5-1/4" black card stock, then to 4-1/4" x 5-1/2' silver card stock.

Add metal embellishments, as shown, with Beacon 3-in-1 glue.  Adhere to black pre-folded card front with foam tape for dimension.

Here is another card I made, this time with the background stamp from the Rosette Hearts set. I used the same technique as before.  However,  this time I first added Pitch Black alcohol ink, then removed excess ink with plain alcohol.  This left a reddish tint that resembles copper.  Very interesting.
So, next I added a wash of black fluid acrylic ink and some water, then wiped away the excess.
I got more black definition and some very cool colorations.
I trimmed the excess from the image, leaving a tiny border.  Then I cut a piece of green glossy card stock to 4" x 5-1/4" and adhered the image to that layer, which was then adhered to the black card.
I stamped the  three rosettes onto a scrap of copper glossy card stock with Versamark ink and detail clear embossing powder.  The three furthest to the left were embossed with regular clear embossing powder, but I lost all definition from these detailed stamps.  So I used detail clear embossing powder on the three to the right.  Can you see the difference?
I cut those three out and pressed each one onto a brown distress ink pad to get some antiquing and definition to the embossing.
I then added them to the card front, layering each with varying thicknesses of foam tape, and added black bling, as shown.
You can make this a lovely thank you card by simply stamping the "Thank You""Thank You" with black StazOn ink onto another scrap of the copper metallic card stock.  Punch out with label punch and edge with a black pen.  Add to upper left of card front with foam tape.

Supplies used:

Sin City Stamps:  Wing It; Rosette Hearts
Cardstock: Black, Silver Metallic Glossy, Copper Metallic Glossy, Green Metallic Glossy
VersaMark ink pad (or any embossing ink pad)
StazOn Black ink pad
Clear detail embossing powder
Heat tool
Fine Line black pen
Black swirls bling
Stampin Up Label Punch
Brown and Black distress ink
Liquitex black ink
Ranger Pitch Black alcohol ink
Blender tool with felt
Rubbing Alcohol
Black fluid acrylic ink
Beacon 3-in-1 Glue

I hope you enjoyed my project today and that I have inspired you to create something using this faux metal etching technique.  Play around with your stamps, inks and paints to see what you can come up with.  By the way, there are still a few more days left to get your Sin City Stamps and supplies, so stock up now.


Have a wonderful, creative week!

Barbara

Monday, February 2, 2015

Love Vanquishes Time


Hi, Chris here sharing my first reveal for Sin City Stamps. 

For this project I used the following supplies:

Sin City Vintage Fashion Stamps
Tissue paper
 Archival Ink (black)
Distress Ink (Antique linen)
Cardstock
Letter stickers
Embossing Folder
Lace Heart Doily
Black lace
Baker's Twine
Decoupage 
Sandpaper

To create this card, I started with a White cardstock card base (10x7 ).  I cut out a card base "top" in black and adhered to the card base. 

I then stamped the watch from the Sin City Vintage fashion on a cream colored tissue paper.  I stamped multiple images.  (the folds won't matter or show up. )


I then tore the tissue paper into pieces and adhered to a piece of white cardstock (to create the card background) and to a chipboard heart using decoupage.  After the pieces were dried I trimmed off the excess paper and sanded the edges.  I attached the cardstock background piece to the card. 


I then Embossed a 4 x 6 piece of cardstock.  I slightly sanded the embossed piece and then matted the embossed piece onto black cardstock, and attached diagonally onto the card


I cut the inside heart out from the white heart doily and then inked the doily with Distress Ink.


 I attached the heart on the left side of the card trimming off half of the heart for use on another project. I then added the letters to the heart and backed the heart with black lace and added to the card.  I added a baker's twine bow to the heart to help soften the bold black and red tones. 


Hope you enjoyed this card and technique!  Here is another picture of the final product! 


Thursday, July 3, 2014

Steampunk Style Masculine Card With A Spark

Happy Independence Day!  I hope everyone is enjoying a wonderful holiday with family and friends.     I am so excited to get to play with my new Sin City Stamps collections.  I love making cards, and my father's birthday is coming up.  I thought the Classic Spark stamp plate images would work beautifully for a masculine card, as well as my "go to" Art Journaling with Terri Sproul stamp sets.

Supplies used:


Sin City Stamps:  Classic Spark; Art Journaling with Terri Sproul

Ink Pads:  VersaFine Smokey Grey; StazOn Black; VersaMark; Salty Ocean, Brushed Corduroy Distress

Silver embossing powder

Pan Pastels:  Red Iron Oxide, Bronze

Soft palette brush tips

Dylusions Spray Inks:  Squeezed Orange, Calypso Teal, White Linen

Tim Holtz Courtyard die

Tim Holtz mirror sheet

Sakura 3-D Crystal Lacquer

Charcoal Pencil & Blending Stump


Directions:


Cut newsprint card stock to 6-1/2" x 9", fold in half to make 4-1/2" x 6-1/2" card.


Stamp harlequin background with Slate Grey over pre-printed invoice paper.

Use a Softt sponge to add Pan Pastels to entire stamped sheet.  Interesting how the stamped harlequins picked up the color  of the Pan Pastels to become  a new color.
Heavily distress edges and ink with Brushed Corduroy ink.
Adhere this to center of card front.
Stamp screw along pre-printed tape measure paper with grey ink, heat emboss with silver embossing powder.
Adhere stamped tape measure strip along bottom edge.
Die cut a piece of chipboard with Courtyard die.

Stamp random images from the Art Journaling with Terri Sproul stamp set with black StazOn ink.  Looks like a bit of a mess, but wait.
Add colors to the chipboard using Dylusions Squeezed Orange and Calypso Teal spray inks.  Spray lightly with White Linen, and again with the orange and teal.
Remove die cut from chipboard piece and adhere to card front.  I later added some of the center pieces back into the die cut, as well as some of the center pieces I cut from another piece of the mirror card.
Stamp "A Real Classic" onto a Tim Holtz ticket stub, ink edges with Brushed Corduroy, adhere to card front at an angle. 
Stamp winged spark plug onto a piece of cork paper.  Stamp just the spark plug a second time.  
Color image with Squeezed Orange on a sponge.  Then apply Salty Ocean around the edges of the wings.  Fussy cut around the image and adhere to card front.


Cut out only the spark plug, adhere with pop dots.


Stamp light bulb onto scrap of print paper, cut out and adhere to card front beneath spark plug.  Add glossy dimension with 3D Crystal Lacquer.


Use charcoal pencil and blending stump to give a shadow effect to all of the elements.  See finished card photo above.


I hope you enjoyed my masculine card project today, and will try making one of your own with these techniques.  Oh,  by the way, have you seen all the new stamps and chipboard available at Sin City Stamps. They are awesome.  I even have a new Gothic Shrine chipboard piece that will be super fun to alter and decorate.  Stay tuned for more on that, because I am going to have a giveaway for one.


As always, thanks for stopping by, and be sure to check out the rest of the team's projects this month.


Have a happy and safe holiday.


Barbara


Thursday, October 17, 2013

Halloween Card and Paperbag Mini Album Continued

Hey there, Sin City Stamps fans, and welcome back to the continuing saga of my Halloween mini album.  We are proud to have The Robin's Nest sponsor us this month.  I cannot think of a better fit for two separate companies, fabulous papers and awesome stamps.


Copyright Text

Blank Page Muse 2018 Sin City Stamps 2013