Showing posts with label party favor. Show all posts

Sunday, December 17, 2023

Best Chocolate Gift Bags

 Hi everyone, Steph Ackerman here today.

Today I am using some amazing products from Blank Page Muse and I Brake for Stamps.


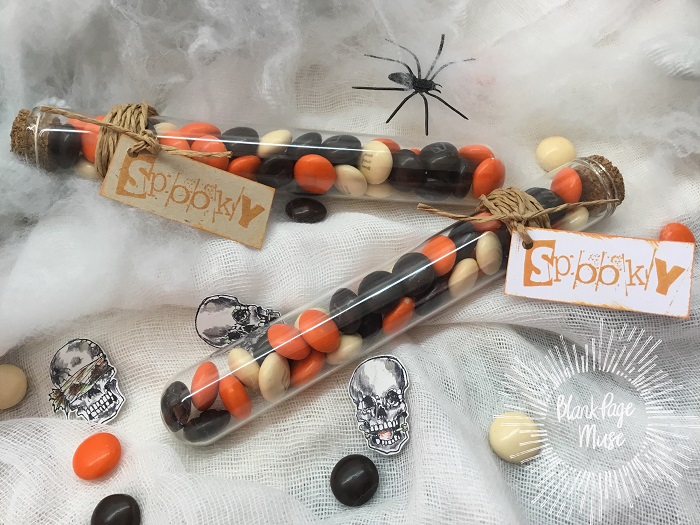
I Break for Stamps: Best Chocolate
Blank Page Muse Stencil:  Butterfly Trails

 
Stamp the phrase on white cardstock and emboss and die cut.
Place the stencil on top.
Create the candy toppers and adhere the stamped panel.
Fill the bags with candies and adhere the candy toppers.

Details can be found on my blog.

Thanks for stopping by.


Steph

Looking for more Inspiration? Click the links below!
The Blank Page Muse Shop https://blankpagemuse.com/

Save 15% of your Blank Page Muse orders with discount code:  BPMSteph

Sunday, October 16, 2022

Have a Spooky Halloween!

 
Hi Stamping Fans!


It's that time of the year - "Spooky" Season!
Look how quick it is to make some "trick or treat" gifts with some sweets, glass tubes and a spooky sentiment stamp!


There's lots of Halloween Stamps in both stores so pop over and have a look!

***Remember to us the code BPMSharon at the store for 15% off ***
So many fab stamps to choose from!
Note: you can use the code at either the IBFS Store OR the BPM Store - why not do an order from each and increase your stash!

Wednesday, October 20, 2021

Halloween Treat Bags

 Hi everyone, Steph Ackerman here!


Have you seen Blank Page Muse's selection of seasonal stamps? 
 I wanted to create some special Halloween treat bags and these stamps were perfect!


The full tutorial can be found on my blog.


Thanks for stopping by.


Looking for more Inspiration? Click the links below!
The Blank Page Muse Shop https://blankpagemuse.com/


Thursday, October 29, 2020

Halloween Treat Box

Hello BPM fans! There probably won't be a lot of trick or treating this year due to the pandemic, but I wanted to make sure my neighbors little kids got some treats on Halloween. I found the perfect stamp, Halloween Witch Costume Bear by Rick St. Dennis, to use on the treat boxes. These boxes are easy to make and mass produce! Try making one and join us in this month's challenge with the theme of "All Things Spooky, Boo!" It can be anything Halloween/Fall that's spooky, cute, whimsical, or fun!


SUPPLIES:

  • Blank Page Muse Stamp: Halloween Witch Costume Bear by Rick St. Dennis
  • Black ink pad
  • White cardstock
  • Coloring Medium of choice (I used Copic markers)
  • Distress or Distress oxide inks: Squeezed lemonade and Wild Honey
  • Ink blending tool
  • Sentiment stamp of choice - no bigger than 1” x1” (I used Trick or Treat)
  • Fall color patterned paper – 8-1/2” x 11”
  • Scoring tool
  • Strong adhesive
  • Double sided tape
  • Double sided adhesive foam squares or dots
  • Crop-a-dile or small hole punch
  • 14” ribbon – ¼” size; any color to match your patterned paper
  • Scissors
  • Paper trimmer
  • Candy
INSTRUCTIONS:

Make the Label:

  • Stamp the image with a black ink pad onto white cardstock. Color the image and then fussy cut it out.

  • Using an electronic die cutting machine, a label punch or paper trimmer, cut a piece 3-1/4” x 2-1/4” for the label. Since I have a Silhouette Cameo, I cut out a decorative label, but you can just cut a rectangle label.
  • Distress ink the entire label with Squeezed lemonade. Then use Wild honey to ink the edges.
  • Stamp your sentiment using black ink.
  • Glue the image onto the label. Set aside.


Make the treat box - this treat bag will use the entire sheet of 8-1/2” x 11” patterned paper:
  • Score the patterned paper on the short edge at 2-1/2” and 6”.

  • Score the patterned paper on the long edge at 4-1/2” and 6-1/2”.


  • Fold the paper on all score lines, back and forth, to make sure all creases are sharp.


  • Fold the paper to form diagonal creases as indicated in the photo and use your bone folder to make sure the creases are sharp by folding back and forth.

  • Once you have all the diagonal creases made, fold it into a box.


  • Use double sided tape under the flaps so that it doesn’t open up when you stand it up.
  • Add foam squares to the back of the label you made earlier and adhere to the box.

  • Punch two holes on the front and back flaps of the box, an inch from the top.

  • Add candy to the treat box.

  • Thread the ribbon through the holes and tie and bow. The treat box is done!


I hope you give this box a try. You can use any Blank Page Muse stamp for this project!
Thanks for stopping by! ~Betty~

Looking for more Inspiration? Click the links below!
The Blank Page Muse Shop https://blankpagemuse.com/
FB Fan Page https://www.facebook.com/groups/bla...
Instagram - Shop https://www.instagram.com/blankpage...
Instagram - Blog https://www.instagram.com/blankpage...
Twitter https://twitter.com/BlankPageMuse
Pinterest https://www.pinterest.com/blankpage...


Thursday, September 26, 2019

Trick or Treat Bag!

Hello Again!
  
Today I am sharing a fun Halloween Treat idea for you to prepare in advance
for any "Trick or Treaters" you may get knocking on your door come October 31st!


Here in Australia Halloween is not a huge event although in the past few years it has gained a bit more popularity sooooo if you place a sign on your front gate you may get some kids out seeking treats and at least I will be ready if I'm home and get my sign out - unless of course I eat the treats myself!


Supplies:
Blank Page Muse Stamps: DriBonez skulls & Bones Stamp Set
Shrink Plastic
Permanent Black Ink Pad
Cello Gift Bags - I found mine on EBAY
Tools: scissors, hole punch, heat gun or oven, colour pencils (optional)
Extras: rubber band, string or thread, charms, beads or small embellishments, lollies - YUM!!!
Instructions:
Stamp your skeleton images onto the shrink plastic, colour with colour pencils if you like or leave blank. Cut out stamped image and use your hole punch to punch a hole. Shrink according to directions. You can get coloured shrink plastic for a different effect.

Fill your treat bag with yummy lollies in Halloween colours and secure bag with a rubber band. Use your string/thread to tie around the bag top and add your shrunk skulls!!!!! You can add some co-ordinating beads or charms as well or any other embellishments.


Have a great week!
Happy stamping!
Sharon
Don't forget to check us out at all of our social media "haunts"!!!
The Blank Page Muse- https://blankpagemuse.com/

Wednesday, September 25, 2019

Stamped Trick or Treat Party Favors

With Halloween being my all time favorite holiday, I couldn't pass up the chance to make these oh so  spooky party favors! They are easy to make up and fun to fill.
I'll be making these to give to the kids in my neighborhood all through October, as a early Halloween treat!

To make party favors like these, you will need the following:


3. Halloween party fillers
4. Washi tape
5. Strong double stick tape
6. Stapler
7. Scissors
8. Crepe paper
9. Colored paper
10. Black ink for stamping
11. Assorted markers and glitter gel pens


For the party favors with pencils in them, I cut my paper to be 6 ½" x 11".
The smaller treat tubes measured to be 5" x 6 ½"
Use the black ink to randomly stamp all over the papers.


Have a little fun coloring in your stamped images!


To make the tube, tightly roll your paper first, to get its shape. Add a strip of double stick tape along one side and press the rolled end into the tape.


Gently press down one end of your tube and insert some crepe paper. Staple this shut. 
Add some washi tape to this end, covering the staples. Use your scissors to cut slits in the crepe paper to make a 'fringe'. 

Fill your tube with Halloween toys or candy. 
Turn the tube and close the opposite end as you did before. 


You can also fill these with money, gift cards, and other fun things! 
Happy Halloween!

For more creative idea's, visit us here:
The Blank Page Muse- https://blankpagemuse.com/

Wednesday, April 24, 2019

Sunny Treat Gift Bag

Spring is in the air, BPM fans!  
Are you looking forward to sunny days ahead?  
This treat bag, which would be great for fun little gifts or name tags for your table.  
Whatever you use this for, it's super easy to make and can be changed to other themes by changing out the colors and stamped images.

Supplies:
White Lunch Sack
Glossy White Stamping Paper
White cardstock scrap for star
Random small paper circles in matching colors and small rectangles (Scraps were used for these)
Doily
Watercolor Pens
Tim Holtz Distress Crayons (or equivalent type) 
Black Archival Ink
Double-sided foam tape
Paper Die Cut 3-Dimensional Star (Sizzix 661595 Thinlits Die Set, Dimensional Stars by Tim Holtz)

Instructions:

1. Stamp Sun using archival ink to the glossy card stock.  After ink dries, begin coloring sun.  Once done, fussy cut sun out.


2. Using the crayons, color all sides of the white lunch bag.


3. Use a circle scrap that fits behind the sun (3" one should work fine), attach the sun to the circle, then the circle to the doily.  In my case, the doily I used was one I made with a large die out of velum, but any doily or larger circle cut from decorative matching paper will work. Punch out your 3-D star, color and decorate as you like.  I added a random stamp "smile" on mine.

Die cut doily, 3" circle out of a metallic cut that was on hand, fussy cut sun, narrow rectangle and star punched out and decorated.
4.  Finding a few more smaller circle scraps, arrange the pieces where they will eventually land on the card.  Leave at least a 2" at the top of the bag free from embellishments.  That will be where the bag will fold closed.


5. Fold the top of the bag at 1" from the top and another fold at 2" from the bag opening.

6. Glue down your various embellishments.


7. Option is to punch two holes through the top folded to draw a ribbon through to act like an enclosure.


It's now ready for giving.
Looking for more Inspiration? Click the links below!


More ideas & crafts by Mercy

Want an extra 15% off on your next order? Use this code on your order! Good until June 1, 2019. BPMDtMercy2019

Copyright Text

Blank Page Muse 2018 Sin City Stamps 2013