Showing posts with label Purple. Show all posts

Monday, April 25, 2022

Happy Birthday Card Featuring Pam Bray's Masquerade Papers

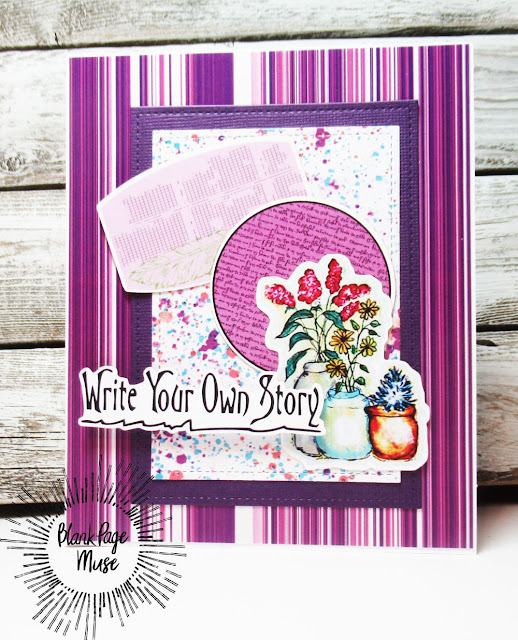
Today I am excited to share this Happy Birthday Card Featuring Pam Bray's Masquerade Papers and ephemera. I admit to being super excited to finally get my hands on Pam Bray's papers! 
The colors are soooo vibrant! 


To recreate this card you will need:

Masquerade 6x6 inch sheets Paper Pack by Pam Bray Designs


gemstones, card base, ink( I used Staz-on for quick drying)


Start by stamping your sentiment from the Florals Sheet Flowers for you Bouquet Happy Birthday Thank you set. onto a tag from your Masquerade Ephemera Paper Embellishments by Pam Bray Designs. Your may notice that I positioned the tag upside down (the mask in the corner is upside down)  so that the sentiment would fit better onto my card with the added ephemera.


Trim and adhere papers from the Masquerade 6x6 inch sheets Paper Pack by Pam Bray Designs onto your card base. 


Add your stamped tag to your card. 

Finish by adding large floral ephemera from your Masquerade Ephemera Paper Embellishments by Pam Bray Designs onto your card and embellish with a few gemstones. 


I hope you are inspired to get creative with your stamps and papers from Blank Page Muse and I Brake For Stamps. 


Be sure to follow us at 

The Blank Page Muse- https://blankpagemuse.com/


I Brake for Stamps-https://ibrakeforstamps.com/


FB Fan Page-  https://www.facebook.com/groups/blankpagemuse/


Instagram Shop-  https://www.instagram.com/blankpagemuse/


Instagram Blog-  https://www.instagram.com/blankpagemuseblog/


Twitter-  https://twitter.com/BlankPageMuse


Pintrest- https://www.pinterest.com/blankpagemuse/boards/


Friday, April 22, 2022

Write Your Own Story in Purple

 Hi everyone, Steph Ackerman here using some amazing stamps from Blank Page Muse.


Papers:  Pam Bray Designs - Masquerade
Embellishments:  Pam Bray Designs - Masquerade Ephemera 

Create card from white cardstock then cut one of the papers to fit.
Die cut another paper and mat with cardstock before adding to the card.
Select the die cuts to use on the card

The full tutorial can be found on my blog.

Thanks for stopping by.

Steph

Looking for more Inspiration? Click the links below!
The Blank Page Muse Shop https://blankpagemuse.com/

Save 15% of your Blank Page Muse orders with discount code:  BPMSteph

Tuesday, April 5, 2022

Quick and Easy Easter Greeting Card

 Spring Greetings!  Chris here and today I am excited to share this quick and easy Easter greeting card!  Often I forget to create card for the Easter season until I start receiving cards in the mail. 


 This year I vowed to have a few on hand! So this quick and easy card can be recreated in 4 easy steps and can be created in any color! So let's get started. 

Step 1. Start by stamping the He is the reason for the Season image from I Brake For Stamps onto water color paper with Versa Mark.  This is such a gorgeous stamp!


Step 2. Add white embossing powder to your stamped image and heat emboss your stamped image. 

Step 3.  Choose your favorite distress ink colors and blend over your image.  Wipe ink off your embossed image. I choose to use purples and blues but you could easily choose yellows and oranges or any other color combo! 

Step 4. And the final step. Mat your image onto coordinating cardstock and add to your card base.  


That's it.  4 quick and easy steps makes this card easy to mass produce! 


I hope you are inspired to get creative with your stamps and papers from Blank Page Muse and I Brake For Stamps.  


Be sure to follow us at 

The Blank Page Muse- https://blankpagemuse.com/


I Brake for Stamps-https://ibrakeforstamps.com/


FB Fan Page-  https://www.facebook.com/groups/blankpagemuse/


Instagram Shop-  https://www.instagram.com/blankpagemuse/


Instagram Blog-  https://www.instagram.com/blankpagemuseblog/


Twitter-  https://twitter.com/BlankPageMuse


Pintrest- https://www.pinterest.com/blankpagemuse/boards/


Monday, March 28, 2022

Hello - A Sweetheart Bouquet

Today I am excited to share this beautiful card I created featuring the Heart Bouquet Stamp  from I Brake for Stamps!


 This stamp looks so pretty and can be custom colored to coordinate for any occasion that you want to send a little extra love! 


I chose  purply-pinks for my hearts! I chose to mat my stamped image onto glitter card stock and die cut my greeting from the same glitter card stock. You could even pair it with the Happy Valentine's day stamp. 

I hope you are inspired to get creative with your Blank Page Muse Stamps.  


Thursday, October 25, 2018

Mixed Media Amethyst Druzy Tag WIP Oct 25


Want to learn how to create this sparkling Druzy effect?
 Check out the tutorial  below.


Stencil mask
Modeling paste
Card
Ink pads
Mist sprays
Crackle glaze
Glitter
Gems


Spray a blank tag with purple mist sprays, then use a variety of purple colored inks to stamp randomly around the tag. 
Apply the modeling paste with a stencil and leave to dry.


Stamp out the flowers on to scrap card that has been sprayed over with mist sprays. 
Cut them out and apply some glue to the centers of the larger flowers. 
Sprinkle still wet glue with glitter, then seal with crackle glaze. 
This will take a few hours to set before you can add them to the tag.


Add burlap and a die-cut background to the center of the tag. 
I buy white burlap and either paint or ink it to match the color scheme. 
Decorate with gems and sequins.


Once the crackle glaze has set, a faux druzy effect will appear..

Thank you for  visiting and please follow us on social media 

The Blank Page Muse Shop http://blankpagemuse.com/
That's Crafty  UK And Worldwide here http://www.thatscrafty.co.uk/blank-page-muse.html
FB Fan Page https://www.facebook.com/groups/bla...


Copyright Text

Blank Page Muse 2018 Sin City Stamps 2013