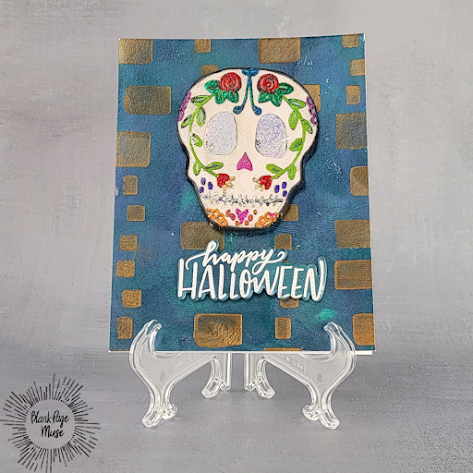
Day of the Dead - Foiled Skull
Good day, fellow crafters. It's Tamara once again, with a new post where I will be showcasing my latest card created using I Brake for Stamps and Blank Page Muse products!
The Day of the Dead (Día de los Muertos) is a vibrant Mexican tradition that honors the lives of those who have passed away. Often mistaken for a spooky holiday like Halloween, it is actually a joyous celebration of life and remembrance. The holiday spans two days, with November 1st dedicated to deceased children (Día de los Angelitos) and November 2nd focused on adults. Families build colorful altars, called ofrendas, filled with photos, personal items, and offerings like sugar skulls, candles, and pan de muerto (a special sweet bread), inviting the spirits of their loved ones back for a visit. Marigold flowers, known as cempasúchil, play a central role, as their bright color and scent are believed to guide souls home. The iconic skeleton figure, La Catrina, also represents the equality of all in death, no matter one’s status in life. Recognized by UNESCO as an Intangible Cultural Heritage, the Day of the Dead reflects a deep cultural connection between life, death, and family, emphasizing that death is not an end but part of the human journey.

To create this project, you will need the following:
Blank Page Muse Sugar Skulls by Michelle Frae
| Colored Paste (Colors optional)
|
1 piece of White cardstock
| Blending Pads
|
1 piece of watercolor paper
| Scissors
|
1 A2 White Card Base
| Liquid Glue
|
Black ink - watercolor friendly
| Stamping Platform
|
Watercolor Pallet
| Foam Tape
|
Fine Tip Watercolor Brush
| Heat Tool
|
Qucik Gel Glue Pen
| White Embossing Powder
|
Various Colors of Foil (Brand/Type optional)
| Anti-static Pad
|
Background stencil: Geometric Pattern
| Watermark ink |
Focal Image
- Place the watercolor sheet into the stamping tool and secure
- Position and secure the stamp into place
- Ink the stamp with black ink
- Stamp the image by applying even pressure
- Repeat as necessary for a clean image,
- Allow the ink to dry
- Dampen the colors to be used in the watercolor pallet with some water and allow it to become saturated with pigment
- Using the fine-tip watercolor brush, carefully color the focal image.
- Allow to dry completely
- KEY TIP: Be sure to keep the brush clean between each color change and do not over-saturate the brush to prevent the colors from running
Boosting the Color
- Using the Quick Gel glue pen, apply gel to areas where you will be applying foil following the manufacturer's directions
- KEY TIP: Stick to one area and one color at a time so that the foil does not adhere in unwanted locations
- Apply the foil gently over the gel and press it lightly. If the gel is ready, then the foil will easily peel from the foil transfer and remain on the gel.
- Repeat this step for each of the foil colors to be added.
Background Panel
- Use white cardstock, colored paste (the color choices are optional), and a blending pad, apply the paste to the card until the desired hue is reached.
- Once the desired hue is reached be sure to allow the background panel to dry completely. This will prevent the paste from being smeared or removed accidentally in subsequent steps.
- Using a geometric patterned stencil, place it over the dried background panel
- Using a complementary colored paste to background panel paste, in this instance gold over blue, blend the paste over the stencil until the desired hue is reached
- Carefully remove the stencil and allow the background to dry.
- KEY TIP: Always clean your tools after using them as a lot of brands of these pastes are meant to be permeate so they will stain the stencil if left to dry.
Sentiment
- Using white cardstock and colored paste, apply and blend the paste to the same hue as the background panel. Allow to dry completely.
- Using a stamp platform, align, ink, and stamp the sentiment with watermark ink.
- Apply the white embossing powder, remove excess, and then heat set with a heat tool
Assembly
 Trim the background panel to 4.25" x 5.5" using a paper trimmer
- Use liquid glue to adhere the background panel to the card base
- Apply foam tape or pop dots to the back of the focal image to add dimensions
- Remove the backing from the foam tape
- Repeat for the sentiment
- KEY TIP: Add some liquid glue onto the foam tape or before adhering into place. The liquid glue will allow a small opportunity for repositioning before the foam tape adheres to the background panel
The stamps I used can be found by following the links in the materials list or you can find them with a quick search on www.blankpagemuse.com. Visit our social media sites for more stamping fun!
 I Brake For Stamps: Sugar Zen Skull
 I Brake for Stamps: Mr. and Mrs. Bones Set
%20(1).png)


