Showing posts with label Wing it. Show all posts

Saturday, April 1, 2017

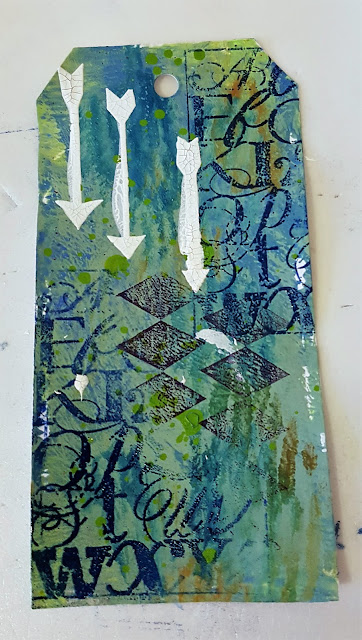
Inspire Mixed Media Tag


Hello all,
 Katie here to show you how you can make this layered tag using Sin City Stamps.


Products used:

Blue embossing powder
White modeling paste
Green misting ink
Assorted blue acrylic paints
Stencil
Gelli plate 
Brayer
Baby wipes
Glue stick
Inspired charm and assorted embellishments


1) Use a Gelli plate to create the background with paint and ink. Clean your Gelli plate with the baby wipes, set the wipes side for later.

2) Use the random letters stamp around the edges and emboss with blue embossing powder.

3) Stamp another layer of texture stamps over the top and add a stencil.


4) Coat with a stencil using modeling paste and leave to dry.


5) Spritz with misting ink and leave to dry.


6) Stamp over the top with the random letter rubber stamp.


6)  Cut up the baby wipes from earlier into strips and glue to the tag.


7) Add another texture stamp from the Art Journal set. 

8) Stamp out the wings onto painted or inked paper and cut out. 


9) Finish the tag by adding a charm and other embellishments..

Thank you for visiting


Tuesday, March 7, 2017

Time is a Healer

Hello everyone, Monique here with a new mixed media project for Sin City Art Stamps


Supply list:
Chalk Paints in  Blue, Red, grey-green and white.
Metallic paint in gold
Matte varnish
Crackle medium
Antiquing cream in black
Gesso
Burlap
Cardboard 
Waterproof stamp ink in black
Colored pencils
Dies (swirl and scroll-work)
Die-cutting machine
Assorted embellishments 
twine
Alphabet stickers or stamps 
White cardstock
Distress inks in green and brown

HOW TO:


Step 1: stamp the image onto white cardstock and color it using pencils


Step 2: Take a piece of a cardboard box and remove parts of the top layer


 Step 3: Remove some threads from a piece of burlap to create frays on the edges. Add a layer of gesso on the burlap like in the picture


 Step 4: Paint the cardboard blue and add a little white using an almost dry paint brush.


Step 5 : Add some red paint

 Step 6: Die cut the swirl and the scrollwork, then paint them with the grayish green with gold.
To give it an aged look, remove some of the paint with a babywipe or wet cloth.

 Step 7: Add 3 layers of matte varnish, letting it dry in between layers.
This is to seal the image before using the crackle medium.


Step 8: Apply a layer of crackle medium. As the medium dries, it will create an effect as if it is an old painting complete with aged cracks.  Rub some black antiquing cream to further age the image by rubbing it into the cracks.

Step 9: Add water to some black paint and use this to help age the burlap.

Step 10: Assemble the piece with strong adhesive and add some finishing gold details around the edges and on your added embellishments.


Here some close up pictures, the crackle doesn't show very well in the photos but it's there!


Thanks for visiting.

Here's our quick links to find even more inspiration and to grab your own Sin City Stamps:
Sin City Stamps Store
Sin City Stamps Facebook Group
And you are here at "The Blog" but make sure you keep checking back - even better "follow" us so you don't miss any of the Inspiration Team posts

Saturday, February 25, 2017

ATC Bathtime


Supplies Used

Sin City Stamp Bathtime nude woman also available on the Wing It sheet
Stamp ink in black
Embossing folder and machine.
Gilding wax
double sided foam tape
Colored pencils
3 ATC sized (2.5" x 3.5")pieces of cardstock (White, Black and Brown)


Step 1
Make an impression of the stamp on the white cardstock using black ink.

Step 2
Color the image using pencils.


Step 3
Add highlights using a white pencil and shadows using a black pencil.


Step 4
Cut out the image and go around the edges with a black pencil to cover any left over white paper.


Step 5
Cut the piece of black cardstock a bit smaller as the brown, the brown cardstock will be used as a mat.
Emboss the black piece of cardstock and add the gilding wax over the raised parts using your finger.

Step 6
Place double sided foam tape over the back of the stamped image.


Step 7
Adhere the black embossed cardstock in the middle of the brown cardstock and add some gilding wax over the edges. Attache the image on top of the ATC base.


Thanks for visiting.

Here's our quick links to find even more inspiration and to grab your own Sin City Stamps:
Sin City Stamps Store
Sin City Stamps Facebook Group
And you are here at "The Blog" but make sure you keep checking back - even better "follow" us so you don't miss any of the Inspiration Team posts

Copyright Text

Blank Page Muse 2018 Sin City Stamps 2013