My project today is a mixed media mini album. I had an urge to get dirty, artsy dirty, that is. So here goes. I plan to use this little mini to keep tiny keepsakes and memorabilia, favorite quotations, as well as any profound thoughts I might want to remember. As soon as I saw the Metal Madness stamp plate, I immediately thought "book covers". But it is such a versatile stamp set, it also makes the most beautiful backgrounds, as you can see in my previous post where I used it for a card background.
Paint a piece of canvas (it does not have to be sticky back, like I used) using acrylic paints tahiti blue, seamist, and leaf green. I like to squirt the paint onto the canvas and mix it up from there. Blend as much or as little as you like.
You will get some really nice color variations that way. Allow paint to dry.
Cover background stamps with gesso and stamp the larger background twice and the skinny background once onto canvas. Allow gesso to dry.
Most of you worry about applying paint to your stamps. This picture shows how messy your stamp will be, and that is okay. We are going for an altered, kind of grungy, look. Just be sure to clean it immediately after stamping. That is the beauty of using unmounted stamps. You can run it under the faucet and scrub it with a soft brush to remove all the paint. No wood to worry about getting wet.
Mix a bit of seamist with water to get a wash, and simply brush over the entire canvas.
The picture shows only one image covered, so you can see the difference. It tones down the white of the gesso image.
I also sprayed the covers with Heirloom Gold Perfect Pearls Mist. It barely shows in the photo, but it really looks gorgeous.
Here is a close-up of the texture from the gesso.
Cut three pieces of chipboard so they are the same size as your stamped images.
To cover each piece of chipboard with the canvas, I trimmed the stamped images, leaving some extra around the image for turning. I next made a crease in the canvas so I could see where I wanted to place my chipboard properly beneath the stamped image. Remember, I have to work "blindly" on the back side, so creasing the canvas gives me a reference point for placing the chipboard.
Miter the corners, leaving about 1/8" of canvas from the corner of the chipboard. In other words, do not cut the canvas right up to the corner. If you do, the corner will not get covered and the chipboard will show.
Wrap and adhere the excess canvas to the reverse side. Crease that tiny excess of canvas down over the corner of the chipboard, as shown, before wrapping the next side.
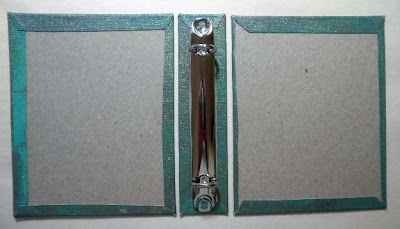
Center Tim Holtz small ring binder onto spine and mark placement for holes. Punch holes with a crop-a-dile or hole punch.
Cut a piece of recycled Tyvek envelope to 4" x 5". Paint with the same acrylic colors as used on the covers. Spritz with Heirloom Gold Perfect Pearls Mist.
Center chipboard spine piece over painted side of Tyvek, as shown in photo.
Center and adhere both covers on either side of spine, without leaving any gap between the chipboard pieces. I used Helmar 450 glue to adhere the spine and covers to the Tyvek to ensure a good bond.
Paint edges of Tyvek on inside to match covers in case some of it shows later.
Stamp thin border image twice onto grunge board with Versamark ink and heat emboss with rust tapestry embossing powder. Do the same with the ornate accent image.
Use a blending tool or foam to add rusty hinge distress ink over the stamped images.
Cut out each image and set aside.
Computer generate the word "Ponderings" using French Script MT or font of your choice. Adhere acrylic label to paper with a vellum adhesive strip.
Trim around label and attach to front cover using brads. Dab rust alcohol ink onto the acrylic label with a small piece of felt. (NOTE: If you plan to add anything else using brads, do it now so you can cover the brad prongs with your inside cover papers.)
Stamp large background onto three sheets of coordinating colors of card stock using bundled sage distress ink. Cut out each image. Two will be the inside covers, while the third will cover the spine and form a pocket.
Using a stormy sky distress marker, color only the flower part of the fairies image.
Stamp onto edges of inside covers, as shown.
Doesn't this make a beautiful background that matches perfectly?
Adhere the front and back covers, then center and adhere the lighter piece over the spine. I used miracle tape and placed the tape on the chipboard spine, not the paper, to ensure I was only attaching the paper onto the spine. Before laying the paper in place, though, I ran a bead of glue along the top and bottom edges of the paper. Then I centered the paper over the spine and adhered the top and bottom to form a pocket. See photo below. (NOTE: Apply adhesive to spine on the book, not on the paper. This will ensure you only adhere that part of the paper to the spine.) Run a bead of white glue along the top and bottom edges to form a pocket.
Insert brads through small ring binder, as shown. The prongs will be on the outside of the book. Don't worry, we are going to cover them.
Turn book cover over to the outside and adhere the two strips of grunge board made earlier with a strong glue, like Helmar 450, to act as hinges as well as cover the brad prongs. Adhere one of the ornamental images you stamped earlier onto the spine, again using the Helmar 450 glue.
After adding the rusty hinges, I felt I needed to blend a bit of the rusty hinge distress ink onto the cover to bring it all together. Heat set the ink. Oh my, do I ever like this now! That is the fun of mixed media. You can always add more to your project. Just keep going until you like it.
Here is a photo of the finished inside of my little mini album. But wait, we need some pages.
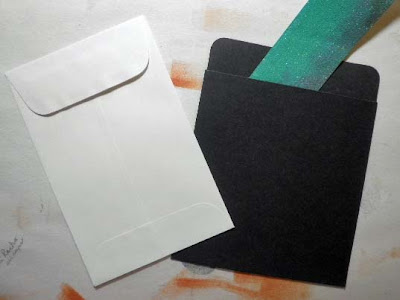
I found these cute black library pockets in my stash, as well as these little cream coin envelopes. They are the perfect size for my little book, but they need some holes punched to fit in the ring binder.
To make it easy to punch holes to match the spacing for the ring binder, I used a scrap of paper and made a template. That way, I was sure where my holes need to be before punching on my cute little envelopes. Then I clipped the template to several envelopes and used my crop-a-dile to punch several at once.
Voila! My little pockets and envelopes fit perfectly and are ready to hold whatever treasures I can find to store in them.
Supplies used:
Sin City Stamps Metal Madness
Sin City Stamps Fairies & Blossoms 2
Miracle Tape
Thick chipboard
Claudine Hellmuth Studio Sticky Back Canvas (natural)
WRMK Crop-a-dile hole punch
Acrylic Paints: Apple Barrel Leaf Green, Ceramcoat Tahiti Blue, Folk Art Seamist
Claudine Hellmuth Studio Gesso
Versamark ink pad
Distress Ink: Bundled Sage, Rusty Hinge, Stormy Sky
Rust Tapestry embossing powder (Personal Stamp Exchange)
K&Co Julianne Solid Mat Pad
Acrylic oval label
Vellum adhesive strip
Helmar 450 adhesive
Tim Holtz long fastener brads
Tim Holtz mini binder clip
Rust Alcohol Ink
6 Black Library Pockets (3-1/2" x 4-1/2")
5 Small Cream Coin Envelopes (3" x 4-1/2")
2 Small manila tags (2-1/8" x 4-1/4")
My little album is not completely finished yet. I need to embellish it further, so I hope you will stop back by the blog in two weeks to see Part 2 of how I use my Sin City stamps, papers, and more mixed media to embellish this little beauty further.
I hope you enjoyed my Part 1 of my project today and that you are inspired to play with mixed media and stamps, too. It is so much fun, you will not want to stop playing. So be sure to stop by Sin City Stamps and check out their new stamp plates, and pick up some Miracle Tape, too. The blog is full of inspiration from the design team, so I hope you will visit often. I would also love for you to stop by my blog and see what trouble, er, uh, I mean crafting goodness, I have gotten myself into.
Thanks so much for stopping by, and see you again in two weeks! Until then, happy crafting!


No comments:
Post a Comment
Thank you for visiting and leaving your kind words!
~~~
A note regarding the GDPR and EU ePrivacy Regulation:
Those leaving a comment on any post on this blog do so on the understanding that their name and personal details will be visible to anyone who visits this blog.
People entering a piece of artwork into any competition or giveaway promoted here, they do so in the knowledge that their name and blog link are visible to all who visit this blog and in so doing have published their own personal details and consented to our use of that personal information should it be selected as a winner.
Thank you.