Tuesday, February 21, 2017

Tag, You're It!!


Hi Everyone!

Here I am again to share my latest creations with you using more of the amazing stamps available at the Sin City Store! I've created some tags for my post today - I love to alter and decorate tags - any size with any images! Hope you like them!


Supplies List:
  • Sin City Stamps: Flower and Bird Sketches (Bird & Flowers) & Dandelion Wishes with Butterflies (Butterfly)
  • Paper Towel - a great way to use your "mop up" roll from excess ink sprays etc. - "recycling"!!
  • Matt Medium
  • Hole Punch
  • Kraft Colored Paper/Card
  • Black ink pad
  • String
  • Cardboard scrabble tile "words"
  • Embellishments: scraps of muslin, feathers, paper flowers & leaves, pearls etc.
  • General craft items: scissors, glue

Let's start - these are relatively quick to make so it's something that can be achieved in a sitting and give you the satisfaction of creating something in a few hours or less!

1. As always gather your supplies so everything is close by to grab as you go! Start with your "mop up" roll of paper towel - you can also use tissue paper or deli paper or even gelli plate prints for covering your tags if you don't have a "mop up" ink spray roll. I love the texture of the paper towel which is why I have chosen to use it for these tags!


2. Using any type of Matt Medium smother the tags with this adhesive and lay down flat on your paper towel. Note: the tags will want to curl so place an old book or something heavy over them to keep them flat and to make sure they adhere to the paper towel evenly.


3. Once the matt medium is dry you can trim around your tags and grab a hole punch to put the hole "back" into the top of the tag!


4. Next step is to stamp your gorgeous Sin City Stamps! The aim of these tags is to make them quick and simple using black ink stamp onto the Kraft colored paper or card and then cut out.
 I used one image per tag.


5. The last step is to play around with your chosen embellishments and start to lay out everything on your tags until you achieve the look you are happy with! I'm not a "arranger" so I tend to procrastinate and change my mind a lot LOL!!!
Use whatever you have in your stash - you don't need a lot - the idea is not to cover the entire tag - we want to see those gorgeous colors on the background!
To finish attach string to the tops.


6. And the finished tags!


Hope you feel inspired to create!
This technique is one that can be used over again with any images!
 Perfect for gift tags!!


Here's all the quick links you need to get creating with "Sin City":
Sin City Stamps Store
Sin City Stamps Facebook Group

Have a great day and happy creating!


Sharon

Sunday, February 19, 2017

Seaside In Your Pocket Match Box Shrine

Hi all

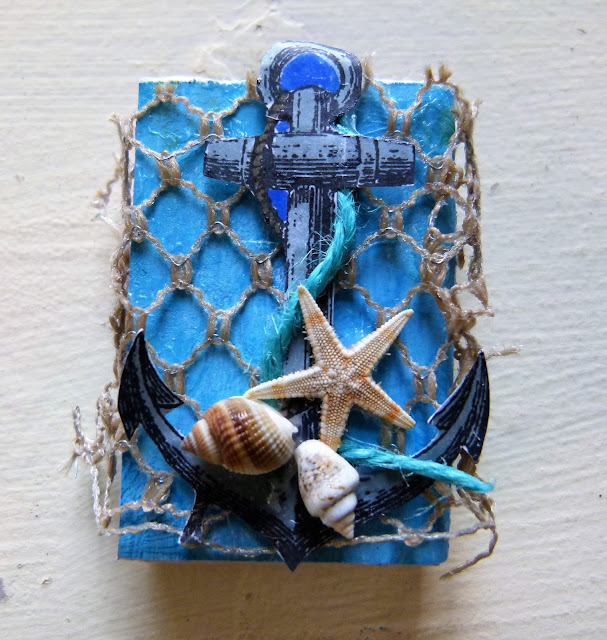
Today I am going to show you how to create this nautical matchbox shrine.

Close up of completed project

Close up of full shrine


You will need

Match Box
Twine
Netting
Decoupage glue
Blue paint and dark blue ink
Paint brush
Clear drying adhesive
White cardstock
Wood grain patterned paper or tissue
Seaside embelleshments
Markers


Close up of products used on project
1. Paint the white cardstock blue, then once the paint has dried, stamp with the spiral shell.
Close up of covered match box
2. Adhere the wood grain print to the matchbox bottom with the decoupage glue.

close up of match box insode
3. Cut the netting to cover the top of the matchbox. Use the clear drying glue to hold it in place.

Match box with net on top
4. Stamp out the anchor from the Nautical 2 set onto white cardstock and color in with a marker.
decorated match box
5. Cut out the anchor and wrap a bit of twine around it before attaching to the front of the matchbox. 
Adhere any other sea side embellishments to the anchor.
Close up inside of shrine

6.Stamp onto a scrap of cardstock one of the small fish from the Nautical 2 stamp set and color in with a marker before gluing to the inside of the matchbox.

Add a few more shells inside.

Friday, February 17, 2017

Cheery Greetings Card

Hi Chris here and today I am excited to share this bright and cheery card I created with Sin City Stamps!


Sin City Stamps Supplies 

Other Supplies
Burlap, Patterned paper, Cording, markers or watercolors, water brush, Archival Ink, cardstock

To create this card start by stamping the script from Art Journaling #2  onto cardstock. 
 I did stamp the stamp twice since it only covered half of the paper.
Don't worry if you don't get the script exactly aligned, it won't show in the end product! 

Stamp the tree rings from the Knock on Wood Stamp Set  over the script.

Mat onto patterned paper and wrap a coordinating cord or fiber around the edge and attach to card 
base. 
                                           
On another piece of cardstock stamp the flower bunch from Flower & Bird Sketches Stamp Set


Color your image using markers or watercolors. 

Mat flower image onto burlap then attach to your card.


Here is the finished project again! Hope you are inspired to get stamping! 


Wednesday, February 15, 2017

Love speaks without words - Art journal page


Hello Everyone,
Shilpa here,

It is a great pleasure to share my first creation here at SinCity Stamps blog, today.
I have created this as a journal page, but you can also use this for a tag or greeting card.

Supplies Used:
SinCity Stamps set - Romance
SinCity Stamps set - Inhale-exhale 
Mixed Media Paper
Flower Decoupage napkin
Mod Podge
Washi tapes
Red ink pad
White Gesso
Iridescent water colors
Black Archival ink


Step 1
Adhere flower design decoupage napkin onto the mixed media paper using Mod Podge.


Step 2
Apply thin layer of white Gesso to the whole surface. Let it dry completely.
Next, color the flowers and leaves with your water colors.


Step 3
Stamp the couple image with  black archival ink on watercolor paper and color it with the water colors.


Step 4
Adhere washi tapes in the middle of page to create a base for Couple's image.


 Step 5
Adhere couple's image on washi tape, also add threaded button as an extra embellishment. 
Stamp sentiment "Love speaks without words" with black  ink.


Step 6
Finish your page by using a stencil and your red ink to randomly add a patterns on the surface of the journal page.

Thanks so much for stopping by.
To purchase these stamps please visit http://sincitystamps.com/
Follow us at Facebook page for more inspiration and new announcements!

Tuesday, February 14, 2017

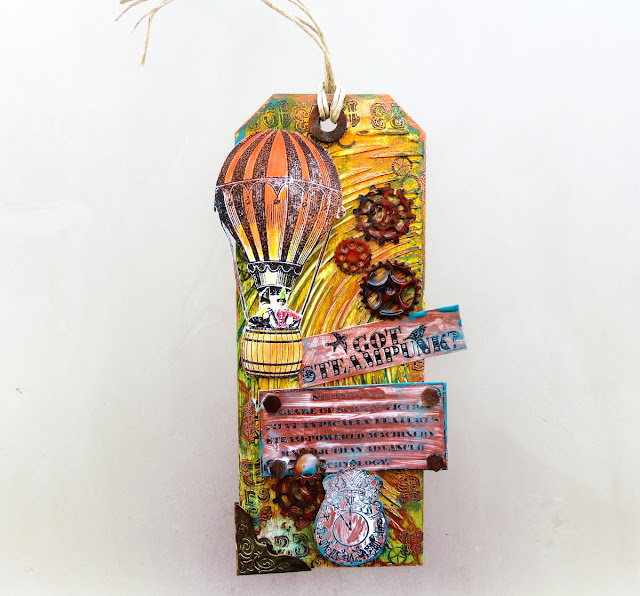
Got Steampunk? Mixed Media Tag

 Hello my dear crafty friends!
My name is Irit from Irit Shalom Designs blog and this is my first ever blog post as Sin City Stamps Inspiration Team member.
I am totally thrilled to be a part of this team and I hope to do my very best to show you the beauty and versatility of Sin City stamps!

I am a big fan of everything Steampunk. So first I asked for Steampunk stamps and when I got them I decided to use quite a few of them for my first project- hence " Got Steampunk?" was born.

Product list:
SinCity stamps
Clock with crown vintage style 
Got Steampunk
Hot air balloon with wooden barrel basket
Small cogs and gear Steampunk
Steampunk definition phrase
1923 Numerals

Other products:
Chipboard tag
White gesso
Texture paste
Stencil
Black pigmented ink
Clear embossing powder
Acrylic paints
Colored pencils
Teal Antiquing cream
Small bolt chipboards
Metal corner and cogs
Scissors
Baby wipes
Liquid glue
Glossy Accents
Paint brush
Misty stamping tool
Heat gun


Step by step instruction for this tag:
1. Cover the tall thick chipboard tag with a thin layer of white gesso.


2. Add a thin layer of texture paste over stencil and let it dry.


3. Stamp  with 1923 stamp randomly using pigmented black ink and heat emboss with clear embossing powder.


4. Add some random stamping with Cogs and gear stamp in the same technique as the previous step. Paint with a mix of fluid acrylic paints.


5. Paint the edges with another acrylic paint and move some to the middle of  your tag.


6. Stamp the Hot air Balloon with black pigmented ink. You don't really need a fancy stamping tool  used here, but if you have it it makes your life easier. Heat emboss the stamped image with clear embossing powder.


7. Stamp the title, the vintage clock and the Steampunk definition in the same way and hand cut them both.


8. Hand cut the stamped Hot Air Balloon and color it with pencils. The pencils used here were Inktense, but any markers or pencils will do a job.
Glue the colored image over the tag as shown.


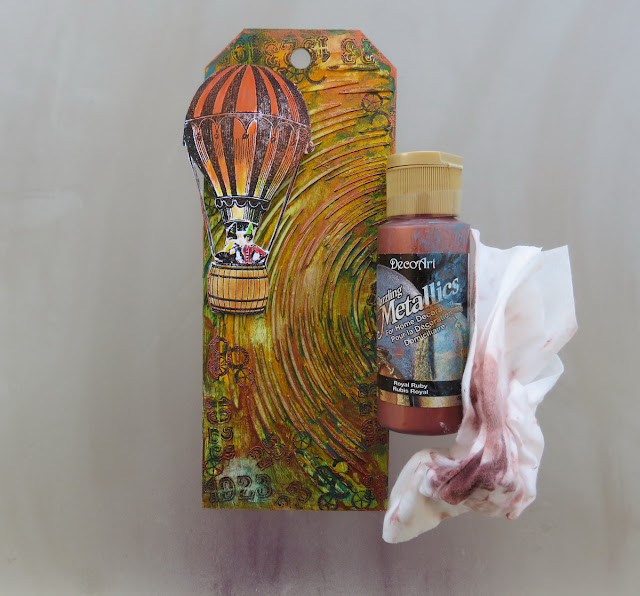
9. Add Copper Metallic acrylic paint using baby wipe over the tag.


10. Paint the two other stamped pieces with copper paint and add some Antiquing teal cream.
Let it partially dry and then wipe with  baby wipe.


11. Paint the bolt chipboards as shown with a mix of two acrylic paints. Glue the circle on the top of the tag and all 4 bolts over the definition stamped piece.


12.Arrange all stamped pieces over the tag as shown. Add a couple of metal cogs painted in the same way as bolts. Use Glossy Accents to glue all metal pieces. Attach the cord on the top of the tag.
Add the metal corner.


And now to some close- ups of the finished project:


That's it for today. I hope  that you liked my Steampunk tag and will try to make a similar one with our gorgeous Sin City Stamps.
You can also find ALL the stamps that were used to make this project on the Steampunk Circus set.

Monday, February 13, 2017

Before You Can Fly Card

Hello,
Karen here to share with you my bright and cheerful bird card. 

Sin City Stamp Sets
http://sincitystamps.com/flower-bird-sketches-art-rubber-stamp-sheet-set-sc97/ http://sincitystamps.com/inhale-exhale-art-stamp-sheet-set-sc87
Supplies:
1. Inhale Exhale Art Stamp Set
2. Flower Bird Sketches Art Rubber Stamp Set
3. White & black cardstock
4. Water based dye inks
5. Spray bottle & non stick craft sheet
6. Small spots stencil
7. Black permanent ink
8. White acrylic paint & bubble wrap
9. White gel pen
10. Branch die
11. Die cutting machine

12. Black card base (6x6")

Directions:
1. Swipe 3 colors of dye inks onto a non stick craft sheet.

2. Lightly spray with water until you can see small droplets form.

3. Press white cardstock onto the inked craft sheet. Slowly peel the paper back to reveal the ink transfer. If the colors are not dark enough or there are white areas of paper remaining, repeat the process of inking, misting with water, and pressing the paper.
Dry with a heat gun. (Repeat to make 2 inked sheets)
 

4. Ink the bird stamp with permanent black ink and stamp in the lower left corner. Add a highlight to the bird's eye with a white gel pen.

5. Apply a small amount of white acrylic paint onto the craft sheet. Smear the paint thinly and dab a piece of bubble wrap into the paint, blot off any excess paint, and stamp randomly to create a subtle pattern. Avoid stamping over the bird image.
 
6. Use an ink applicator to apply ink through a small spotty stencil. Apply ink randomly with inconsistent pressure to create irregular texture. Reposition the stencil and continue inking.


7.  Next, stamp the feather images onto the second inked background and carefully cut out.

8. Stamp a sentiment using permanent black ink.
9. Tear the bottom edge of the background and adhere to a black card base.

10. Adhere a die cut branch to the top of the card.
11. Attach the feathers scattered randomly.

A Closer Look:
To purchase these lovely stamps, please visit Sin City Stamps.
For more inspiring paper-craft projects from the Design Team, be sure to visit us often at the Sin City Blog and follow us on Facebook.

To learn more about our designer Karen, please visit her blog, Art & Soul.
 
Thanks for visiting!

Copyright Text

Blank Page Muse 2018 Sin City Stamps 2013