Showing posts with label butterflies. Show all posts

Monday, July 21, 2025

Creating a Butterfly-Themed 'Brighten My Day' Card

Creating a Butterfly-Themed 'Brighten My Day' Card

Good day, fellow crafters. It's Tamara once again, with a new post showcasing my latest card created using  Blank Page Muse products! This stunning "Brighten My Day" card, adorned with shimmering butterflies and vibrant hues, is the perfect way to spread joy to someone special. Whether you're a seasoned crafter or just starting out, this DIY guide will walk you through the steps to create a handmade masterpiece that’s as beautiful as it is heartfelt. Let’s dive into the world of cardmaking and bring this dazzling design to life!


To create this project, you will need the following:
  • Special Day CLEAR Sentiments Birthday Stamp Set stamp from Blank Page Muse
  • White cardstock panel - 4.25" x 5.5"
  • White A2 Card base
  • Scissors
  • Liquid glue
  • Paper Trimmer
  • Sentiment of choice
  • Die-cut machine
  • Boarder die of choice
  • Label die of choice
  • Watermark ink 
  • Heat Tool 
  • White embossing powder
  • Anti-static powder 
  • Black ink
  • Twine 
  • Dimensional tape 
  • Splat box 
  • Mica Spray (I chose Violet Luster and Oriental Fuchsia) 
  • Microfiber towel

Process:

  • Place the white cardstock on the stamping tool.
  • Apply watermark ink to the butterfly stamp.
  • Press the stamp firmly onto the cardstock to create the image. Repeat if necessary for complete coverage.
  • Remove the cardstock from the stamping tool and sprinkle white embossing powder over the stamped image.
  • Tap off excess powder and heat set with a heat tool until the image is raised and glossy.
  • Place the cardstock into a splat box and spray the cardstock with mica spray in your chosen color(s); the embossed butterflies will resist the ink.
  • Allow to dry, then wipe off excess ink with a microfiber towel.
  •  Use a boarder die of your choosing to trim down the panel to size.
  • Wrap with twine using an odd number of wraps for visual interest, adhering the ends to the back of the panel.
  • Use liquid glue to adhere the panel to the A2 card base.
  • Use sentiment of choice and black ink to stamp onto white cardstock. Repeat for clarity.
  • Use label die to cut the sentiment to required size and then using dimension tape, adhere it to the card panel, make sure the dimensional tape is on either side of the label die to stiffen the lable up and prevent if from bending.


The stamps I used can be found by following the links in the materials list, or you can find them with a quick search on www.blankpagemuse.com. Visit our social 

media sites for more stamping fun!


Sunday, May 26, 2024

Warm Sun and Gentle Breezes

Good day, fellow crafters. it's Tamara once again, with a new post where I am

going be showcasing my latest card created using Blank Page Muse products! 

As soon as I saw the sets I am showcasing today, I thought of someone special

who loves sunflowers, butterflies, and the color yellow. I ordered them right

away and added them to my craft stash. This card is beautiful yet simple to

make, so let's get started.


You will need the following:

 Blank Page Muse

 Butterfly Breezes

 Blank Page Muse

Blocks Pattern Stencil

 Black ink pad

 Yellow ink pad

 Cardstock –white and yellow

 liquid glue

 masking

 paper trimmer


To craft your card, start by selecting a background panel. You can use one you’ve previously

created or make a new one based on your preference. For this project, the

chosen panel features light pink and various shades of yellow. This panel will

serve as the basis for your stamped images, so choose colors that appeal to

you.


Next, use black ink and the Butterfly Breezes stamps to stamp the images onto

the panel in the colored area of your choice. You can either let the natural

color of the background panel stand out or add additional coloring to the

images. Once stamped, or stamped and colored, fussy cut the stamped images

and set them aside for later.


For the background panel, you will need a piece of white cardstock, the 

 Blank Page Muse Blocks Stencil, and some masking tape. Because the stencil

is smaller than an A2 card, masking is necessary. First, secure the white

cardstock to your work surface and then secure the stencil in place. Mask off

the area where you don’t want ink, and use yellow ink and an ink blending

brush to apply the color. Once completed, remove the stencil, realign it on the

opposite side of the panel, secure it, mask, and ink blend this side of the panel.

Allow it to dry fully.

The last stage is to assemble the card. Using a paper trimmer, cut the inked

background panel to its final dimensions. Trim a piece of yellow cardstock

slightly larger than the finished background panel to create a mat. Once both

sheets are to size, use liquid glue to adhere the background panel to the mat,

then adhere the composite to a white card base. Once dry, orient and adhere

your sunflower and butterflies to the panel. Finally, using the sentiment from

the Butterfly Breezes stamp set and black ink, orient and stamp the sentiment.

With that, your card is complete.

The stamps I used can be found by following the links in the materials list or

you can find them with a quick search on www.blankpagemuse.com


Visit our social media sites for more stamping fun!


I Brake For Stamps - https://ibrakeforstamps.com/ 

The Blank Page Muse- https://blankpagemuse.com/

FB Fan Page-  https://www.facebook.com/groups/blankpagemuse/

InstagramShop https://www.instagram.com/blankpagemuse/ 

Instagram Blog-  https://www.instagram.com/blankpagemuseblog/

Twitter-  https://twitter.com/BlankPageMuse

Pinterest- https://www.pinterest.com/blankpagemuse/boards/

Wednesday, April 5, 2023

Mini Stamps Big Impact

Hi Chris here today sharing this cute Easter tag using the mini stamp from the Anime Fairies 2 Stamp set.  


Supplies needed to create this tag:
Manilla Tag
Sin City Stencil Template #20
Tim Holtz Distress Inks -Old Paper, Walnut Ink
Tim Holtz Distress Markers- Spiced Marmalade, Wild Honey, Pickled Raspberry, Shaded Lilac, Stormy Sky
Embossing Folder-Darice
Sizzix Die- bunny
Vellum
Staz-on Ink
Copic Markers - B24, Y15, YR04, R04, V06
Scenic Route Stickers
Ribbon
Liquid Pearls


I started by inking over the Stencil #20 template using the Old Paper Distress ink.


I then embossed the tag with my embossing folder. A little hint, I partially cut along the fold of the embossing folder just enough to allow the tag to slip through the embossing folder.

 Here is the result.

I then stamped some mini flowers on the embossed image using the mini flower stamp from the Anime Fairies 2 collection.  I used the Distress markers to color directly on the stamps .  I stamped the flowers in multiple colors.  I added Liquid Pearls to the center of each flower. 


I then stamped the mini butterfly from this set onto vellum with Staz-on and then colored the back sid of the image with Copic markers. After fussy cutting the butterflies I attached them to the tag. 


I trimmed off the bottom of the tag that was not embossed.  I die cut out the bunny and inked edges of the bunny with Walnut Distress Ink and added the bunny to the bottom of the tag.


I added some ribbon and Baker's twine and matted the tag on card stock to finish off the tag.

 I had so much fun creating this tag I decided to use the same techniques and stamps to create this card.
I sprayed Glimmer Mist all over the tag.  After embossing the tag I "painted" the vines and flowers with distress ink and my water brush.  The butterflies were stamped on cardstock and then punched out with the Martha Stewart butterfly punch.  I  layered the flowers from Petaloo with Fabri-Tac from Beacon Adhesives and added microbeads to the centers of the flowers using Gem Tac from Beacon Adhesives. I hope you are inspired to create some project using mini stamps.

Looking for more Inspiration? Click the links below!
The Blank Page Muse Shop https://blankpagemuse.com/

Saturday, July 10, 2021

Butterfly Card

Hi, Monique here with a summer card to show you.

July is summer and holidays, hopefully we will travel again and have fun in a world without a pandemic.

So I figured to make a happy and bright card, using colors that remind me of happy days in the sun. Of course Butterflies also make people happy so they had to be on my card too.


Supply list:

Blank Page Muse stamps used:

Sunshine Cherub Sunflower art SC 81

Dandelion wishes with butterflies sc0085 by Terri Sproul

Watercolor paper

Waterproof stamp ink in black

Distress ink in peacock feathers, Ripe Persimmon, Picked Raspberry, Mustard Seed.

Dylussions Spray in Lemon Zest


For detailed instructions see video:


here some more photo's 


Thank you for stopping by and have a great day! I'd love to have you follow/subscribe on my YouTube channel


Monday, December 2, 2019

Quick Idea: Decorated Gift Box

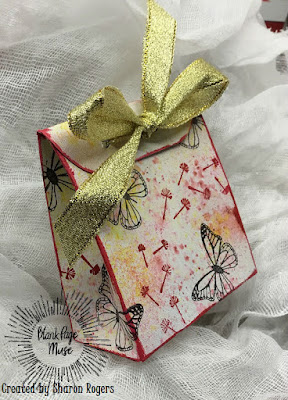
Hi Blank Page Muse Stamps Fans today we are sharing a qick gift box idea from our DT Member Sharon.
She has used a purchased precut gift box and decorated with Brusho Crystal Colours and BPM stamps.
Precut boxes are great to be able to decorate whilst they are still flat and then once "adorned" they can be constructed and are ready for use!
Simple and quick and the prefect receptacle for your special gift for Xmas! 


Don't forget to check us out at all of our social media sites
The Blank Page Muse- https://blankpagemuse.com/

Thursday, August 22, 2019

Butterfly Love...

Hi Everyone!

I hope you have all been enjoying the DT makes this month and getting some ideas and inspiration for layering on your creations!
Today I am sharing some mini "moo" sized gift cards - perfect for attaching to little gifts!
They are quick and easy to make and you can use any Blank Page Muse stamps you have on hand ad you can make them any size you like - I like the mini size - they are nice and cute and they were perfect for my little jar of bath salts!
Supplies:
Blank Page Muse Stamp Set: Heart of Nature Butterflies Bees by Donna Gray
Blank Page Muse Stamp: "Love" word Dandelion Wishes Set or ay other little word stamp
Embossing Pad and fine Black & White Embossing Powder
Black card - cut to 140mm x 28mm plus extra black card
Scrap of painty card - cut to 66mm x 25mm
Small piece of white card/paper to glue inside gift card for writing greeting
Embellishments: string/twine and small piece muslin
Tools: heat gun, ruler, scissors, knife, glue, double sided tape or glue stick, hole punch
Instructions:
Cut your black background card to size and score in the middle and fold in half.

Cut your "painty" card to just smaller than the front of the base cards so when it is ready to adhere it leaves a nice black border around the outside.


Next step is to stamp and emboss all the card elements. Use the garland flowers to stamp on the painty card with theblack embossing powder. Stamp the small butterfly onto black card and emboss with white powder and fussy cut. Stamp the "love" word onto black card and emboss in white and free hand cut the word.


Glue the embossed painty card to the gift card front and then arrange and glue your butterfly, muslin cloth and word to the front.


Use a small hole punch and punch a hole in the top corner of the card to attach twine.

Hope you have enjoyed my embossed and layered gift tags - a perfect way to personalise your gifts - even better if your gifts are also handmade!!


Have a wonderful week!
Happy stamping!
Sharon
Don't forget to check us out at all of our social media "haunts"!!!
The Blank Page Muse- https://blankpagemuse.com/

Monday, February 4, 2019

Butterfly Clipboard

Hello Everyone,
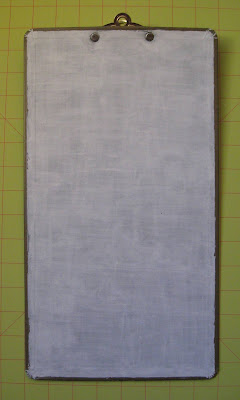
So what do you do when your clipboard fades due to sun exposure?  Well, you give it a make-over by getting out the rubber stamps and ink and stamping all over it!

I just love this month's theme "Things with Wings." I could stamp with this theme for every project I make. I used the beautiful butterfly stamp set called Love of Butterflies.
 Follow along as lead you through the transformation process.  Let's get started!


BPM Stamps:
Other Supplies: white acrylic paint, sponge brush, black permanent ink pad, ink pads, ink blending tool, clear mounting block, clipboard, watermark ink pad, embossing powder (clear & gold), paint brush, heat tool, scrap paper

Directions:
1. Select stamps and practice your arrangement on the clipboard. (TIP: Take a photo so that you may refer to it as you create in order to avoid disappointment at being able to recreate the design from memory.)

2. Use a sponge brush to apply white acrylic paint to the clipboard. (2-3 coats may be necessary)  Set aside to thoroughly dry.

3. Use black permanent ink to stamp the butterfly images. Make sure to overlap some images off the edge of the clipboard.

4. Stamp a smaller butterfly with watermark ink and apply gold embossing powder. Return the excess to the jar and heat set. (TIP: Check the image carefully for any stray particles of embossing powder and if necessary use a dry paint brush to sweep them away.)

5. Create masks by stamping the butterfly onto scrap paper. Cut out the duplicate image and carefully align the mask over the stamped butterfly images on the clipboard. Use black ink to stamp the dandelion slightly overlapping the butterfly. Remove the mask to reveal a layered image where it appears that the stem goes behind the butterfly.


6.  Apply watermark ink to the waterdrops stamp and stamp in any open areas to add a subtle texture. Apply clear embossing powder and heat set.

7.  Use a mask to protect any areas that you want to remain white. Carefully align the mask and hold it in place. Use an ink applicator to apply and blend ink to color the background.

8. Use watermark ink to stamp flourishes. Some images should overlap the previous black stamping, as well as, overlap the edge of the clipboard. Apply gold embossing powder. Remove the excess embossing powder, check for any stray particles, and heat set.
 

9. Create a border by applying watermark ink around the edge of the clipboard. Then add gold embossing powder and heat set. Use your finger to apply the ink to create a hazy and less precise frame. If you want a sharp straight border edge, mask the edge before applying the ink.
 

A Closer Look:


The Blank Page Muse- https://blankpagemuse.com/
Facebook Fan Page- https://www.facebook.com/groups/blankpagemuse/
Instagram Shop- https://www.instagram.com/blankpagemuse/
Instagram Blog- https://www.instagram.com/blankpagemuseblog/
Twitter- https://twitter.com/BlankPageMuse
Pinterest- https://www.pinterest.com/blankpagemuse/boards/
To see more projects by our designer Karen, please visit her blog Art & Soul.

Wednesday, September 26, 2018

Pockets full of inspiration

Hi Everyone,
Jess here today.  I am a huge reader.  I love everything about books.  Remember when you used to have to sign out your books at the library by writing your name on the card in the pocket?  Today I have a project for you using library pockets.


Blank Page Muse Products:

Other Supplies:
Library Pockets
Paper Dolls
Photobooth Photos
Distress Inks
Distress Oxide Ink
Archival Inks
Adhesive
Chipboard Sentiments
Bronze Paint
Vintage Sheet Music
Heavy weight thread
Milk Cap
Die Cuts
Mini flashcard
fabric tape
Frosted Crystal Embossing powder
Cardstock
Paper Distresser

Start by using a piece of silver cardstock. Coat the cardstock using Distress Ink and Oxide Ink.  Once the ink is dry use archival ink to stamp the  Small Crackle stamp.  Using a paper distresser rough up all the edges and cover the front of your library pocket.  
Stamp a piece of vintage sheet music with the postal stamp from the Correspondence  set.  Slide the paper into the pocket and glue it in place.  Add your 3d embossed border to the top of the pocket.  Stitch a small "x" onto your photo and glue it onto the crackled background.  Glue on the milk cap and chipboard sentiment. 
Stamp out the small Butterfly using archival ink.  Add bronze paint to the edges and cut the butterfly in half.  Add the wings to a paper doll and slide her into the pocket. 

This will complete your front cover. 


 Line a second pocket up to the backside of your first pocket.  Using a piece of fabric tape attach the pockets together.  Line the backside of your first pocket with a vintage airmail envelope.  Use postage stamps from the Correspondence  set in various spots.
Using archival ink stamp a Hot Air Balloon.  Color the balloon using various shades of blue distress ink.  Fussy cut your balloon and use the bronze paint to cover your raw edges.
Adhere the balloon to the page.  Add a paper doll, chipboard sentiment, and die cut globe.  Using the smallest  of the Feathers stamp them all around your page.  

   Use patterned scrapbook paper to cover the pocket on your next page.  Add the Pointing Hand and Feathers to the top of the pocket.   

Use the   Small Crackle stamp to add age to a tiny flashcard.  Use bronze paint around the edges. 
Add paper doll with die cut suitcase into the pocket.
Here are the middle pages. 


For the back of the second page(your back cover), stamp on a plain piece of cardstock. Use the script stamp from the Correspondence  set, the  Small Crackle stamp, Sequin Waste, and the  Feathers.  I used various shades of archival inks in browns and reds to create my background.  Glue the paper to your pocket.  Rip a piece of patterned scrapbook paper and add it to the edge.  Stamp out a couple Feathers using archival ink and fussy cut them,  Add the tiniest hint of blue using distress inks to the feathers and edge in bronze paint.  Cut a small slit in your photo and slide the feathers in to make them appear to be wings.  Glue remaining pieces to complete your book.     
I hope you enjoyed this project as much as I enjoyed creating it.


Thanks for coming by!
Please visit the following for more inspiration!


Copyright Text

Blank Page Muse 2018 Sin City Stamps 2013