Sunday, September 30, 2018

Witch Sisters Magic School

Hi There!
Even the witches and magical being have to go school. So the call is out to them too. I have made a card to call them all to a new school year. Won't you join us?

Blank Page Muse Stamp used:
Witch Sisters

Other supplies:
Halloween papers
Black and white cardstock
Halloween ephemera
Wish bone and wire
Computer printed phrase


 Start out by stamping the witch sisters onto white cardstock.
Edge with black ink and set aside. Use the black cardstock and make a card base.
Take a piece of Halloween paper and layer on the black cardstock base.
 Wrap wire around the wish bone.
                               
         Print out a saying from the computer and edge it with black ink, Mount to the card with foam squares.
                                                     
Adhere the witch sisters to the front of the card, the the ephemera and wish bone.
                                                                       
Stamp just one of the witch sisters. Edge in black and adhere to some Halloween paper. Add this to the inside of your card. 

Don't forget to join all the fun at all these spots
The Blank Page Muse- https://blankpagemuse.com/

FB Fan Page-  https://www.facebook.com/groups/blankpagemuse/

Instagram Shop-  https://www.instagram.com/blankpagemuse/

Instagram Blog-  https://www.instagram.com/blankpagemuseblog/

Twitter-  https://twitter.com/BlankPageMuse

Pintrest- https://www.pinterest.com/blankpagemuse/boards/

Saturday, September 29, 2018

"2 Kool 4 Skool"

Hello Blank Page Muse Fans!


I'm back with my second post for this month and it's another "Back to School" themed project!

I've teamed up a Blank Page Muse Stamp with some Rick St Dennis digis for this creation!!

Rick also designs rubber stamps for Blank Page Muse and they are just as fab as his digis so make sure you pop over to the store and check them out!

Supplies:
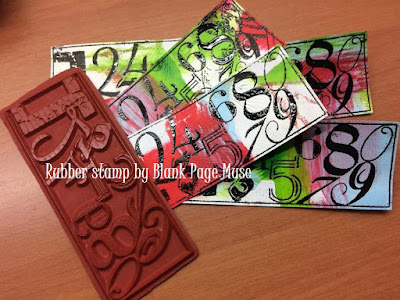
  • Blank Page Muse Rubber Stamp: Numbers Collage
  • Rick St Dennis Digital Stamp Sheet: Mall Girlz
  • Black Journal Page or Black Card or Black Gesso Painted Page
  • Gelli Print or Painted Paper
  • White Card to Print Digital Images
  • Embossing Ink Pad and Fine Black Embossing Powder
  • Copic Markers or Any Colouring Medium
  • Embellishments: ink sprayed muslin cloth, cardboard letters or any of your choice
  • Tools: heat gun, glue, scissors
Instructions:
Start with your gelli or painted paper and Numbers Collage Stamp.
Stamp the Numbers Collage multiple times over the painted page with the embossing pad and heat emboss with the fine black embossing powder and cut out each of the stamped images.
Arrange the cut out stamped images over your black background page and when you are happy adhere them to the page. Once dry cut off any overhanging bits.
Next step is to print your digital images onto white card and colour with your choice of colouring medium and fussy cut.


Use little cardboard letters and numbers (or whatever you have in your stash!!!!) to spell out your phrase or wording - "2 Kool 4 Skool".


Arrange all your elements on the page background using any embellishments you have on hand. Used here ink sprayed muslin cloth and cardboard letters.


Happy Stamping
Make sure you visit all of our Social Media "Hot Spots" - you are sure to be INSPIRED!!!!!
 
The Blank Page Muse- https://blankpagemuse.com/


Wednesday, September 26, 2018

Pockets full of inspiration

Hi Everyone,
Jess here today.  I am a huge reader.  I love everything about books.  Remember when you used to have to sign out your books at the library by writing your name on the card in the pocket?  Today I have a project for you using library pockets.


Blank Page Muse Products:

Other Supplies:
Library Pockets
Paper Dolls
Photobooth Photos
Distress Inks
Distress Oxide Ink
Archival Inks
Adhesive
Chipboard Sentiments
Bronze Paint
Vintage Sheet Music
Heavy weight thread
Milk Cap
Die Cuts
Mini flashcard
fabric tape
Frosted Crystal Embossing powder
Cardstock
Paper Distresser

Start by using a piece of silver cardstock. Coat the cardstock using Distress Ink and Oxide Ink.  Once the ink is dry use archival ink to stamp the  Small Crackle stamp.  Using a paper distresser rough up all the edges and cover the front of your library pocket.  
Stamp a piece of vintage sheet music with the postal stamp from the Correspondence  set.  Slide the paper into the pocket and glue it in place.  Add your 3d embossed border to the top of the pocket.  Stitch a small "x" onto your photo and glue it onto the crackled background.  Glue on the milk cap and chipboard sentiment. 
Stamp out the small Butterfly using archival ink.  Add bronze paint to the edges and cut the butterfly in half.  Add the wings to a paper doll and slide her into the pocket. 

This will complete your front cover. 


 Line a second pocket up to the backside of your first pocket.  Using a piece of fabric tape attach the pockets together.  Line the backside of your first pocket with a vintage airmail envelope.  Use postage stamps from the Correspondence  set in various spots.
Using archival ink stamp a Hot Air Balloon.  Color the balloon using various shades of blue distress ink.  Fussy cut your balloon and use the bronze paint to cover your raw edges.
Adhere the balloon to the page.  Add a paper doll, chipboard sentiment, and die cut globe.  Using the smallest  of the Feathers stamp them all around your page.  

   Use patterned scrapbook paper to cover the pocket on your next page.  Add the Pointing Hand and Feathers to the top of the pocket.   

Use the   Small Crackle stamp to add age to a tiny flashcard.  Use bronze paint around the edges. 
Add paper doll with die cut suitcase into the pocket.
Here are the middle pages. 


For the back of the second page(your back cover), stamp on a plain piece of cardstock. Use the script stamp from the Correspondence  set, the  Small Crackle stamp, Sequin Waste, and the  Feathers.  I used various shades of archival inks in browns and reds to create my background.  Glue the paper to your pocket.  Rip a piece of patterned scrapbook paper and add it to the edge.  Stamp out a couple Feathers using archival ink and fussy cut them,  Add the tiniest hint of blue using distress inks to the feathers and edge in bronze paint.  Cut a small slit in your photo and slide the feathers in to make them appear to be wings.  Glue remaining pieces to complete your book.     
I hope you enjoyed this project as much as I enjoyed creating it.


Thanks for coming by!
Please visit the following for more inspiration!


Tuesday, September 25, 2018

Where The Wind Takes You Art Journal Page


Hello all
I have a colourful art journal page to share using stamps by The Blank Page Muse.
September is all about layers of color so the more the merrier.


Products used


Gesso
Craft foam
Ink pads
Mist sprays
Art journal
Ephemera/ clip art
Washi tapes

Here are some close ups of the project. 
Keep reading to learn how to create this page!.


Cover the page in gesso and leave to dry. 
Next spray on two mist sprays until you have a rich layer of colour.

Take a few texture stamps and stamp them along the bottom and one side of the page. Use different colours so each layer shows through.


Add washi tapes and emphera  onto the page.


Add more layers until you are happy with it.


Stamp images onto scraps of craft foam and cut them out.


Position them onto the page and glue them down. Add quotes to the center of the page and decorate with gems and other bits.

Thank you for visiting  and follow us on social media 

The Blank Page Muse Shop http://blankpagemuse.com/
That's Crafty  UK And Worldwide here http://www.thatscrafty.co.uk/blank-page-muse.html
FB Fan Page https://www.facebook.com/groups/bla...

Friday, September 21, 2018

Mechanical Bird Card

Welcome to my bright and colorful semi-steampunk card. I love the look of gears and the mechanical bird image but I'm not always a fan of the dark and dreary colors that are typical of steampunk....so I opted for a non-traditional mix of colors.  I used three distress inks: lime, cranberry, and purple.
Mechanical Bird Card

Blank Page Muse Stamps:
Birds & Clocks Rubber Stamp Set
Cogs & Gears Steampunk Background Rubber Stamp
Metal Screw profile view Art Rubber Stamp

Supplies:

  • Black ink pad
  • Distress Ink Pads (lime, cranberry, purple)
  • Spray bottle
  • Clear mounting block
  • Silver ink
  • Black marker
  • Brads
Directions:
1. Gently swipe a distress ink pad across a non-stick craft mat and then lightly spray with water until small beads form. Place a piece of white cardstock onto the wet ink and wipe it through the ink until all the puddles have absorbed.  Continue to add different colors of ink + mist to create the background.  Repeat the process until you have covered the whole bit of cardstock.

2.  Apply black ink the gear stamp and press it over the background of blended inks.

3.  Use a sponge applicator to add more ink as needed.  (I darkened the purple and added more lime.)

4.Stamp a bird image with black ink and color in using lime distress ink.  Stamp a screw with black ink and carefully cut out both shapes.

5.  Adhere the stamped background to a cranberry card base.  Apply the bird and screw to the lower right corner.

6. Use silver ink to stamp multiple clusters of small hexagon shapes.  Finally, add brads to the center of some of the gears.


Closer Look:
www.blankpagemuse.com
Follow us on Facebook and Pinterest.
Join the Blank Page Muse Fan Group...HERE
Instagram - Shop
Instagram - Blog
Twitter


To learn more about our designer Karen, please visit her blog, Art & Soul.
Thanks for visiting us today!

Copyright Text

Blank Page Muse 2018 Sin City Stamps 2013