Wednesday, October 30, 2019

A Little Birdie Told Me

Hello, hello! Samantha here with another quick and easy card to share with you all today. It's no secret that the bird from the Flower & Bird Sketches Art Rubber Stamp Set is one of my all time favorite stamps. That's why I reach for it as often as I do and I hope that my love for it will inspire you.
Remember to use code BPMDtSamantha2019 to save 15% off of your next order!


For this card I stamped my bird onto white cardstock with black ink. I colored it in using alcohol based markers but decided that it was too dark. So I colored over the marker with crayons! Regular old Crayola crayons.
Next, completely experimenting, I applied odorless mineral spirits over the crayon and it blended. So super cool. I did a bit of stamp surgery to the "A little birdie told me..." Phrase stamp and stamped it below the bird.


I layered the panel to a card base on which I'd adhered a background die. Then I added some feather die cuts to cover a huge boo boo.
Remember that mistakes are really just opportunities for embellishment!


Easy enough, right? Make sure you check out the video I did featuring this gorgeous bird stamp and don't forget to subscribe to the blog!

Until next time,
Samantha


Looking for more inspiration?

Click the links below!

The Blank Page Muse Shop

Facebook Fan Page

Instagram- Shop

Instagram- Blog

Twitter

Pinterest

Tuesday, October 29, 2019

Before the Pen October Planner Pages Spread

Hi everyone! It's me, Tonya and I am super excited to share my first blog post using Blank Page Muse stamps by Pam Bray! 


I gathered up a B6 Size NotebookMISTI Stamping ToolWicked Black Archival Ink (it's water proof), Watercolor Brush, assortment of watercolors/inks and Watercolor PaperBoo! Halloween Planner Invitation StampsFall is in the Air Planner Stamps and Everyday Planner Stamps to start my planner pages.


I started by placing the days of the week stamps from the Everyday Planner Stamps onto the MISTI Stamping Tool and inking with Wicked Black Archival Ink.


I stamped onto a piece of Watercolor Paper. Then apparently I was so into stamping the rest of the images onto the watercolor paper, water coloring and fussy cutting or using a punch that I didn't take any photos of those steps. UGH! 😳


But I did take photos of the completed pages! Before using a punch to punch out the Monday though Friday stamps and the numbers I watercolored over those and let dry before using a mini tag punch on the days of the week and a circle punch on the numbers. I stamped the "splash" stamp from the Boo! Halloween Planner Invitation Stamps onto each small box.


I used the sunflower, leaf, jack-o-latern, owl and set of pumpkins from the Boo! Halloween Planner Invitation Stamps and Fall is in the Air Planner Stamps. Once I stamped all onto a piece of watercolor paper, I watercolored and I fussy cut each one out. 


I adhered the images next to each day of the week and number. I added tiny google eyes to the owl and a little glitter glue to the center of each sunflower. I watercolor/inked up the rest of the watercolor paper and cut out numbers for each day using the Number Diecuts from the Side Kick Diecut Machine. I placed the numbers of each day on top of a scalloped circle punch before adhering to each section on the pages. I also added a little washi tape at the bottom of each section to dress my pages up.
If you have any questions please let me know and when ordering use my BPMuseTonya code for 15% off your whole purchase when shopping the Blank Page Muse Shop. Also if you need more inspiration click the following links below. 


Supplies

Blank Page Muse: Everyday Planner Stamps
The 1407 Planners: B6 Size Notebook
Watercolors/Inks
Beacon Adhesive: Zip Dry Adhesive 
Washi Tape
Circle, Mini Tag and Scalloped Circle Punches

(Products listed above are Affiliated Links for your convenience)


Thanks for stopping by, hope your Tuesday is wonderful and enjoy creating!


Monday, October 28, 2019

Decorated Notepads

Hello! Kelly here today with a great gift idea or something you can make and sell at craft shows. I am always looking for something I can make for a quick gift or sell in the local gift shop in my small town. These notebooks make great gifts and can be made in several different sizes.

Blank Page Muse stamps used
Vintage Keys Border
Dream Big Dreams
Unicorn Wishes

Other supplies used
VersaFine Clair ink Nocturne
Tombow permanent tape
Red Tape
Distress ink - Vintage Photo, Ground Espresso
White cardstock
Black cardstock
Kraft cardstock
Ruled paper pad 5" x 7"


To create this notepad cover, trim off a 1/2" of paper on the kraft cardstock on the 11" side, then score at 5 1/8" and at the next notch towards the right for the spine of the cover, fold and set aside this piece. Next, you will cut the black cardstock to 4 3/4" by 7 3/4" adhere to the front of the kraft paper.

Using the Vintage Keys Border, stamp a panel that is 4" by 7". Adhere this stamped panel over the black panel and stamp the sentiment, Dream Big Dreams to a piece of white cardstock and ink blend Vintage Photo over the entire sentiment and use Ground Espresso on the edges.  Adhere to the front of the cover over the key panel.


Next, you will take the ruled paper pad, I bought these at the Dollar Store and they have many assorted sizes and colors to choose from, using the Red Tape, place along the edges of the notepad and a strip in the center and place on the inside back of the kraft cover. You now have a gift finished! These notepads could be used for wedding favors, house warming gifts and much more!


I made a second one with some of the extra pieces on my table. This notepad had the words on the pages so I cut one out and used it for the cover. 


Check out our other projects here - 
The Blank Page Muse- https://blankpagemuse.com/


Sunday, October 27, 2019

Hug Your Cat Day with Blank Page Muse

Hello!  Susie on the blog today with more Weird & Wonderful!  Today we are celebrating Hug Your Cat Day!

As a brand new, first time cat owner I do not need a special day to hug my cat because as all cat owners know, I hug him whenever he wants and/or allows me to hug him!  Seeing Hug Your Cat Day on the Fun Holiday Calendar (June 4th), however, did remind me of a super cute stamp I bought from Blank Page Muse and a technique I wanted to try with it using Sculpey clay.  It is called the Sutton Slice and before I began, I conditioned my clay with a pasta machine.

Time to play...


Supplies:
The Femmes Woman Snuggling a Cat Art Rubber Stamp , unmounted
Pasta machine for conditioning clay
Sculpey clay
Blade for slicing clay
Acrylic stamping block, large
Oven
Beacon Adhesives Fabri-Tac
Adjustable cat collar

Directions:

  • Choose colors and condition clay.


  • Stamp image on paper to use as reference.  Color if desired.
  • Start with one color and embed a small amount of the conditioned clay into the stamp, pressing firmly with your fingers.


  • Use a blade to shave off any clay that sticks up above the rubber.  It is important for this technique to not have any clay left on the surface of the stamp.


  • If clay becomes embedded in the wrong areas, use a piece of scrap clay to remove it from the stamp.


  • Continue adding small amounts of clay until the area has been filled and sliced.
  • Repeat with additional colors of clay.


  • As you work, small amounts of clay may stick to the blade and be removed during the slicing process. (Clean blade frequently to remove bits of clay sticking to it.) Patch these recesses until all areas are filled.
  • When you are finished, re-shave the entire surface of the rubber stamp to remove any visible clay from the surface of the stamp.
  • Roll out a piece of conditioned clay that is large enough to cover the filled area.
  • Place the sheet down over the stamp and tamp down very firmly with your fingers.


  • Flip the stamp and clay over onto an acrylic stamp block.
  • Bend the stamp backwards, nearly folding it in half, and slowly roll it off  of the clay.  (This is much easier if you use an unmounted stamp.) As you do this, watch carefully to see if any of the clay is stuck in the stamp. If so, simply roll the stamp back onto the clay and press the area firmly with your fingers to fuse the clay to the background. Repeat this as often as needed to be sure the clay from the recessed areas of the stamp is adhered to the background clay.
  • Continue until the entire image has been released.


  • Lightly pat down the raised clay to ensure it is adhered to the background clay.
  • Trim design as desired.
  • Carefully slide the blade under the clay to release it from the acrylic block.
  • Bake according to the manufacturer's directions.


  • Attach buckle to the back of the finished piece.


I added the buckle (it is actually an adjustable cat collar I picked up at the dollar store *giggle*) to the back of this piece so that I could use it on a little mini-album I created to hold all the cute kitty pictures I find myself taking! 


This technique takes a little practice and some patience.  I think this is my third attempt at a Sutton Slice and I absolutely love the way it turned out!  If you would like to try it I suggest you start with a small and simple design first.  I covered the basics today, but there are a bunch of great videos out there with great tips.

This technique makes me look at my stamp collection in a completely different way and I am already looking for my next Sutton Slice project!

Thanks for stopping by and I hope you find some time to play today!
Susie

Looking for more inspiration?
Click the links below!

Saturday, October 26, 2019

Dandelion Wishes Shaker Gift Tag

Hello, hello! Samantha here with a fun project to add to your gift bags that will leave everyone wishing for more.
Remember to use code BPMDtSamantha2019 to save 15% off of your next order!


For this project you will need the following:


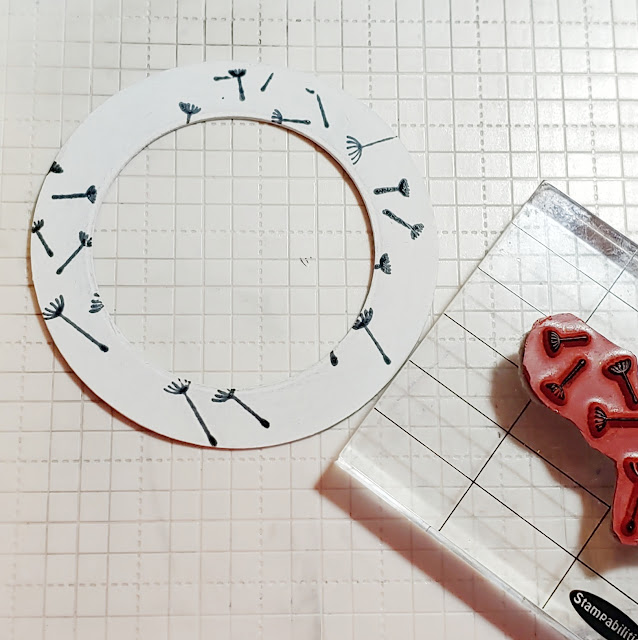
 Take your chipboard circles, paint them white, and die cut one to create a frame.


Stamp your circles with the dandelions from the stamp set.


Line the base piece with foam tape and tuck your baker's twine underneath. 
Adhere your acetate to the back of your chipboard frame. 
Fill the well created by the foam with sequins, glitter, etc.


Thanks so much for stopping by. Make sure you head on over to the BPM Facebook Fan Group to show us what you were inspired to create!
Until next time,
Samantha

Looking for more inspiration?


Thursday, October 24, 2019

Sweet Scented Flowers!

Hi BPM Fans!!!
You know Xmas is coming so I have a quick gift idea to share with you today - super simple and only a few supplies required!!
Hope you feel inspired to have a go - I always love decorating soaps and using them as gifts!
One of the best things is you can use any stamps, card and coloured embossing powder for this project!
Supplies:
Blank Page Muse Stamp: Whimsical Daisy by Pam Bray Designs
Oatmeal Coloured Card
Embossing Ink Pad
Black Embossing Powder
Heat Gun
Handmade Soaps
Scissors, double sided tape, string, ruler, cutter
Instructions:

Start with your card, stamp and embossing supplies. Randomly stamp over the card with your stamp, cover with embossing powder and heat set.


Cut the embossed card into strips slightly smaller than your soap as shown below so when you wrap the soap you can still get the colour contrast as well as the embossed strip. Use string or fibres of your choice to tie a basic knot or bow around your soap. You may want to use double sided tape to secure the embossed card before tying the string.


Make several at a time so you can have a set to use as a gift! Quick and easy but a really great way to be creative with your gift giving. Make some spooky Halloween themed ones for the Trick or Treaters!
 
Thanks for joining me today!
Happy Stamping!!
Sharon
Don't forget to check us out at all of our social media sites
The Blank Page Muse- https://blankpagemuse.com/

Wednesday, October 23, 2019

Winged Skeleton Card

Hi Everyone, Michelle here with a card to portray my favorite Holiday...Halloween!
I know it's late, but I could not resist. I hope you'll enjoy and be inspired to create your own!


 Supplies:
  • Winged Skeleton and "Dead men Tell No Tales" from Halloween Bingo Stamp Set
  • Dew and Diamond drops
  • Vintage news print
  • Scrapbook Paper
  • Assorted washi tapes
  • Pumpkin Smooch
  • precision scissors
  • Black stamping ink
  • Adhesive, foam tape, and a pen.

Start by trimming your scrapbook paper to be a card size of 4"x6".
Next attached several torn pieces of the vintage news print. 
Place some decorative washi tape in the center of the card and some pleat a bit near the bottom.
A few more strips of washi tape were placed on the card before I added decorative detail with the liquid smooch.
Stamp the winged skeleton and the saying onto the back side of the vintage newsprint paper. 
Cut out and color lightly with the smooch.
 I added a criss-cross of washi tape to the center of the card before adding the skeleton with foam tape.


Decoratively add the dew drops and saying.

Happy Halloween! 
-Michelle
Don't forget to check us out at all of our social media sites
The Blank Page Muse- https://blankpagemuse.com/


Copyright Text

Blank Page Muse 2018 Sin City Stamps 2013