Showing posts with label paint. Show all posts

Tuesday, April 7, 2020

Decorated Bag Idea

Today DT Member Sharon is sharing some super quick decorated paper bags!
Get the kids to help with the painting and stamping and then they can use the bags for adding treats as gifts for their friends!
Sharon started with some tiny paper bags and used a spatula to add some coloured paints and once dry she stamped with coloured ink.
Pop a choccy inside and you have a little sweet treat gift idea!
Use the same process on bigger bags to wrap gifts in!
Have fun!


Stamps used designed by Pam Bray - Art Journaling Mixed Media Set


Don't forget to check us out at all of our social media sites
The Blank Page Muse- https://blankpagemuse.com/

Monday, January 13, 2020

Make a Wish........

Hello Blank Page Muse Stamps Fans!!!

Here we are already into the new year!

Are you enjoying our "Happy Birthday" theme so far this month?
A great theme to start 2020 with lots of inspirational ways to use your BPM Stamps!

I'm particularly excited because January is my birthday month so I've been having a lot of fun creating my blog posts!


Today I am sharing some gift tags using BPM Stamps and some quirky collage elements. I love that these have a rustic and sort of messy feel to them.

Not only do these tags fir perfectly with our challenge theme this month but can also be adapted for Xmas and any other occasion - "Making a Wish" really relates to any occasion and we can always do with a guardian angel!

Hope you enjoy my post today!


Supplies:
Blank Page Muse Stamp: "Make a Wish" from Dandelion Wishes with Butterflies Stamp Set
Blank Page Muse Stamp: "Stars"
Collage Angels: Art Tea Life Collage Sheet used for these Tags
Manila Tags
Chalk Paints
Embossing Ink & Gold Embossing Powder
Black Archival Ink Pad & Scrap White Textured Paper
General: heat gun, scissors, glue, spatula
Extras: Smooch Gold Ink, Scrap muslin or gauze, ribbon or twine

Instructions:


Gather your bits & pieces - grab multiples and make several tags in the one sitting!


Start by painting the tags. Use a spatula to scrape "blobs" of the coloured chalk paints onto the background.  Allow to dry. Note: I love using a spatula because I am too lazy to clean a paintbrush and I love the messy rustic look!


Using the embossing ink pad and star stamp on the tag backgrounds emboss with gold powder. No need to be neat! Use the black archival ink pad to stamp "Make a Wish" onto white paper and tear out.


Edge the tags with gold Smooch and allow to dry. Arrange the collage angels, wording and gauze on the tags and adhere with glue. Tie a piece of ribbon or twine to the tag tops and you are done!


Happy Stamping!

Sharon

Don't forget to check us out at all of our social media sites
The Blank Page Muse- https://blankpagemuse.com/

Sunday, October 15, 2017

Skully Tea Bag Gift Holders....

Hi Spooky Sin City Fans!!
Today I'm sharing another creation for this month of Halloween!
I've created some fun "tea bag" gift holders - hope you enjoy the process!


Supplies:
  • Collage Labels: Custom Labels used for this project by Art Tea Life@Etsy
  • Black Card 10cm x 25.5cm folded into 3
  • Black Archival Ink
  • Kraft Paper
  • Muslin Cloth
  • Distress Inks: Brushed Corduroy & Tea Dye (any aged/brown colours will work)
  • Cobweb Stencil or your favourite Halloween style stencil
  • White Paint or Texture Paste
  • General supplies: scissors, glue, double sided tape, spatula, sponge

Instructions:
First step is to cut your base holder to size using the black card. For this tutorial the cut size is 10cm height by 25.5cm width - folded into 3 (each third 8.5cm). As shown in picture below diagonally cut the last panel to make the flap for the tea bag to slip in. Note: you can make any size folder to fit any size teabag or even a gift card!


Next step is to use your stencil and white paint or texture paste and sponge over the facing side of the black card. This cobweb stencil is a Silhouette File cut on a Cameo Silhouette from Acetate. Any style of spooky stencil will have the effect! Set aside to dry. Once dry fold into three and glue the flap over. 


Next stamp your skulls and bones from the "Dribonez Skulls & Bones Border Set" with black Archival Ink onto Kraft paper. Stamp a range of the designs - they all work perfectly with this little project!


Print labels onto Kraft Paper. I was very lucky to have the lovely lady from ArtTeaLife make me some custom labels especially for these creations because I couldn't find the exact wording I wanted on any collage labels!!!


Fussy cut your stamped images and tear the labels from the collage sheet to give an aged worn look.


Use a sponge to "stain" the scraps of muslin cloth to age them and start to arrange the cloth, labels and stamped images on the front of the folded holders.

 Glue everything to the front of the folder and you have some cute spooky and gruesome little gifts!!!


Thanks for joining me again!
Hope you keep popping back each day for more Halloween inspired creativity by the DT!!
Remember to join us at our Facebook Group for more fun and sharing!
Sharon


Saturday, February 11, 2017

Just Clownin' Around with Print & Paint...


Hi Sin City Stamp Fans!!!


Today I am sharing a few different printed and decorated items!! When I have my Gelli Plate out I like to do "extra" prints to save for later and to also make it worthwhile getting all the paint out and making a mess LOL!! So you will see some printed envelopes, tags and cards - hope you enjoy the process!

Supplies List:
  • Sin City Stamps (of course!): Steampunk Circus Stamp Set 
  • Ink Pads
  • Embossing ink, embossing powder plus a heat gun
  • Color pencils
  • Gelli Plate
  • Paint - use your favorite colors!!
  • Roller (brayer)
  • Tags, envelopes, index cards, really anything you want to print on and create with!
  • Mark making bits & bobs ie. old credit card, old lids, bubble wrap etc.
  • Embellishments like fibers, muslin, feathers etc.
  • And of course scissors, glue, tape etc.

Her we go with the process - and remember no right or wrong and I am certainly not an expert with my Gelli Plate - I have lots to learn and today I have just used a really simple technique and added to the "pattern" afterwards!!


1. Gather up a few supplies - but as you will notice with me I always "add" as I am going because I remember something else in my "stash" that would work with what I am doing! I bet that happens to everyone!


2. Printing! This is really simple - just put some "blobs" of your fave color combo on your plate and spread it with your roller to cover the whole area. Love how this looks when it's all "smooshed" out!


3. Add your items to the plate - below I have a row of tags plus an envelope. I love to use my roller to help pick up the paint because it cleans off the roller and also decorates the back of my items!! You can add a sticky note to the front of the envelope to leave a gap for addressing if you wish! Now if you are a waste not want not gal and want to get the most from your paint grab another two envelopes, or whatever you have at hand and pick up the excess left on the plate - you still get a great print to work with!


4. Next step - once everything is dry of course is to add some images and other "marks" to the items you have printed. Picture below shows images stamped direct to each item.

You can play around with arranging the stamps to see how they will look/fit when stamped. In the pictures below both black archival ink has been direct printed to the pieces and also embossing ink and white embossing powder to decorate. The little stamps in the set are great for using to make borders and fill gaps!


For these items use an old credit card and small round lids with black paint to decorate the pieces and add more dimension along with a scrap of bubble wrap and white paint.


5. To also "decorate" some of the items with colored stamped images stamp on white card in black archival ink, color with pencils or any color medium, cut out and use as desired!!


6. Images have been added with the embellishments to the items. Lots of wording/quote stamps in this set so you can cut out the "wording" stamps and edge them with some color or with a black sharpie.


Don't you love the colors on the tag? The bird stamp was colored to match, then the coordinating feathers added along with some fiber to each tag top and the stamped wording to finish off! I love the white stamped border at the bottom. 


Below is an index card printed in yellow and reds with the cute kids stamp and "Clownin' Around" wording along with a piece of scrap muslin cloth.


The envelopes are perfect as they are although on the bottom envelope you can stamp some gears/cogs with pink and purple ink just to add a bit more pattern. I love these envelopes!


I think the clown below is my fave image from the stamp set - a bit of fun!! Add some cloth, cotton wound around your fingers and the "clown" word stamp from the set.


Hope you have enjoyed this process! I still have some printed items that I will be able to grab when I am in need of a quick background or base card for creating at short notice! I think that is the beauty of the Gelli Plate - nice and quick and you can get quite a production line going!

Thanks for stopping by!

Here's our quick links to find even more inspiration and to grab your own Sin City Stamps:
Sin City Stamps Store
Sin City Stamps Facebook Group
And you are here at "The Blog" but make sure you keep checking back - even better "follow" us so you don't miss any of the Inspiration Team posts!!

Happy Crafting
Sharon

Monday, June 9, 2014

Wrong Way

 
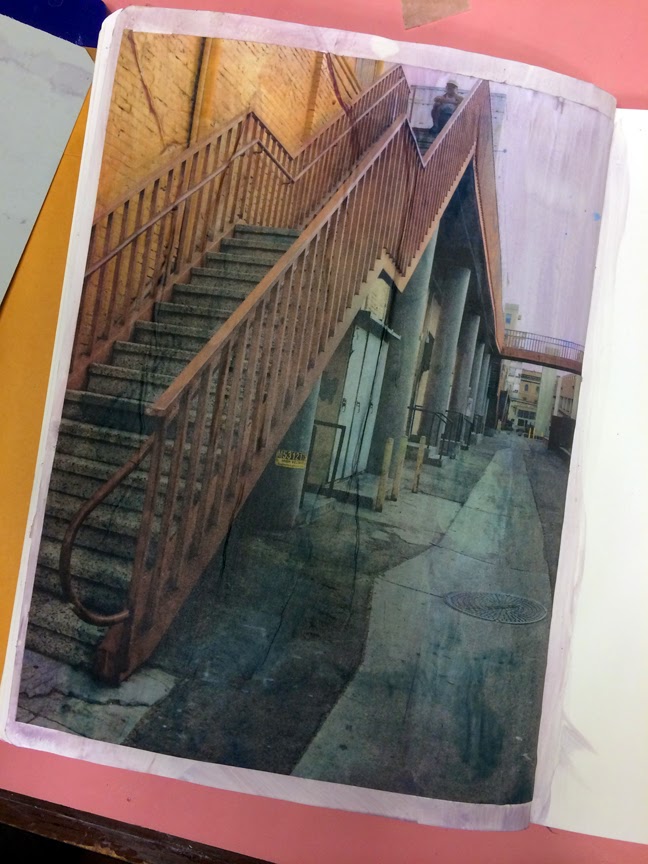
 I took this picture while strolling Santa Ana in the Art District one afternoon.  
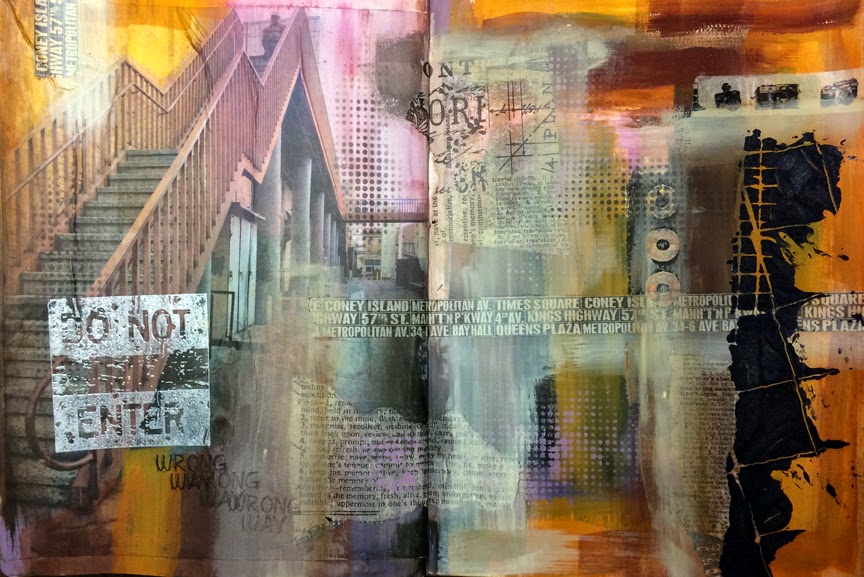
I wanted to use my Urban Grunge stamps on a journal page 
and chose to use a photo I had taken myself as the main subject.  
I printed it on plain copy paper and glued it to my art journal page with Liquitex Matte Medium.

 I added paint on the opposite side of the page using colors that were in the photo, that way, when painting over my printed image, it blends through to look as if one painting.  I used both acrylic paints and Art Anthology paints.  I wanted the paint to be semi transparent in some places so the photo would show through.  Art Anthology Paints are transparent so this was the perfect tool.

 I collaged some Tim Holtz Tissue Wrap, 
some Washi tape and decorative hole reinforcers around the two-page spread.

 Then, I added another layer of paint unifying everything.
 I stamped the Do Not Enter stamp from the Urban Grunge Stamp Set 
with the White Daisy stamp from Close To My Heart.
It's a pigment ink so I added clear embossing powder over it to heat set the image.
I also used the Wrong Way stamp from the Urban Grunge Stamp Set.

 I used Art Anthology's black Stone Effects with The Crafter's Workshop stencil.  
I love how it's so gritty and thick.

Here is the full two-page spread.

I hope I have inspired you to create something today.
Until next time...

Monday, March 24, 2014

#PetLove


Hey there!  It’s Robin Redd, back with you to show you my second project with Sin City Stamps and Composimold.  I have to tell you, I’ve been having fun playing with my gel plate that I made with Composimold for my previous post.  I have even melted it again and made a new gel plate in a different size!  That’s another thing that makes Composimold so desirable!  If I happen to cut into my plate or gouge it with a sharp edge, all I have to do is make a new one with the same product.  Within MINUTES, a new plate will be ready to go!

Today I made some more collage papers using a lot of pretty colors from Art Anthology 
and some of my fun stencils I have.

Here’s a pretty feather stencil from Julie Balzer and The Crafter’s Workshop.

Look at this pretty Cotton Candy Dimensional Paint from Art Anthology!

Here’s a sampling of the pretty collage papers I made.

Now, to show you how I put some of those pretty, gel-plate, collage, papers to use.  I started by painting a strip of some Cotton Candy paint from Art Anthology down one side of my 12” x 12” ‘canvas’.

I stamped the Romantic Background Stamp a few times on a piece of white sketch paper.

I free-hand cut quite a few scallops out of the stamped images.   
I made these various sizes, heights and widths to give my layout a whimsy look.

Next, I simply applied the scallops along one edge of my layout, 
next to my painted pink strip, using Liquitex Matte Medium.

With some coordinating collage papers I had just made 
I made a few layered, free-hand drawn and cut flowers.
1.        Cut three large circles out.
2.       Adhere a circle on another collage paper.
3.       Draw petals once then twice over the same petals to continue the whimsy look.
4.       Cut around petals.

I hand-drew the title of my page, #Pet and stamped Sin City’s stamp Love next to that.  
 I use that ‘hashtag’ when posting pictures of my pets on Instagram.

I’m pretty sure this ‘hello’ flair is from Recollections.

The scallops at the top were painted on with Limeade Dimensional Paint from Art Anthology.  
 I outlined them with a Scarlet Lime pen with works great when writing over paint.  
 I embellished the scallops with Queen’s Co Candy Stripers.

Be sure to use a permanent ink such as India ink when doodling 
so that the ink does not bleed when applying flowers or anything with matte medium.

This pretty pink bow is from Freckled Fawn.  I believe the enamel dots are from My Minds Eye.

And, here, is my completed layout featuring the loves of my life, Tootsie, Harley and Roxy….ha-ha!

Until next time…

Copyright Text

Blank Page Muse 2018 Sin City Stamps 2013