Showing posts with label Robin Redd. Show all posts

Monday, July 28, 2014

My Manifesto

Heeey, it's Robin Redd (a.k.a. RockinReddRobin!)

 This week, I did another art journal page.  
This lesson was taken from Effy Wild's Book of Days class.

The top and bottom border is made with strips of masking tape.  
The masking tape lays underneath a selfie that is printed on simple copy paper.

I used Punchinella to stencil on the sides of my photo, 
then turned the Punchinella over and stamped with it around my art journal page.


I doodled, with a gold metallic pen, little squares to frame the entire layout.
I stamped the swirl from the Art Journaling with Terri Sproul 2 stamp set, and the Believe in Yourself from the Fairies & Blossoms stamp set.
 

And I just love the pointing finger from the Classic Spark stamp set.
I hope I've inspired you to create something today.
Until next time...

Tuesday, July 15, 2014

My Story

Hello!  It's Robin Redd (a.k.a. RockinReddRobin!)
I found this video tutorial online and thought this journal page is perfect for my Sin City Stamps!

I'm, very much, into learning how to draw faces.  This one in particular is a 'whimsical' face.

After sketching out the face, shoulders and hair, I  went to my collage stash.  My collage stash are papers I painted myself at various times via various methods, i.e. Gelli Print, random painting, stencils.

I chose to use this one.  I found it fitting for this wonderful summer season we are in.

I tore up my collage paper into many, many quarter-size pieces.

Then, I collaged them onto the background of my girl.

I still can't get too far out of the box with my 'whimsical' look.  
Although, she's not completely realistic, she's not as whimsical as I'd like.

I used my Art Journaling with Terri Sproul 2 stamps.

After stamping with a coordinating color, I embossed with a sparkly, clear embossing powder.
Because the ink was going onto the paint and gel medium that I laid onto the page, 
first, the ink stayed wet a while.  
I sprinkled, liberally, onto the stamped images and shook the excess off, 
back into the embossing powder container.

I heat set the embossing powder slowly, to keep the collage papers and paint from bubbling up.

Look how pretty this lovely swirl looks after the heat embossing is complete. 

http://www.sincitystamps.com/index.php/art-rubber-stamps-2013-11-27/art-journal-rubber-stamps/art-journaling-with-terri-sproul-2-detail
This is the great set I used for this art journal page.  Perfect!

I hope I have inspired you to create something today.

Until next time...

Monday, June 9, 2014

Wrong Way

 
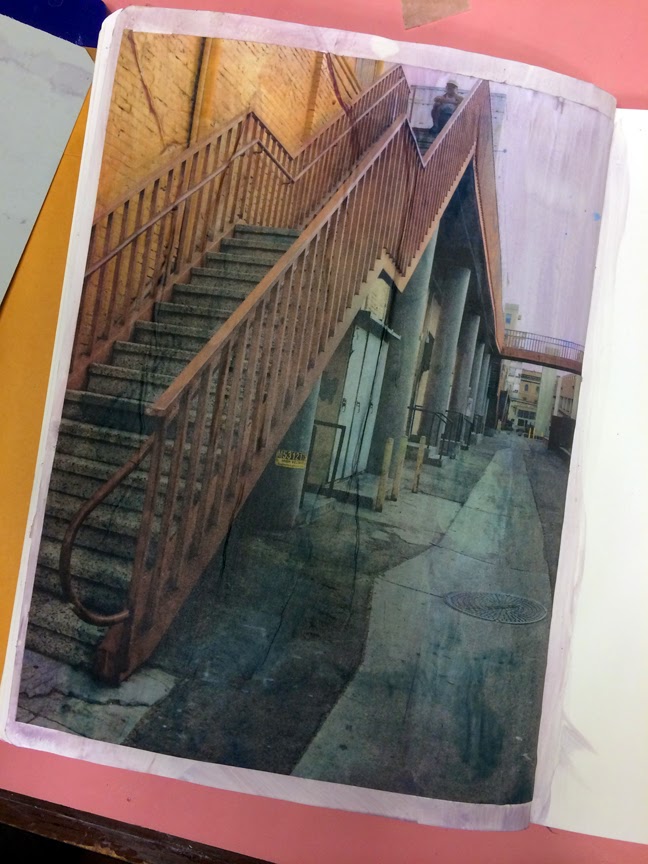
 I took this picture while strolling Santa Ana in the Art District one afternoon.  
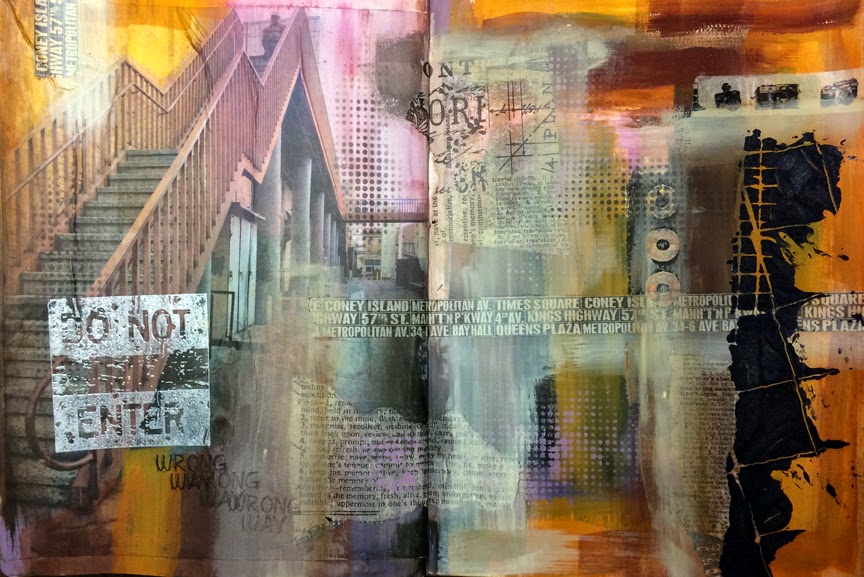
I wanted to use my Urban Grunge stamps on a journal page 
and chose to use a photo I had taken myself as the main subject.  
I printed it on plain copy paper and glued it to my art journal page with Liquitex Matte Medium.

 I added paint on the opposite side of the page using colors that were in the photo, that way, when painting over my printed image, it blends through to look as if one painting.  I used both acrylic paints and Art Anthology paints.  I wanted the paint to be semi transparent in some places so the photo would show through.  Art Anthology Paints are transparent so this was the perfect tool.

 I collaged some Tim Holtz Tissue Wrap, 
some Washi tape and decorative hole reinforcers around the two-page spread.

 Then, I added another layer of paint unifying everything.
 I stamped the Do Not Enter stamp from the Urban Grunge Stamp Set 
with the White Daisy stamp from Close To My Heart.
It's a pigment ink so I added clear embossing powder over it to heat set the image.
I also used the Wrong Way stamp from the Urban Grunge Stamp Set.

 I used Art Anthology's black Stone Effects with The Crafter's Workshop stencil.  
I love how it's so gritty and thick.

Here is the full two-page spread.

I hope I have inspired you to create something today.
Until next time...

Monday, April 28, 2014

Project Life with Sin City Stamps!

Hey there!  It’s RobinRedd (a.k.a. RockinReddRobin)!   

I’m here to share with you a Project Life layout I made this week using Sin City Stamps 
and Ecstasy Crafts, whom we are teaming up with this month.   

I enjoy Project Life, however, 
I will probably just finish the year I started working with it, 2013 and that’s pretty much it.   
I’m so far behind with that year.   
I have plenty of Project Life layouts that still need to be completed.
I love this little peacock feather stamp from the Wildlife stamp set.  
 I stamped it with one color, then added color to the center top portion with markers.
And who doesn’t love Pearl Dot Embellishments!   I used the
Decorative Pearls Dark Red from Ecstasy Crafts.
 So simple to add to any project and makes such an impression.
Speaking of impressions....keep in mind you can use embossing folders in your Project Life layout.  So quick and simple and makes a very unique card on your layout.  I used the Flower Border 1 embossing folder from Ecstasy Crafts. Since the cardstock had a white core, I sanded over the embossing to make the image “pop” more.  I love the results.

I hope I’ve inspired you to create something today.

Until next time…

Monday, April 14, 2014

Butterfly Card

Hey there!  This is Robin Redd (a.k.a. RockinReddRobin!)  Sin City Stamps is teaming up with Ecstasy Crafts this month.  I made a card, to share with you, using some fun products!
I started with the Ornare Vellum/Emb/ Piercing Template-stars (PR0565), found at Ecstasy Crafts, and some vellum paper.   I used the template with a light box so I was able to see where I needed to poke and press.  It is instructed to poke the small dots with a piercer and rub the larger spaces with an embossing tool.
This is how it looked once I was finished with the poking and piercing.
Next I took a piece of double sided sticky paper and removed the covering of one side and pressed it onto a piece of white cardstock.  Then I removed the other covering to reveal the cardstock completely covered with sticky.  I poured some fine glitter over the sticky paper, shook off the excess and pressed the glitter into the sticky paper with a rubber brayer.
I chose the Butterfly Starfoam Outline Stickers, also found at Ecstasy Crafts for my focal point.  I carefully pressed them onto the glittered paper.
I used Copic Markers to color in the Butterfly Stickers then cut them out using Teflon scissors.
After cutting out the vellum, following the scalloped edge formed by the template, I attached it to the front of my card.  I placed the butterflies on the card using foam tape.

Here is my pretty sentiment from the Fairies and Blossoms stamp set on the inside of my card.
And my little “Handmade By:” stamp, from the Wildlife stamp set, on the back.

I hope I’ve inspired you to create something today.

Until next time…


Thursday, April 3, 2014

Composimold Cards


Hello Spring!

Hey there!  This is Robin Redd (a.k.a. RockinReddRobin!)

I made a couple of cards using papers 
I made with my home-made gel plate 
I made with Composimold.  
 Now, that’s A LOT of “MADE” stuff!  Lol
(see this post, here: #PetLove)
 On this card, I used the Butterfly with Script stamp.
A Mannequin Tag stamp was used for this card.
I hope you like them…Thanks for taking a look.
Until next time…

Copyright Text

Blank Page Muse 2018 Sin City Stamps 2013