Showing posts with label background. Show all posts

Sunday, March 3, 2024

I'm Sorry

  Hi everyone, Steph Ackerman here today.

Today I am using some amazing products from Blank Page Muse and I Brake for Stamps.


I Brake For Stamps: Phrases Sheet #048
Blank Page Muse Paper:  Sweet Pasion 6x6 Paper Pad
Blank Page Muse Stamps:  Classic Wildflower Background


Use a large stamp to create a background for your card.

Details can be found on my blog.

Thanks for stopping by.


Steph

Looking for more Inspiration? Click the links below!
The Blank Page Muse Shop https://blankpagemuse.com/

Save 15% of your Blank Page Muse orders with discount code:  BPMSteph

Monday, September 18, 2023

Admit One!

  Hi Stamping Fans!


Today I am sharing some tags made with some leftover "masterboard" card. I made this at an art journal class I attended here in Australia - I love making background papers with paint, stencils and stamps!
I used stamps available in store on this piece of card - there are so many great little stamps to choose!
And the focal images n the tags are some fabulous vintage style stamps - perfect for small projects and adding interest to anything!


Here are links to a few I used but really there are endless choices in the stores:
Diamond Border by Pam Bray
Ornate Medallions by Michelle Frae Cummins


And for the focal images these vintage style stamps:


We would love to see what you create so remember to tag us on social media or make sure you have joined our Facebook group so you can share your creations and we can get some inspiration from you!


***Remember to us the code BPMSharon at the store for 15% off ***
So many fab stamps to choose from!
Note: you can use the code at either the IBFS Store OR the BPM Store - why not do an order from each and increase your stash!

And visit our social media sites for more stamping fun!
I Brake For Stamps -https://ibrakeforstamps.com/ 

Thursday, August 25, 2022

Let's Make Backgrounds!

 Hi Creative Fans!

Today I'm sharing a background idea - works for journal pages, card fronts, index cards, atc's - really whatever you want to create!

The best thing is that you can use up your patterned paper scraps and as you know I hate throwing any pretty bit of paper away!


There are some wonderful patterned paper pads available in store designed by Pam Bray - I save all the left over bits for using as backgrounds - it's quick and easy and looks effective - minimal supplies required so everyone can do this!

CLICK HERE to see the paper packs in store!

Gather your paper scraps - works best with all different sized pieces - grab your backing item whether it be a journal page or card front - you can use "mop up" pages and pieces of card - gives some extra grunge and interest to the page. My journal page had been used to "clean" excess paint from my brayer so I had some colour on the background.
If you have a plain page you might want to gesso it.


Adhere your scraps over the page - use glue or gel medium whatever is your fav!
Rub white gesso or paint over the patterned papers to dull out the colors - just a really thin layer - I use my fingers because it allows the layer to be thin and translucent! And then grab a charcoal pencil and color all around the edges of the patterned paper, smudge with your finger - love the dimension this adds. You now have a great background to add a focal stamp, sentiment and any other embellishments you like!


Pop over to My Blog and you can see all my stamping & digital creations!

***Remember to us the code BPMSharon at the store for 15% off ***
So many fab stamps to choose from!
Note: you can use the code at either the IBFS Store OR the BPM Store - why not do an order from each and increase your stash!

Thursday, December 9, 2021

Vintage Distressed Christmas

Hello from design team member, Heidi.  

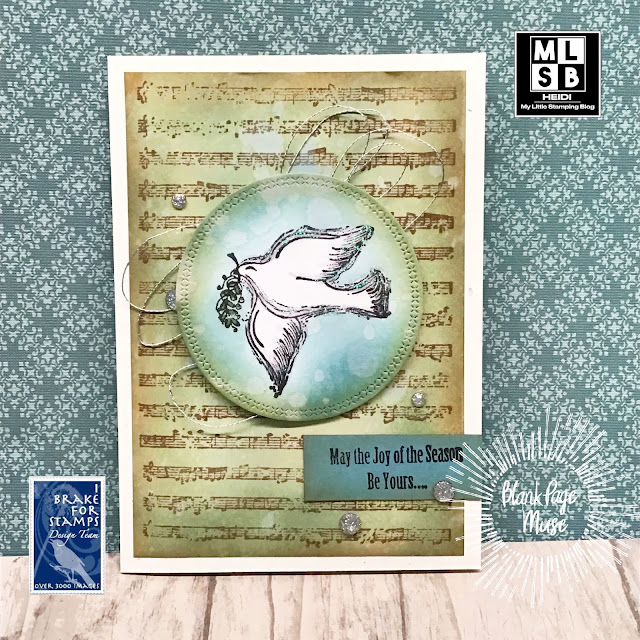
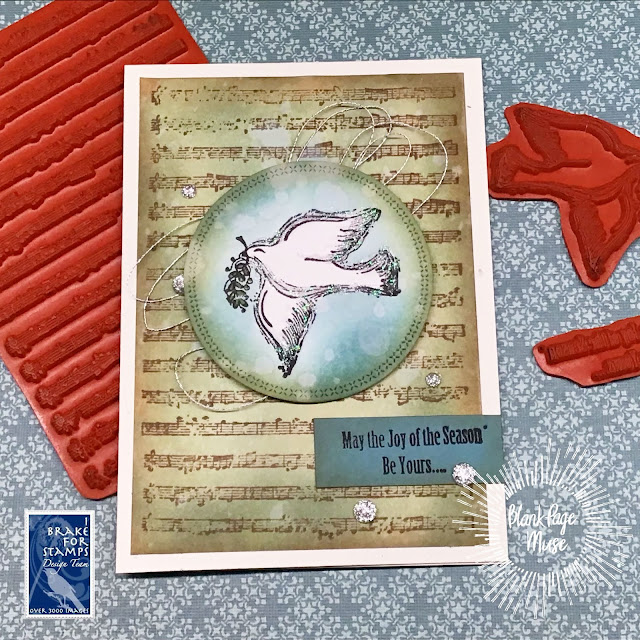
I was in the mood to use some distress inks so I decided on making a vintage-look distressed Christmas card.  I really love the soft, muted tones.  The backgrounds were sponged and then I spritzed water on the backgrounds to remove ink. And I dried the panels and repeated the process until I loved the look.  The colors I used were Bundled Sage, Speckled Egg, Tea Dye and Antique Linen.  


I added shadows to the dove image with a grey marker, and then I applied some glitter glue over top to get a pretty holiday look.  

I finished the card off simply with some silver twine and gems.  

I hope this card reminds you of the spirit of Christmas past and present. 


 I used stamps from the Blank Page Muse shop:

Distressed Music Background

Classic Christmas by Pam Bray Designs


You can also find more inspiration at the links below:

The Blank Page Muse- https://blankpagemuse.com/

FB Fan Page- https://www.facebook.com/groups/blankpagemuse/

Instagram Shop- https://www.instagram.com/blankpagemuse/

Instagram Blog- https://www.instagram.com/blankpagemuseblog/

Twitter- https://twitter.com/BlankPageMuse

Pintrest- https://www.pinterest.com/blankpagemuse/boards/


Thursday, January 23, 2020

Happy Birthday Quick Idea~ Fun Art Tag by Sharon!

This tag has a great quick background technique using stamps from the Steampunk Circus Set and has been created by DT Member Sharon.
The thing we love about this quick technique is you can use any sentiment stamp you have to create not only tag backgrounds but ATC's, ATcoins and greeting card backgrounds and is perfect for any occasion. Your base card can be painted or inked prior to stamping to add some colour.
Add another feature stamp and some embellishments and you have a quick creation that can be whipped up at the last minute! No need to colour you main image either which makes an even faster creation - just leave black & white or print on kraft card for a different look!


Make sure to come back and play in our Creative Challenge the link can be found on the sidebar and up top.

Don't forget to check us out at all of our social media sites
The Blank Page Muse- https://blankpagemuse.com/

Saturday, September 8, 2018

Dandelion Wishes Card

Karen here today to share my "Quick Idea" creating a simple blended background with a meadow silhouette.  The metal brad dragonfly embellishment added that little something special to a basic flat card. I hope you will try your own silhouette sunset cards and share them with us on the Facebook Fan Page.  Have a creative day!

Blank Page Muse Stamps:   Dandelion Wishes & Butterflies


Other Supplies:
  • black ink pad
  • distress inks
  • ink blending tool
  • glitter gel pen
  • dragonfly embellishment
  • mounting block
A Closer Look:

Blank Page Muse Shop http://blankpagemuse.com/
Facebook Fan Page https://www.facebook.com/groups/bla...
Instagram - Shop https://www.instagram.com/blankpage...
Instagram - Blog https://www.instagram.com/blankpage...
Twitter https://twitter.com/BlankPageMuse
Pinterest https://www.pinterest.com/blankpage...

To learn more about our designer Karen, please visit her blog, Art & Soul.

Thanks for visiting!

Tuesday, September 4, 2018

Eye of the Beholder Card

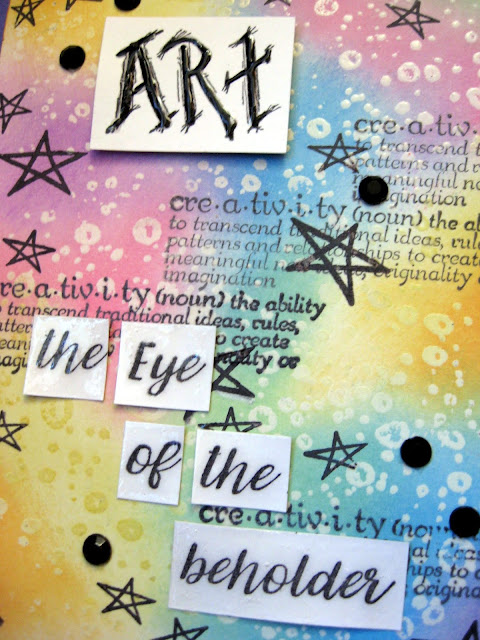
This month's challenge theme is "Color Layering"  My layers include stamping the definition in permanent black ink.  Then I used embossing ink with clear embossing powder to create the splattered pattern in the background. I gently blended oxide inks to add color and make the embossing pop. I hope you enjoy my tutorial!


Stamp Supplies:
Creativity Definition Word Phrase Rubber Stamp by Terri Sproul
Art Journaling Mixed Media Stamps Set 1 Pam Bray Designs
Waterdrops Background Rubber Stamp
Art sentiment stamp - Soulful Dolls Art Rubber Stamps Sheet by Cathy Frailey

Other Supplies:
  • black ink pad
  • embossing ink
  • clear embossing powder
  • heat gun
  • Oxide Inks (pink, tangerine, yellow, pistachio, lt blue, lavender)
  • ink blending tool
  • star stamp
  • clear dimensional paint
  • black gems
  • liquid adhesive
  • clear mounting block
Directions:
1. Stamp a text or definition back ground stamp randomly with black ink onto white cardstock. Use embossing ink to stamp waterdrop background. Apply clear embossing powder and heat set.


2. Apply a variety of colored inks using an ink blending tool to carefully shade and blend the colors over the stamped designs.


3. Use black ink to stamp a scattered an arrangement of various sized star images.  Apply the background to a cardbase.

4. Stamp the sentiment onto white cardstock and cut around each word. Assemble with
foam tape and apply clear dimensional paint over each individual word.  Finally, use liquid adhesive to embellish the design with a random scattering of black gems.

www.blankpagemuse.com
Follow us on Facebook and Pinterest.
Join the Blank Page Muse Fan Group...HERE
Instagram - Shop
Instagram - Blog
Twitter


To learn more about our designer Karen, please visit her blog, Art & Soul.
Thanks for visiting us today!

Tuesday, November 28, 2017

Mad Bonkers!


Hello Sin City Fans!!!
Today I am sharing some cards using one of the fab "Alice In Wonderland" sets available in store!!

Hope you enjoy the process - it's fairly long and involved - perhaps grab a coffee & snack?? LOL!!
Supplies:
  • Sin City Stamps: Art Journalling #2
  • Sheet 12 x 12 patterned or plain paper or card
  • Old Book Pages
  • Gesso
  • Acrylic Paint
  • Black Archival Ink
  • Stencil with Small Patterns
  • Embossing Fluid and Embossing Powders
  • Impasto Medium
  • White card
  • Black Base cards
  • Scraps of co-ordinating coloured card
  • Colouring medium: copics or pencils
  • Embellishments: "Alice" digital quotes (used here from:Digital Magpie@Etsy), Gauze/Muslin cloth scraps, charms, sticky mesh, playing cards
  • General supplies: brayer, sponge, spatula, scissors, cutting blade, ruler, pencil, glue, gel medium, double sided tape, heat tool
Note: You will need a "One Sheet Wonder" Template for this tutorial - so many to choose from if you do a search. I used the 12 x 12 template here: https://www.craftsy.com/blog/2015/11/one-sheet-wonder/

Instructions:
To start we are going to make our "masterboard" to cut the One Sheet Wonder Template. This process is a perfect way to use patterned paper that you really don't like and give it a whole new lease of life!!

Start by adding strips of old book pages - adhere with a glue stick or gel medium.


Next step is to add some Gesso - use a spatula to scrape it thinly over the entire page. No need for a thick layer as we want to see the pattern and book pages underneath for interest and texture.


To add more texture use scraps of gauze/muslin and ahere randomly over the page with gel medium. Allow to dry.


Now to add some colour with some acrylic paint and a brayer. "Blob" the paint onto the page randomly and spread with your brayer. No need to cover the entire page - as mentioned before we still want to see what is underneath. Allow to dry thoroughly.


Now to have some fun with your Sin City stamps! For this page we are using stamps from the Art Journalling #2 set - great for background stamping. As below use archival ink to randomly stamp over the page - no need for an acrylic block or mounting just stamp!!


Adding even MORE interest to the page!! Use a sponge, archival ink and stencil with small patterns and randomly stencil and sponge the page.


And we haven't finished yet - keep your stencil on the go and emboss over the stencil, add embossing powder and heat set. Use complimentary colours so your page flows!


And FINALLY one last bit of texture! Apply "Impasto" medium with your spatula randomly over the page and allow to dry completely.


Rub some gold metallic paint over the "raised" impasto stencilled areas to highlight them.


And here is a section of the finished page looking sparkly, texture filled and "interesting" - ready to create with!!!


Now we have our unique had created masterboard ready to mark out the template and cut out! Mark out the back of the sheet with a pencil - remember to "number" each piece as per the template!


Gather your black base cards and masterboard pieces along with co-ordinating coloured card to mount your masterboard pieces on if you with to add a "border" colour and layer around each masterboard section as I have done with my cards.


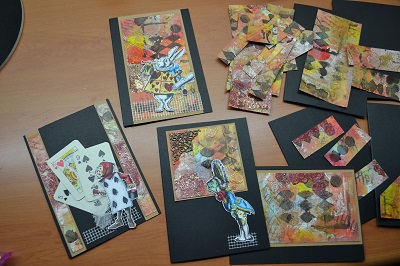
Start to place the sections on your cards. The One Sheet Wonder used here makes 14 cards!! I have completed 4 cards to show you how they look!


Stamp your chosen "Alice" images on white card with Black Archival Ink and colour with your favourite medium and fussy cut ready to use.


Play around with your masterboard pieces, stamped "Alice" images, embellishments and quotes until you are happy and then adhere everything to the base cards!


 And here are the four cards I have completed - LOL I have ten to go!!!


Hope you have gained some inspiration!!
I loved making these - love to create my own backgrounds!

Remember to pop to our Facebook Group for Sin City Shares!!!

Sharon

Friday, November 24, 2017

Creating Brick Background

Hi Stamping Friends,

Today's focus is on creating your own background paper.  My nephew celebrated his second birthday with a fire truck theme party.  The brick background stamp created the perfect matting paper for my main photo.  When you don't have the perfect patterned paper to match your photos, make your own.  Let me show you how.

Supplies:
1.  Brick Wall Section Art Rubber Stamp by Terri Sproul (Sin City Stamps)

http://sincitystamps.com/brick-wall-section-art-rubber-stamp-by-terri-sproul-sc24-3/
2.  Black ink pad
3.  Dye ink pads (red, maroon, rust)
4.  Ink blending tool
5. Water spray bottle
6. non-stick craft mat

Directions:
1. Use black ink to stamp the brick image repeatedly onto white cardstock making sure to overlap the edge of the paper. To make a second generation image, don't re-ink the stamp and just re-position it and press it to the paper again. You may even apply a third generation impression. With each impression the intensity of the design lightens. Re-ink the stamp and continue to fill the background with first & second generation impressions leaving occasional empty spaces.

2. Swipe a red ink pad across a non-stick craft mat and mist lightly with water until you see small beads of ink forming.

3.  Next, place the stamped brick panel face down onto the wet beads of ink. Press down gently and move the paper around until all the ink is absorbed.

4.  Continue repeating the process with two other shades of red ink until you are satisfied with the blend of colors.

5. Use an ink blending tool to help blend the wet ink and cover any white areas.  Then add a hint of rust ink to the brick background panel.

6. Finally, matte the main photo and adhere it to the upper left side of the layout.

Happy 2nd Birthday Colin!
You can find the brick stamp image at www.sincitystamps.com
For more inspiring paper-craft projects from the Design Team, be sure to visit us often at the Sin City Blog and follow us on Facebook.

Join the Sin City Fan Group. HERE
Thanks for visiting!

Copyright Text

Blank Page Muse 2018 Sin City Stamps 2013