Showing posts with label stamp. Show all posts

Sunday, May 19, 2019

Happy Father’s Day card

Hello there all our fellow BPM fans! Jess here with you sharing a card using some of those famous red rubber stamps!! This time it's a different masculine take on Father's Day. I just love this stamp set by Kate Leitch! Come along, let's craft a unique Father's Day card together!

Products used:
Spectrum Noir: Watercolor paper
7 Dots Studio: Hazy Days
Prima Marketing Inc. Junkyard Findings: Lightbulb
Ranger Ink: Archival Black ink
Hobby Lobby: Wooden gears
American Crafts: Sticky Thumb - foam dots
Black and White gesso
(Shop now and save! Use code BPMDtJessica2019 to save %15 off your total order!)

I am in LOVE with this stamp sheet! The possibilities are endless!!
1. Cut your desired card size
Do you like using up scraps in your stash? Well, here's your chance
Pull out some of your paper scraps
2. Begin by cutting them at different lengths and sizes
3. Stamp and cut out your images using black ink

4. Take some large pieces of scrap paper and mount the two larger stamped images onto them
5. Cut them out leaving a thin boarder around the images
6. Start mounting your paper layers using tape

7. Use some foam dots or cardboard pieces to mount your top layer of stamped images


8. Adorn the card with some wooden gears adhering them with tacky glue
9. Finally, splatter the front of the card with watered down white and black gesso

You have finished your card! 
Here are some close-ups for you to enjoy!


Thank you for stopping by today!
We look forward to seeing you next time!

Visit and follow us for more inspiration:

Wednesday, May 1, 2019

Just a Note

Hello there all our fellow BPM fans! Jess here today sharing with you a note card using some of those fabulous red rubber stamps!! This month, I'm going for a more masculine appeal. I just love this stamp set by Kate Leitch too! Come along, let's craft some fun pieces for the guys in our lives!

Products used:
Blank Page Muse: Seth Apter Rocky Road embossing powder
Spectrum Noir: Watercolor paper
Ranger Ink: Archival Black ink
American Crafts: Sticky Thumb - foam dots
(Shop now and save! Use code BPMDtJessica2019 to save %15 off your total order!)

Here is a fun photo of the stamp sheet I used!

You cannot tell me that this script stamp is not GORGEOUS! I just had to show it off a bit!
1. Cut your desired note card size
2. Begin by distressing the edges of your paper with a pair of scissors or other tool of your choice
3. Get out your stamp, embossing pad, and powder

4. Emboss your script stamp directly in the middle of the card
5. Heat emboss your stamped script using your heating tool
6. Stamp and cut out your images using black ink
I like leaving a very thing white line surrounding the images to make them POP.


6. Now get out your distressing tool of choice and some ink. We are getting inky!
7. Start blending from the edges inward
The idea here is to have the inner part of the note card the lightest, making the stamped images the focal point. 
8. Finally, use some foam dots or cardboard pieces to mount your stamped images.

Here we are! We have our finished notecard! 
Here are some close-ups for you to enjoy


 Thank you for stopping by today!
We look forward to seeing you next time!

Visit and follow us for more inspiration:

Thursday, February 28, 2019

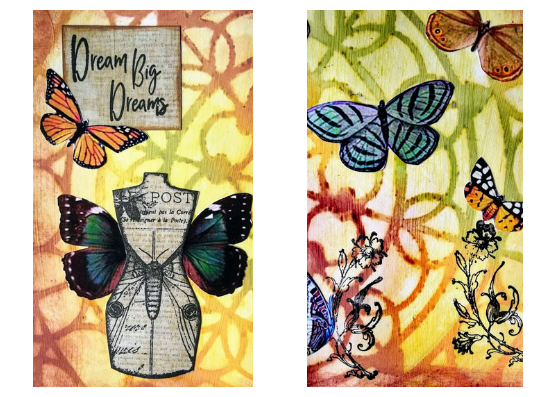
Dream Big Dreams Art Journal

Hello Crafty Friends,


Today, I made an Art Journal Page with some beautiful stamps BPM, a lovely stencil and butterflies.
Always a vintage style for this creation.


BPM Rubber Stamps Used :


Other Supplies

Art Journal
Distress Inks
Stencil
Vintage images or Clip Art


Start to colour your background with Distress Inks.


Use a baby wipe with your stencil.


Here the result.


Stamp the mannequin and the title onto a printed paper and the flowers on the Art Journal background.
Adhere two wings and some beautiful butterflies images to finish!


Hope you have enjoyed my tutorial!

Thanks for stopping by today.

Marie-Christine
Inspiration Team Member

Please visit the following for more inspiration!


Monday, June 23, 2014

Free

Hey!  It's Robin Redd (a.k.a. RockinReddRobin!)
 
  
Today, I worked on an art journal page based on week 4 of The Documented Life Project.  If you don't know about The Documented Life Project, click the link, here, for more details.

Personally, I don't keep the weekly journal as they do.  I just use the art journal prompts when I can get to them.  Like I said, this is the art journal prompt for week 4 and they are on week 26!

Week 4's journal prompt was to "Write a secret message and then paint over all but one key word."
I had written a letter, a while back, on watercolor paper for this use.  I didn't know of this prompt, specifically, but it's kind of cool how it worked out.

I used the background stamp and the wings stamps from the Classic Spark collection.  I LOVE these wings and that background stamp will get used over and over, for sure!

 I LOVE these wings.

 And, that background stamp will get used over and over, for sure! 

I hope I have inspired you to create something today.

Until next time...

Monday, April 14, 2014

Butterfly Card

Hey there!  This is Robin Redd (a.k.a. RockinReddRobin!)  Sin City Stamps is teaming up with Ecstasy Crafts this month.  I made a card, to share with you, using some fun products!
I started with the Ornare Vellum/Emb/ Piercing Template-stars (PR0565), found at Ecstasy Crafts, and some vellum paper.   I used the template with a light box so I was able to see where I needed to poke and press.  It is instructed to poke the small dots with a piercer and rub the larger spaces with an embossing tool.
This is how it looked once I was finished with the poking and piercing.
Next I took a piece of double sided sticky paper and removed the covering of one side and pressed it onto a piece of white cardstock.  Then I removed the other covering to reveal the cardstock completely covered with sticky.  I poured some fine glitter over the sticky paper, shook off the excess and pressed the glitter into the sticky paper with a rubber brayer.
I chose the Butterfly Starfoam Outline Stickers, also found at Ecstasy Crafts for my focal point.  I carefully pressed them onto the glittered paper.
I used Copic Markers to color in the Butterfly Stickers then cut them out using Teflon scissors.
After cutting out the vellum, following the scalloped edge formed by the template, I attached it to the front of my card.  I placed the butterflies on the card using foam tape.

Here is my pretty sentiment from the Fairies and Blossoms stamp set on the inside of my card.
And my little “Handmade By:” stamp, from the Wildlife stamp set, on the back.

I hope I’ve inspired you to create something today.

Until next time…


Monday, March 24, 2014

#PetLove


Hey there!  It’s Robin Redd, back with you to show you my second project with Sin City Stamps and Composimold.  I have to tell you, I’ve been having fun playing with my gel plate that I made with Composimold for my previous post.  I have even melted it again and made a new gel plate in a different size!  That’s another thing that makes Composimold so desirable!  If I happen to cut into my plate or gouge it with a sharp edge, all I have to do is make a new one with the same product.  Within MINUTES, a new plate will be ready to go!

Today I made some more collage papers using a lot of pretty colors from Art Anthology 
and some of my fun stencils I have.

Here’s a pretty feather stencil from Julie Balzer and The Crafter’s Workshop.

Look at this pretty Cotton Candy Dimensional Paint from Art Anthology!

Here’s a sampling of the pretty collage papers I made.

Now, to show you how I put some of those pretty, gel-plate, collage, papers to use.  I started by painting a strip of some Cotton Candy paint from Art Anthology down one side of my 12” x 12” ‘canvas’.

I stamped the Romantic Background Stamp a few times on a piece of white sketch paper.

I free-hand cut quite a few scallops out of the stamped images.   
I made these various sizes, heights and widths to give my layout a whimsy look.

Next, I simply applied the scallops along one edge of my layout, 
next to my painted pink strip, using Liquitex Matte Medium.

With some coordinating collage papers I had just made 
I made a few layered, free-hand drawn and cut flowers.
1.        Cut three large circles out.
2.       Adhere a circle on another collage paper.
3.       Draw petals once then twice over the same petals to continue the whimsy look.
4.       Cut around petals.

I hand-drew the title of my page, #Pet and stamped Sin City’s stamp Love next to that.  
 I use that ‘hashtag’ when posting pictures of my pets on Instagram.

I’m pretty sure this ‘hello’ flair is from Recollections.

The scallops at the top were painted on with Limeade Dimensional Paint from Art Anthology.  
 I outlined them with a Scarlet Lime pen with works great when writing over paint.  
 I embellished the scallops with Queen’s Co Candy Stripers.

Be sure to use a permanent ink such as India ink when doodling 
so that the ink does not bleed when applying flowers or anything with matte medium.

This pretty pink bow is from Freckled Fawn.  I believe the enamel dots are from My Minds Eye.

And, here, is my completed layout featuring the loves of my life, Tootsie, Harley and Roxy….ha-ha!

Until next time…

Copyright Text

Blank Page Muse 2018 Sin City Stamps 2013