Showing posts with label Love and Romance. Show all posts

Friday, February 6, 2026

Cupid Cammy

Hi everyone, Steph Ackerman here today using some amazing stamps and Stencil from Blank Page Muse.


Blank Page Muse Stamps: Cupid Cammy, Love Fancy Word Art
Blank Page Muse Stencil:  Hearts Stencil


Place the stencil on white cardstock.
Using a dauber, ink through the stencil using a variety of pressures to achieve different effects.


Stamp and emboss Cammy.
Color with Copic Markers and fussy cut the image.

Create a card from red cardstock.  Mat the stenciled panel with gray cardstock and add to card.
Die cut 2 ovals using the same red and gray cardstocks, adding to the card.
Place Cammy on top.
Love and fussy cut Love, matting and adding to the card.

Thanks for stopping by.

Steph

Looking for more Inspiration? Click the links below!
The Blank Page Muse Shop https://blankpagemuse.com/

Wednesday, January 26, 2022

A Dream is a Wish Your Heart Makes

Greetings!  
Chris here, and today I am extra excited to share this Cheery card I created!
This Card features 
Blank Page Muses' Nature Girl Art Rubber Stamp Set designed by Donna Gray and Hearts Stencil designed by Magda Polakow. 


Other supplies needed to recreate this card include card stock, distress inks, archival ink, and coordinating patterned paper. 


Ink your card stock with distress ink. 
 Secure Hearts Stencil designed by Magda Polakow and ink with distress inks.


 Stamp Nature Girl in center of background.
 Add sentiment from Dandelion Wishes with Butterflies Art Rubber Stamp Sheet by Terri Sproul.

Mat your stamped background over patterned paper to finish. I hope you are inspired to get creative with your Blank Page Muse Stamps.  Don't forget to use our discount code . 

Be sure to follow us at 
The Blank Page Muse- https://blankpagemuse.com/


Saturday, January 15, 2022

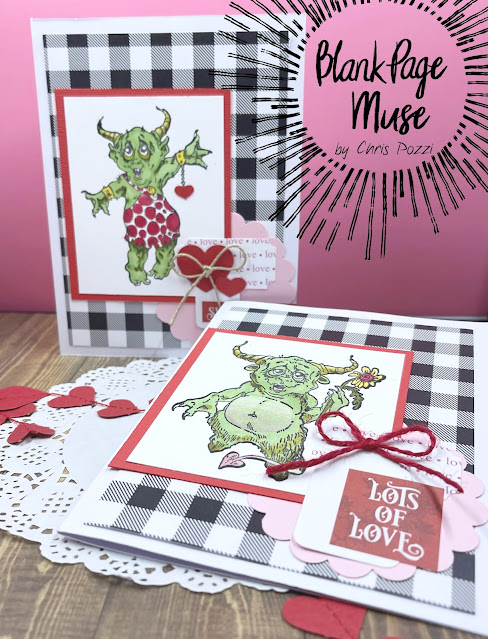
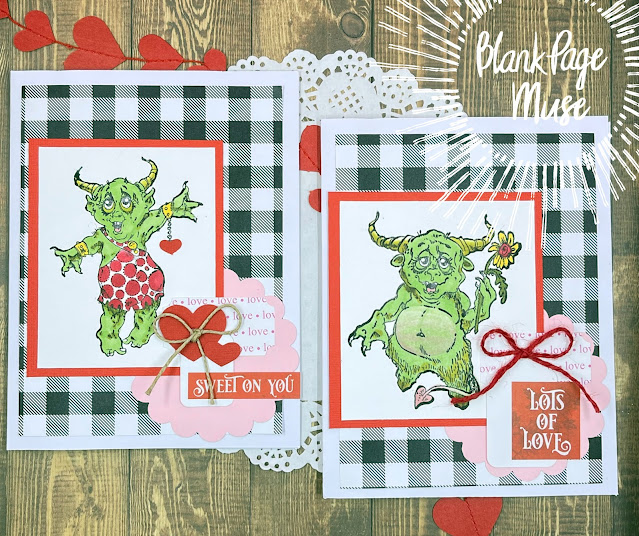
Monster Fun Valentine's Day Cards

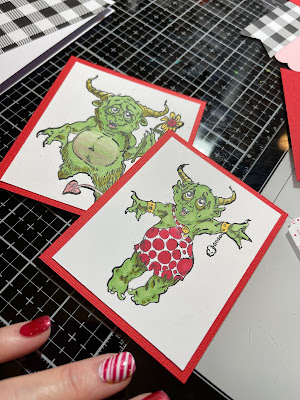
 Today I am super excited to share this adorable valentines day cards perfect for all your favorite trolls.  I had found these stamps last year and just knew I wanted to create Valentine's day cards with them.  Fast forward a year later and here are my cards!!!


and...  Fwiver Lady Monster Art Rubber Stamp designed by Rick St Dennis

They are just so dang cute all colored in!  


Mat, then add some cute little embellishments and you are all set!  


I hope you are inspired to get creative with your Blank Page Muse Stamps.  You can see these and lots of my Blank Page Muse Creations on my Blog. 


Check out all our pages for more inspiration! 

Tuesday, June 8, 2021

Love You Card

 Hello friends! Today I am on the blog with Blank Page Muse with a card created for all those June weddings and anniversaries you will have this summer!


Supplies used - 

White cardstock
Black cardstock
Pink Cosmic Shimmer
Twine
Blank Page Muse Love you Stamp (see below)
Heat tool

Lots of how-to pictures on using Comic Shimmer check out my Flamingo Card using Blank Page Muse stamps

I love making CAS cards and this one was quick to put together! First of all, I cut my cardstock down for the card front. I then squirted some Cosmic Shimmer on my table and spritzed it with a little bit of water then dipped in my card, drying with a heat tool between layers of color. I like to dry my card to get the most of my color on the paper.

I then set this aside to dry a bit more on its own or naturally. I then stamped my sentiment (my sentiment is from Blank Page Muse but it is one that I cut from other words. I have a tendency to cut my words up so they are more versatile) and inked the edges with pink ink. 

I then stamped my Lady and Man Clock stamp on the front of my card with Versamark Clair Ink in Nocturne with my Misti. I stamped the image twice to get a good inked image. I then assembled the card by gluing down the sentiment and punching some small holes to add the twine bow. Then glue the black card stock to the card front, then the stamped image to the front of the black cardstock.

Thanks for stopping by!

Thursday, March 11, 2021

Love Card

  Hello, this is Ana coming to you once more with a handmade card. I feel this Love stamp offers a wonderful size and vintage feel to make it the center focal image of any card or project. Adding some red foil to the card just adds that extra "pop" we look for when creating something. Join me as I walk you through how I created this simple, easy, and beautiful card.


Supply list:

  • Blank page Muse: Love Faith & Family Vintage Art Rubber Stamp Full Sheet SC88
  • Red foiled cardstock, black cardstock, white cardstock
  • R27 Copic Marker
  • Black embossing powder 
  • Spellbinders "Floral" embossing  folder SES-007
  • Cut out letters of  Y, O, U
  • Versamark embossing ink
  • Crop-A-Dile Corner Chomper - Stub & Scallop Punch by We R Memory Keepers

  • Thin black ribbon
  • Scissors
  • Glue

Instructions:

Start by cutting a black piece of cardstock to fit the size of your card base. Cut red foiled card stock to be 1/4" smaller than our card. Next, cut a white piece of cardstock 1/2" smaller than your card size. In other words cut:
  • First card base (black): size of your card, 
  • Second card base (red foiled): 1/4" smaller than your card, 
  • Third card base (white): 1/2" smaller than your card.

Adhere the two first layers (black and red foiled) on to your card base. The card is ready to be worked on.

Next, using embossing ink, stamp the beautiful LOVE stamp on to a white piece of cardstock. Remember to run an anti static powder over the white cardstock where you will be stamping to avoid embossing powder sticking to any other place than where the stamp is. Pour black embossing powder over it and heat set it by melting the black powder.

Using some scissors, "fussy" cut around the embossed Love image. 


Using a red marker, color in the word Love and the thin frame around it for some balance.


Take the white Cardstock cut 1/2" smaller than the card base, and emboss it, using an embossing folder of your choice. I used the Floral embossing folder by Spellbinders because I felt it added to the vintage look the stamp offers. 


Next round the corners of this embossed white cardstock.


Glue your cut out Love stamp and glue it to the top middle section of the embossed white cardstock.


Cut out the letters Y, O, U out of the red foil cardstock. You can use a die cutting machine for this or manually.


By adding a thin black piece of ribbon to the middle of the card, we add a separation between
the Love stamp and the red foiled YOU. This helps balance the colors out.

Glue the red foiled letters of (you) centered under the black ribbon. 


Glue this piece on to the card base on top of the red foiled cardstock and your card is finished. 
Easy and quick lovely card.


That is all from me today...
As always, I hope you get inspired, I hope you create and be happy.
I invite you to follow me on social media. You can find me under Craft Me a Card on YouTube, Instagram, Facebook, and Pinterest. Happy Crafting everyone!
Till next time -Ana


Sunday, February 7, 2021

Stapled Together Forever!!!

 Hi BPM Fans!

Well here we are at the second month of the year already!

February - the month of "Romance" - and we will be bringing you lots of romantic creations so make sure you check back regularly to see what the DT are creating!

Today I'm using my scraps and some sentiment stamps only!


Quite some time ago - maybe several years ago now - oh my goodness time flies - I came across a "one staple" challenge idea - I can't remember where I first saw it but if you do a Google search you can see several people who have promoted this idea.

I love this idea because you can use up your "odds & sods" and you only need one feature stamp - perfect for the hoarders amongst us! 

Hope you enjoy the concept and have a go yourselves!


Supplies:
Blank Page Muse Stamp: Love Word Stamp
Blank Page Muse Stamp: Forever Word from Romance Classic Couples Set
Blank Page Muse Stamp: Every Single Day
Index Cards - any size - 5 x 3 inches used for these
Scraps of coloured/patterned/textured paper and old book pages
Black or coloured ink pads and scrap white card
Stapler and "ONE" Staple!!!

Instructions:


Start by gathering some index cards and lots of bits and pieces of scrap paper and book pages. Stick to a colour theme for each index card - makes everything co-ordinated and it's fun to use different shades of a colour - match your stamp ink with your chosen colour!


Stamp your sentiment/word stamp onto cardstock - use black ink or the same colour as your chosen papers. If you want edge your index card with the coloured ink pad. I have a "fear" of excess white so I like to ink the edge of my cards!


Layer your papers and stamp to fit the index card - remember the aim is to use just "one" staple to attach everything to the index card! You have to love a "challenge"!


You can make lots of these at once - they are great to make affirmation cards and perfect for using your favourite Blank Page Muse Phrase/Quote Stamps!


I like to make these and put them on the wall in my craft room for inspiration and creativity!

I would love to see your stapled cards so make sure you share them at our Facebook Group!

Happy stamping!

Sharon


Don't forget to check us out at all of our social media sites
The Blank Page Muse- https://blankpagemuse.com/

Wednesday, January 27, 2021

Love Greeting Card

Thank you so much for stopping by. My name is Ana and creating cards is a passion of mine. It is with great joy that I present to you this cute Valentine’s Day card. This card uses the "Love" stamp from the Love Faith & Family Vintage Art Rubber Stamp Full Sheet SC88. I made it for Valentine's Day but it really can be given to someone special on any given day.  Who doesn't like to hear they are loved right?


Supply list:


Instructions:

Begin by adding the red foil cardstock to the card base. The shininess of the foil will add a nice elegant look to this Valentine's Day card.
 
Next, stamp the image of the word love on to a watercolor paper. This cute and vintage looking “Love” stamp makes the perfect center piece for a card. 

This next step is optional.
Cut out the inside frame of the stamp. This step is suggested so that a piece of red foil cardstock can be placed under the stamp creating a shiny frame around the word love.

Creating a 'frame' or  'border' like this helps to balance the card once all the elements are put together.  

Blending markers such as Copics, are useful in creating a ombre effect in your card making as I did with the Love stamp.


Using some watercolor markers, choose  colors that will coordinate with your card theme. 
After you have finished coloring in the card, run it  through a die cutting machine with the hearts embossing folder.
This will create dimension. 
Cut this piece to a size of 1/4" smaller than the first layer (the red foil layer).


Adhere the Love onto 1" strip of red foil. 

Finish the card by touching up the letters  with some flossy accents so that they would shine just like the red foil cardstock that surrounds the card. 


Simple and quick Valentine's Day Card created with this wonderful Love Stamp. 


I hope this inspires you, I hope you create and be happy. Thank you so much for stopping by.                                                                             ~ Ana


Copyright Text

Blank Page Muse 2018 Sin City Stamps 2013