Showing posts with label Greeting Card. Show all posts

Thursday, June 20, 2024

Dream, Inspire, Grow

Hi there, crafting friends!

It’s design team member Walter back on the blog with you today.  My first card for June was all about self love and doing what is good for your soul.  Today's project is along the same thought and features the words: DREAM, INSPIRE, and GROW.  An important reminder for everyone that we are never too old to dream, incapable of inspiring, or without the ability to grow. It has a pop art style and is a little funky.  I hope that you like it!


Here's what I used to make it:

 Here's how I made it:

  • Blended blocks from the stencil onto the card panel in an alternating pattern with the oxide inks; stamped circular patterns down the left & right hand sides with black ink.
  • Stamped the art doll and sentiments onto a scrap piece of paper from the Steampunk Romance kit.
  • Colored the art doll with alcohol markers, glitter gel pens, and metallic gel pens.
  • Adhered doll and sentiments to card with double sided foam tape.
  • Spritzed the card panel with some tea stain spray to add some grunge.
  • Adhered the panel to the card base and glued on three rhinestone gems.


You may read more about my creative process on my blog.

Thank you for spending some time here with me today.  See you again soon!

Be sure to visit our social media sites for more stamping fun!


I Brake For Stamps -https://ibrakeforstamps.com/ 

The Blank Page Muse- https://blankpagemuse.com/

FB Fan Page-  https://www.facebook.com/groups/blankpagemuse/

Instagram Shop-  https://www.instagram.com/blankpagemuse/

Instagram Blog-  https://www.instagram.com/blankpagemuseblog/

Twitter-  https://twitter.com/BlankPageMuse

Pinterest- https://www.pinterest.com/blankpagemuse/boards/


Monday, June 10, 2024

Rainbow Soul


Hi there, crafting friends!

It’s design team member Walter back on the blog with you today. Today's project isn't my usual type of creation.  I make a lot of vintage and traditional style cards and I decided to push my boundaries with this one.  I chose to make a pop art styled card that celebrates individuality and loving yourself.  I called it Rainbow Soul since the eyes are the window to your soul.


Here's what I used to make it:

Here's how I made it:

  • Stamped the eye onto the white card panel with black ink; also stamped it onto making paper to create a mask.
  • Applied mask to eye; splattered Brutus Monroe Creamy Aqua Pigments around the eye and dried with a heat tool.
  • Removed the mask and colored the pupil with the glitter gel pens in a rainbow pattern; lightly blended Lost Shadow oxide ink over the image to soften the colors.
  • Stamped the sentiment with embossing ink, applied black embossing powder, and heat set it.
  • Adhered card panel to center of black card panel.
  • Adhered combined card panel to card base.
  • Applied three rhinestone gems with craft glue.


It's a simple but fun card with a really beautiful message.  Let's celebrate it every day!

You may read more about my creative process on my blog.

Thank you for spending some time here with me today.  See you again soon!

Be sure to visit our social media sites for more stamping fun!


I Brake For Stamps -https://ibrakeforstamps.com/ 

The Blank Page Muse- https://blankpagemuse.com/

FB Fan Page-  https://www.facebook.com/groups/blankpagemuse/

Instagram Shop-  https://www.instagram.com/blankpagemuse/

Instagram Blog-  https://www.instagram.com/blankpagemuseblog/

Twitter-  https://twitter.com/BlankPageMuse

Pinterest- https://www.pinterest.com/blankpagemuse/boards/

Monday, May 20, 2024

Wild Berry Thanks

 Hi there, crafting friends!

It’s design team member Walter back on the blog with you today. I had mentioned in my previous post that I'd be making a card using a scrap from the Wild Berries card panel that I had cut out.  I'm here to share with that you today!

I hate to see really nice scraps go to waste.  I generally save them to put them to use in another card.  It's an easy way to stretch your craft supplies as well as your budget.


Here's what I used to make it:

 Here's how I made it:

  • Stamped the Wild Berries background stamp onto a piece of vellum with black ink and colored in the berries with a blue alcohol marker.
  • Adhered the stamped & colored vellum to a piece of white card stock.
  • Added double sided foam tape to the Wild Berries circular scrap, aligned it with the stamped & colored image, and adhered it to the panel.
  • Adhered the panel to the A2 card base.
  • Cut an A2 sized frame from black card stock, colored over it with a metallic silver glitter marker, put double sided foam tape on the back of it, and adhered it to the card.
  • Colored a scrap piece of white paper with the metallic silver glitter marker, glued a sentiment onto it, and glued it down to my card.


You may read more about my creative process on my blog.

Thank you for spending some time here with me today.  See you again soon!

Be sure to visit our social media sites for more stamping fun!


I Brake For Stamps -https://ibrakeforstamps.com/ 

The Blank Page Muse- https://blankpagemuse.com/

FB Fan Page-  https://www.facebook.com/groups/blankpagemuse/

Instagram Shop-  https://www.instagram.com/blankpagemuse/

Instagram Blog-  https://www.instagram.com/blankpagemuseblog/

Twitter-  https://twitter.com/BlankPageMuse

Pinterest- https://www.pinterest.com/blankpagemuse/boards/

Thursday, August 10, 2023

Hummingbird Happiness

Hi there, crafty friends!

This is Walter, a new creative team member for The Blank Page Muse/I Brake for Stamps, on the blog today with my first post as a member of the team.  I truly love the beauty, diversity, and quality of the rubber and clear stamps that BPM/IBFS offers, and I'm excited to create with & share their products with you!

Hummingbird Happiness is today's share.  This bright, colorful, and whimsical card was easy to make and is sure to bring a smile to anyone's face.  The unique design of the hummingbird reminded me of a stained glass sun catcher, and that was my source of inspiration in my design.


I used the following products in making the card:

Embossing the hummingbird and coloring it with the metallic gel pens was key to making it look like stained glass - it gives the extra shine and reflection when light hits the card.  The glitter on the leaves makes them pop, and the circular patterns in the air adds just a touch of whimsy and lightness.


You may learn more about my creative process on my blog.

Please visit the links below for more inspiration, creativity, and stamping fun with The Blank Page Muse and I Brake for Stamps:

I Brake For Stamps -https://ibrakeforstamps.com/ 

The Blank Page Muse- https://blankpagemuse.com/

FB Fan Page-  https://www.facebook.com/groups/blankpagemuse/

Instagram Shop-  https://www.instagram.com/blankpagemuse/

Instagram Blog-  https://www.instagram.com/blankpagemuseblog/

Twitter-  https://twitter.com/BlankPageMuse

Pintrest- https://www.pinterest.com/blankpagemuse/boards/

Thanks for spending some time with me here today.  See you again soon!

Thursday, April 15, 2021

Make a Wish!

 Hi BPM Fans!

Hope you are all enjoying the "Nature" theme this month which is just perfect for soooooo many of the fab stamps available at the BPM Store!


Today I'm sharing some nature/natural feel cards using some of my scraps from my post here at the blog last month along with some new stamps I recently nabbed from the store!
Click here to see how I made the Floral Patterned Kraft Card used on these cards.


Supplies:
Blank Page Muse Stamp: Lady with Butterfly Wings
Blank Page Muse Stamp: Smile Winged Muse
Blank Page Muse Stamp: "Make a Wish" & "Butterfly" from the Dandelions Wishes with Butterflies Set
White Card and Black Ink Pad
Colouring Mediums ie. Copics or Pencils
Kraft Card Bases
Torn Scraps of Stamped Kraft Card
Embellishments
General supplies: scissors, tape or glue

Instructions:
Start by stamping your Main Winged Ladies and Butterflies on white card with black ink. Colour in and fussy cut. I had fun doing some pretty basic "gawdy" colouring to make the images stand out and look quite bold!


Stamp the "Make a Wish" sentiment on white card and tear around the stamp.


Grab some "scraps" of leftover stamped card - link above for how to make patterned paper using BPM stamps!


Gather your base cards, some hessian or fibre ribbon or the like and any other embellishments you want to use.


Arrange your coloured stamped images, patterned card strip and embellishments on the card front and adhere. 


Hope you feel inspired to create your own nature feel cards!
Remember we always love to see what people are doing with their BPM Stamps - we love to get inspiration from BPM "Fans" as well as sharing our creations with you!

Happy Stamping!

Sharon :)


Don't forget to check us out at all of our social media sites
The Blank Page Muse- https://blankpagemuse.com/


Friday, May 24, 2019

Old Fashioned Love

Hello BPM Fans! Mercy here with a blast from the past of sorts.  As a fan of all things vintage, this project really was something that allowed me to use Victorian inspiration (and my stash!) to create a card for Mother's Day.


Supplies:
4 Small Red Roses
Black Pigment Ink
Black Embossing Powder
Page Corner Rounder punch
Alcohol Ink Pens in green, purple, orange, & red
Tim Holtz Alterations Sizzix 3D Impresslits -Scallop
Yellow Dylusions Spray Ink
Red Glossy card stock
Velum with decorative star bursts
Purple A6 Greeting Card blank
White Cardstock postcard (4.5" X 6.5")

Instructions:
1. Stamp the corner curvy flower stamp, centered on the top of the card (right up against the edge) with pigment ink, corner pointing up.  Rotate the card 180 degrees, add a corresponding corner stamp facing the first stamped one like a mirror, placing that one centered up against the edge of the card.


 2. Stamp the "Love" stamp with the pigment ink in the center.


3. Pour black embossing powder across the card and heat emboss.


4. Spray a few spritzes of the Dylusions Yellow ink across the card. Leave some of the white cardstock showing.


5.  On either scrap paper or on other white cardstock, stamp and emboss in black embossing powers a few more "Love" stamps.  Color those in red and one in purple.  Fussy cut each letter out from the scrap ones.


6. Color the rest of the flowers/vines. Glue roses to be just above and below the "Love" stamp in a square (in my case, I ended up spray dying white roses I had to red). Using foam tape, layer the letters over the base "Love" to add more dimension.


7. Using the Tim Holtz 3d Impresslits border, emboss four strips of the glossy red card stock.  Cut those down to wrap around the postcard base. Glue them to create a border around the stamped image.


8. Mount a 5X7 cut of the velum to the card base.  Once that is mounted, use foam tape to glue down to the velum card, centered.  Use a page rounder to trim the edges.


9. Add a note or greeting to the inside of the card. 

This project is definitely themed to fit for a variety of holidays and reasons to create.  Changing out the messaging on the inside of the card is key towards versatility.


More ideas & crafts by Mercy

Want an extra 15% off on your next order? Use this code on your order! Good until June 1, 2019. BPMDtMercy2019

Sunday, May 19, 2019

Octopus AWAY!


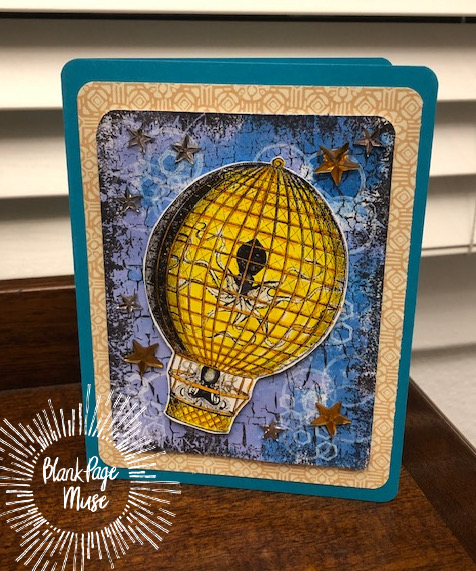
 Are you looking for a fun, masculine card to create for a special someone?  This easy Steampunk themed greeting card is great for Father's Day or any day you want to surprise someone, or warn them of the impending octopus apocalypse (just kidding!).


Supplies:
Crackle Background Stamp
Small Cluster GeoMetric Stamp and Interlocking Circles from this set
Octopus Airship Stamp from this set
Black archival ink
White Pigment Ink
Various Scrap pieces of cardstock in white, purple-blue, blue-green,and yellow decorative patterned paper (in the example it was a Graphic45.
Adhesive
Foam Double-sided Tape
Small Star Embellishments
Scissors

Instructions:

Create the card base from the blue green paper.  This one is a standard 5X7 sized card.  Cut the decorative paper about 1/8" smaller than 5"X7" and cut the purple-blue card stock another 1/8th" smaller than that one.  Using the black archival ink, stamp the crackle background first, then stamp the joined circles and the geometric cluster stamps randomly using the white pigment ink.


Stamp the Octopus Airship on the white card stock with the archival black ink.  Allow to dry and color in with your choice of medium (watercolor pens, oxides, pencils, etc).  Fussy cut out.


Layer the cards, adhering the patterned paper to the base card, then glue the decorative stamped blue card to the patterned paper (all should be centered).  Attach the fussy cut image using foam tape at a slight angle.  Add some star embellishments and you are done.

All ready to float away into an envelope.


More ideas & crafts by Mercy

Want an extra 15% off on your next order? Use this code on your order! Good until June 1, 2019. BPMDtMercy2019


Thursday, January 1, 2015

New Year's Card with Shabby Style

Happy New Year, everyone!  Are you ready for a fantastic year?  I know I am.

I decided to make a card with elements that I feel represent a year's passing.  The wings represent how time flies, while the clock hands and gears are parts of that fast-moving clock that seems to never slow down.  And of course, the Roman numerals represent the year, 2015.


Cut tan card stock to 6" x 12", fold in half to make a 6"x 6" top folded card.

Adhere 5-3/4" x 5-3/4" print paper to card front, edging with similar colors of ink to match the paper colors.

Stamp Roman numerals, as shown.  You will need two "III", an "X" and a "V".
To change the "III"s to M's to represent each 1,000 years, I used post-it notes to mask areas of the "III" and stamped the bottom of the "V" between each "I I I" to turn it into an "M".
Fussy cut the Roman numerals and adhere to card front.

Stamp wings from the Sin City Wings stamp set twice onto scrap tan card stock and fussy cut each.
Layer wings onto card, lifting the top pair of wings with pop dots.

Stamp small clock hand onto scrap tan card stock, fussy cut and adhere to center of wings with more pop dots.  Add Stickles glitter glue to wings (Antique Linen) and clock hand (Vintage Photo).
I wanted a bit more shabbiness, so I added splotches of Frayed Burlap distress crackle paint.

After it dried, I added some Vintage Photo distress stain to bring out the cracks, and then some metal gears to the bottom splotch and to the bottom of the clock hand.

Supples used:

Sin City Stamps:  Sin City Wings stamp set; Clockworks Inspired by Terri Sproul stamp set;
Other: Tan card stock; Print paper (Prima); Distress Stickles (Vintage Photo, Antique Linen); Distress Ink Pads (Black Soot, Vintage Photo); Distress Stain (Vintage Photo); Metal gears (various); Distress Crackle Paint (Frayed Burlap); foam dots

I hope you enjoyed my shabby style New Year's card today.   If you like it, I hope you will visit the Sin City Stamps online store to see what other stamps and accessories they have.  Be sure to also visit the blog regularly as the team has so much inspiration to offer.  Also, I would love for you to stop by my blog to see more of my work!

Thanks for stopping by, and have a wonderful weekend!

Barbara

Wednesday, November 13, 2013

A Card for all seasons

Hello everyone, Astrid here from the UK
Though everyone's head is probably full of Thanksgiving and other Autumn/Fall projects, I thought I would share a card suitable for all season's even though I mainly used Pam Bray's Fall Collection 2 set.
These are the stamps and products I used:
Stamps
Pam Bray Fall Collection 2
Pocket Watch
Banner of Love
Other products
Kraft Card 6 x6 folded card blank
Prima 6 x 6 Fairy Rhymes paper pad
Ranger Archival Jet Black Ink
Ranger Distress Inks in Bundled Sage, Vintage Photo, Gathered Twigs, Walnut Stain, Victorian Velvet
Home made heart shaped Shrink plastic button
Sewing Machine
Smooth stamping card
Perfect Pearls (or any other) Gold Spray
Home made Spray using Victorian Velvet re-inker
Basic Craft Kit, scissors, ruler, adhesive etc.

Copyright Text

Blank Page Muse 2018 Sin City Stamps 2013