Showing posts with label hummingbird. Show all posts

Saturday, April 19, 2025

Taking Flight Card~Beauty in Botanicals


 Hello, Blank Page Muse Family! This month, our theme is Beauty in Botanicals. With spring in full swing, I thought I'd create a card that has a beautiful flower. The hummingbird thinks it's beautiful, too! I started by using the Leaves Collage Stencil and a very light green ink. I applied the ink lightly with a large blending brush onto a piece of white cardstock. I then added a hint of blue ink around the edges of the panel. 

I stamped clouds, a hummingbird, a flower, and a sprig from You Make Me Happy Hummingbird Clouds Flower Stamp Set in an alcohol marker friendly black ink. I colored the sprig, hummingbird, and flower with Alcohol markers. I lined the clouds in a very light blue alcohol marker. I stamped the sentiment, then trimmed down the panel to 4 x 5 1/4 ", mounted it onto an A2 piece of black cardstock. I adhered the entire panel to an A2 card base. 
 
Products used:
White cardstock
Black cardstock
Alcohol markers
Black ink pad
Green ink pad
Blue ink pad

Thursday, August 22, 2024

Hummingbird and Flowers

  Hi everyone, Steph Ackerman here today.

Today I am using some amazing products from Blank Page Muse and I Brake for Stamps.


Blank Page Muse Stamps: Special Day Clear Sentiments
Blank Page Muse Cardstock: Tattered & Worn 6x6 Paper Pack
I Brake for Stamps: Hummingbird Border


Stamp and color the image with Copic Markers.


Stamp the phrase under the hummingbird border.
Ink the edges of the panel and mat with torn black cardstock.


Use paper from the Tattered & Worn paper pack to create the background.
Add die cut elements for opposite corners.
Add the image to the card with foam adhesives for dimension.
Add stickles to the image.

Thanks for stopping by.


Steph

Looking for more Inspiration? Click the links below!
The Blank Page Muse Shop https://blankpagemuse.com/

Save 15% of your Blank Page Muse orders with discount code:  BPMSteph


Wednesday, August 7, 2024

Hummingbird


Hummingbird

Good day, fellow crafters. It's Tamara once again, with a new post where I am going be showcasing my latest card created using I Brake for Stamps and Blank Page Muse products! 


Hummingbirds, known for their vibrant colors and remarkable agility, symbolize joy, healing, and resilience in many cultures. Their ability to hover and move in unique ways, combined with their role as essential pollinators, makes them a captivating subject. The combination of a hummingbird and a flower creates a visually stunning and meaningful image, perfect for occasions that celebrate love, gratitude, or encouragement.


To create this project, you will need the following:

·        Blank Page Muse You Make Me Happy Hummingbird Clouds Flower set

·        Black ink pad

·        Watermark ink

·        Cardstock - white

·        Cardstock – black

·        Distress Oxides or similar

·        Vellum

·        Scissors

·        Alcohol Markers

·        Blending brushes

·        Liquid glue

·        Paper trimmer

·        Anti-static powder

·        Stamping platform

·        Black embossing powder

·        Heat Tool

·        A2 card base – purple (4.25” x 5.5”)

To craft your card, start by creating the background panel.  Using your choice of stamping platform begin with the flower stamp from the You Make Me Happy set and position it on the left side of the white cardstock.  Once satisfied with the position and the stamp is secured to the platform, ink the stamp with black ink and stamp the image. Repeat this step if required to ensure coverage.

 The next step is to use ink blending brushes and your choice of inks to create the soft blue sky and to color the flower.  I choose to use Distress Oxide for this card if you wish to recreate the same look.

 The next thing to create is the Hummingbird. Using your choice of stamping platforms secure the stamp into position over the sheet of vellum.  Next, with watermark ink, ink the stamp up and stamp the image on the vellum.  Repeat this step if required to ensure coverage. Once satisfied, thoroughly cover the inked image with black embossing powder, remove the excess, and then set with a heat tool. KEY TIP: Do this slowly while applying the heat to both sides of the vellum to prevent curling.  Allow it to cool completely.

 Once cool, flip the vellum sheet to the side opposite from the embossing and then color in the pattern on the Hummingbird using alcohol markers.  Use a light touch with light colors and go over the places you want to darken with the same color after it has dried as the markers will dry much lighter than the wet color presents itself.  Once completed and dry, use scissors to cut the Hummingbird out.  You should do this on the outside of, but right against, the outermost profile of the Hummingbird.

The next stage is assembly and finishing.  Once the Hummingbird has been cut out you will need to adhere it into place on your background panel.  To do this use liquid glue.  KEY TIP: To prevent bubbling, DO NOT apply your liquid glue directly to the vellum.  Instead put some liquid glue on to a washable surface and use some sort of applicator to apply in a pouncing method until the image is completely covered.

 Once the focal image is adhered, use the included sentiment stamp, some black ink, and your preferred stamping platform to stamp the sentiment into place.  Lastly, trim your background panel and black mat down to their final dimensions, adhere them together and then adhere the composite to the card base to complete the card.


The stamps I used can be found by following the links in the materials list or you can find them with a quick search on
www.blankpagemuse.com. Visit our social media sites for more stamping fun!


I Brake For Stamps -https://ibrakeforstamps.com/ 

The Blank Page Muse- https://blankpagemuse.com/

FB Fan Page-  https://www.facebook.com/groups/blankpagemuse/

Instagram Shop-  https://www.instagram.com/blankpagemuse/

Instagram Blog-  https://www.instagram.com/blankpagemuseblog/

Twitter-  https://twitter.com/BlankPageMuse

Pinterest- https://www.pinterest.com/blankpagemuse/boards/


Monday, November 27, 2023

Have You Tried Mirror Stamping?

Hello! Have you tried mirror stamping? Mirror stamping is when you stamp your image to create an opposite impression of your image. This technique extends the use of your stamps. It requires a stamp larger than the stamp you want to do an image mirror of, a juicy ink and a stamp positioner. 


The birds were colored using a smooshing technique. This is where I spritz some pigment to a craft mat, and I pick up the pigment with the watercolor paper. I dry the paper in between smooshing to create some texture. I also flicked paint to this panel to add more colors. 


I hope you give mirror stamping a try. It takes practice and the right combination of craft supplies but the result gives your stamp another use. Please visit my blog, Maria Giselle's Creative Cuts, for card details.

Find more inspiration by visiting the following blogs:


Thank you for visiting. Have a blessed, brilliant and creative day!


Thursday, September 7, 2023

You Make Me Happy

Hey there, creative stampers!  Welcome by the Blank Page Muse Blog today. 
I'm Karen Letchworth, one of the new DT Members here.  I hope that my art will inspire you.  Blank Page Muse and I Brake for Stamps both have so many FAB stamps to help you get creative.  Here's what I came up with to share today.
This card uses two FUN Blank Page Muse Stamp Sets:
You Make Me Happy Hummingbird Stamp Set - Hummingbird, Clouds, Foliage and Sentiment

The background was created on white cardstock using several colors of Tim Holtz Oxide Inks including:
Spun Sugar, Kitsch Flamingo, Stormy Sky, Green and Black Soot

You can read all the nitty gritty details here on my blog, My Cup Runeth Over.

For even more FAB inspiration, just click on these links:

Thursday, August 10, 2023

Hummingbird Happiness

Hi there, crafty friends!

This is Walter, a new creative team member for The Blank Page Muse/I Brake for Stamps, on the blog today with my first post as a member of the team.  I truly love the beauty, diversity, and quality of the rubber and clear stamps that BPM/IBFS offers, and I'm excited to create with & share their products with you!

Hummingbird Happiness is today's share.  This bright, colorful, and whimsical card was easy to make and is sure to bring a smile to anyone's face.  The unique design of the hummingbird reminded me of a stained glass sun catcher, and that was my source of inspiration in my design.


I used the following products in making the card:

Embossing the hummingbird and coloring it with the metallic gel pens was key to making it look like stained glass - it gives the extra shine and reflection when light hits the card.  The glitter on the leaves makes them pop, and the circular patterns in the air adds just a touch of whimsy and lightness.


You may learn more about my creative process on my blog.

Please visit the links below for more inspiration, creativity, and stamping fun with The Blank Page Muse and I Brake for Stamps:

I Brake For Stamps -https://ibrakeforstamps.com/ 

The Blank Page Muse- https://blankpagemuse.com/

FB Fan Page-  https://www.facebook.com/groups/blankpagemuse/

Instagram Shop-  https://www.instagram.com/blankpagemuse/

Instagram Blog-  https://www.instagram.com/blankpagemuseblog/

Twitter-  https://twitter.com/BlankPageMuse

Pintrest- https://www.pinterest.com/blankpagemuse/boards/

Thanks for spending some time with me here today.  See you again soon!

Sunday, January 24, 2021

Create a Vintage Layered Card

 I love steampunk, vintage and layered cards. These all came together for me with this great layered card I am posting for Blank Page Muse.


Check out all the dimension created by using multiple layers!


It all started with the Bingo Collage background stamp stamped on natural color Cougar cardstock and smooshed with Distress Inks.


 Check out these great layers! I love the Hummingbird Steampunk Cog Gears Stamp, cut from a cereal box and embossed with copper powder.

Check out the video here: 


The Wishing You the Very Best sentiment was stamped on Kraft.  The base was cut using a deckle edge trimmer. I inked the edges with Vintage Photo Distress Ink.  This was layered on Ginger and Dark Orange Cardstock.


Thanks so much for stopping by today! I'd love to have you follow/subscribe on my social media sites Instagram, Facebook, Blogger and You Tube.  Be well. Be creative!

Looking for more Inspiration? Click the links below!
The Blank Page Muse Shop
https://blankpagemuse.com/
FB Fan Page
https://www.facebook.com/groups/bla...
Instagram - Shop
https://www.instagram.com/blankpage...
Instagram - Blog
https://www.instagram.com/blankpage...
Twitter
https://twitter.com/BlankPageMuse
Pintrest
https://www.pinterest.com/blankpage...


Tuesday, May 21, 2019

Steampunk Hummingbird Card

Hi Friends,
To create more depth for the background I used different color inks with the same stamp. This allowed me to stretch my supplies. Let's create something a bit masculine and get a bit grungy!

BPM Stamps:
Cogs & Gears Steampunk Background Rubber Stamp
Hummingbird Steampunk Cogs Gears Stamp

Chicken Wire Mesh Background Texture Art Rubber Stamp by Pam Bray Designs


Shop now and save! Use code "BPMDtKaren2019" to save %15 off your total order!

Other Supplies:
ink pads (aqua / silver / black), ink blending tool, card stock (black & aqua), mini brads, black marker, gear embellishment, black twine, clear mounting block, card base (5X7")

Directions:
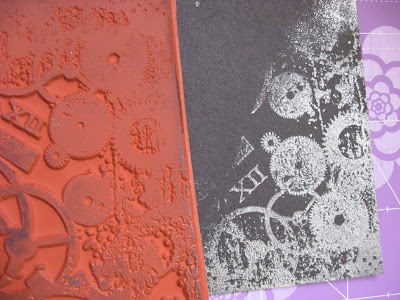
1. Selectively apply silver ink to only the corner of the gear background stamp. To avoid leaving a harsh line, blot the edges of the loaded stamp with a tissue to remove some of the ink so that the intensity of the image gradually fades. Stamp the impression onto the corner of black card stock. Repeat process with other corner and set aside to dry.

2. Load the entire gear stamp with aqua ink and stamp directly to aqua paper. Load the same gear stamp with black ink and first stamp onto scrap paper. The first impression will not be used. Stamp the second generation impression in the corner overlapping the first layer of aqua stamping. The image will be lighter and create a more distressed irregular appearance. Add a honeycomb texture stamp randomly to the background using aqua ink.  Create more depth to the design by using more than one color of ink.  Use an ink blending tool to gently apply black ink to the edges to create a misty haze. Set aside to dry.
 

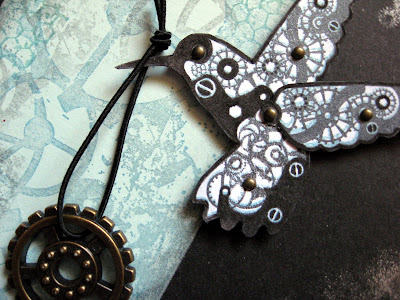
3. Create the embellishment by stamping the steampunk hummingbird onto white card stock using aqua ink. Reload the stamp with black ink and stamp over the first design doing your best to align the images. A perfect line up is not required because you want some of the aqua impression to peek out adding the appearance of more depth to the gears. Repeat the process to create another wing for the hummingbird.

4.  Carefully, cut out the hummingbirds, assemble the second wing, and add mini brads to some of the gears. Use a black marker to outline the hummingbird and darken any important details.

5. Adhere the black card stock vertically to the right side of the card base. Attach the aqua card stock to the left side of the card base leaving a narrow border of black. Add the completed hummingbird to the center of the card with foam tape.

6. Add a loop of twine to a gear embellishment and hook it around the beak of the hummingbird so that it appears as if the hummingbird is carrying the gear.

            Blank Page Muse Shop http://blankpagemuse.com/
            Facebook Fan Page https://www.facebook.com/groups/bla...
            Instagram - Shop https://www.instagram.com/blankpage...
            Instagram - Blog https://www.instagram.com/blankpage...
            Twitter https://twitter.com/BlankPageMuse
            Pinterest https://www.pinterest.com/blankpage...

To see more of Karen's projects, visit her blog Art & Soul.

Copyright Text

Blank Page Muse 2018 Sin City Stamps 2013