Showing posts with label correspondence. Show all posts

Sunday, August 6, 2023

Fantastic Plastic (in PINK)!!!

Hi Stamping & Crafting Fans

Hope everyone has been enjoying the crafting inspiration from the DT here at the Blog!

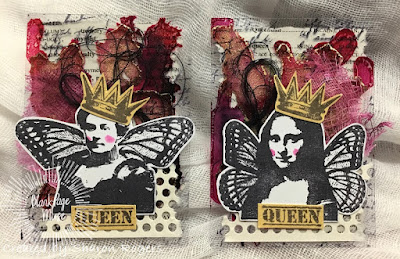
I've been making time for crafting lately and it has been great - even doing a few classes and an ATC swap which has inspired my post for today!


I love using acetate to make things and recently I participated in an Aussie swap Pink/Plastic themed ATC swap so I decided to make a few more using BPM stamps and accessories available in store!

To start I cut some thick acetate to ATC size and used shades of pink and gold alcohol ink - alcohol ink I've had for years and never used! I love the effects of the different colours moving and blending with each other!


Stamps used:
Correspondence Set by Katy Leitch - Script stamp


***Remember to us the code BPMSharon at the store for 15% off ***
So many fab stamps to choose from!
Note: you can use the code at either the IBFS Store OR the BPM Store - why not do an order from each and increase your stash!

Thursday, June 17, 2021

Say it by Journaling It!

 Hi Again BPM Fans!

Hope you are enjoying the creations the DT have been sharing so far this month - always such a wide range of inspiration and different ways to use our Blank Page Muse Stamps!

Today I am sharing a couple of tags using a gelli plate and stamps to follow our "Say It" theme for the month!

Hope you enjoy!


Supplies:
Blank Page Muse Stamps: Correspondence Pens, Ink & Postage Set designed by Katy Leitch
Blank Page Muse Stamps: Art Journaling #2 Set "Journal It" stamp designed by Teri Sproul
Small Gelli Plate
Acrylic Paint & Brayer
Black Ink Pad
Tags
Washi tape
General supplies: glue, scissors, scrap black twine, scrap washi tape.

Instructions:
Start by stamping the ink pot, pens and journal it wording onto white card and fussy cut.


Brayer your acrylic paint over the gelli plate.


Use the wording stamp to stamp over the gelli plate.


Lay your plain tag over the gelli plate and pick up the stamped paint. Allow to dry.


Stamp the excess paint the wording stamp has picked up off the gelli plate and stamp it onto a plain tag - this way you actually create two tag backgrounds at once!


Edge the tags with the black ink pad along with the "journal it" wording. Add a scrap of washi tape and arrange your stamped images onto the tag and adhere. finish off with a piece of black twine at the top of the tag.


Happy Stamping!

Sharon

Don't forget to check us out at all of our social media sites
The Blank Page Muse- https://blankpagemuse.com/

Thursday, February 4, 2021

Vintage Slim Romantic Card

Greetings!  Today I am excited to share my tag I created to go along with this month's challenge  theme at Blank Page Muse which is ROMANCE! I admit I was inspired by all the vintage goodness that was created for last month's challenge.  I also decided to hop on the slim line card trend and make this card slim!  

To recreate this card you will need:

Other Supplies - Distress Inks, Water Color Markers (to stamp images), Card stock, Tag, patterned paper, and ribbon

Start by creating your slim card.  Cut a piece of white card stock to 7 x 8 1/2 inches.  Score and fold to create a 3 1/2 x 8 1/2 inch card. Cut a piece of patterned paper slightly smaller than your card base and adhere to your card. 


Using Blank Page Muse Rose Flower with Leaves Art Rubber Stamp by Terri Sproul, color stamp with markers and stamp repeatedly onto your tag. 


I just love the vintage look of this tag!  Stamp Blank Page Muse LOVE Fancy Word Art Rubber Stamp Small onto bottom of your tag.   Mat your tag onto cardstock. 

Add matted tag to your card and finish with a satin-y ribbon to complete that vintage look!
I hope you are inspired to get creative with your Blank Page Muse Supplies.  For more inspiration, be sure to follow us at 

The Blank Page Muse- https://blankpagemuse.com/


FB Fan Page-  https://www.facebook.com/groups/blankpagemuse/


Instagram Shop-  https://www.instagram.com/blankpagemuse/


Instagram Blog-  https://www.instagram.com/blankpagemuseblog/


Twitter-  https://twitter.com/BlankPageMuse


Pintrest- https://www.pinterest.com/blankpagemuse/boards/


Sunday, May 19, 2019

Happy Father’s Day card

Hello there all our fellow BPM fans! Jess here with you sharing a card using some of those famous red rubber stamps!! This time it's a different masculine take on Father's Day. I just love this stamp set by Kate Leitch! Come along, let's craft a unique Father's Day card together!

Products used:
Spectrum Noir: Watercolor paper
7 Dots Studio: Hazy Days
Prima Marketing Inc. Junkyard Findings: Lightbulb
Ranger Ink: Archival Black ink
Hobby Lobby: Wooden gears
American Crafts: Sticky Thumb - foam dots
Black and White gesso
(Shop now and save! Use code BPMDtJessica2019 to save %15 off your total order!)

I am in LOVE with this stamp sheet! The possibilities are endless!!
1. Cut your desired card size
Do you like using up scraps in your stash? Well, here's your chance
Pull out some of your paper scraps
2. Begin by cutting them at different lengths and sizes
3. Stamp and cut out your images using black ink

4. Take some large pieces of scrap paper and mount the two larger stamped images onto them
5. Cut them out leaving a thin boarder around the images
6. Start mounting your paper layers using tape

7. Use some foam dots or cardboard pieces to mount your top layer of stamped images


8. Adorn the card with some wooden gears adhering them with tacky glue
9. Finally, splatter the front of the card with watered down white and black gesso

You have finished your card! 
Here are some close-ups for you to enjoy!


Thank you for stopping by today!
We look forward to seeing you next time!

Visit and follow us for more inspiration:

Wednesday, May 1, 2019

Just a Note

Hello there all our fellow BPM fans! Jess here today sharing with you a note card using some of those fabulous red rubber stamps!! This month, I'm going for a more masculine appeal. I just love this stamp set by Kate Leitch too! Come along, let's craft some fun pieces for the guys in our lives!

Products used:
Blank Page Muse: Seth Apter Rocky Road embossing powder
Spectrum Noir: Watercolor paper
Ranger Ink: Archival Black ink
American Crafts: Sticky Thumb - foam dots
(Shop now and save! Use code BPMDtJessica2019 to save %15 off your total order!)

Here is a fun photo of the stamp sheet I used!

You cannot tell me that this script stamp is not GORGEOUS! I just had to show it off a bit!
1. Cut your desired note card size
2. Begin by distressing the edges of your paper with a pair of scissors or other tool of your choice
3. Get out your stamp, embossing pad, and powder

4. Emboss your script stamp directly in the middle of the card
5. Heat emboss your stamped script using your heating tool
6. Stamp and cut out your images using black ink
I like leaving a very thing white line surrounding the images to make them POP.


6. Now get out your distressing tool of choice and some ink. We are getting inky!
7. Start blending from the edges inward
The idea here is to have the inner part of the note card the lightest, making the stamped images the focal point. 
8. Finally, use some foam dots or cardboard pieces to mount your stamped images.

Here we are! We have our finished notecard! 
Here are some close-ups for you to enjoy


 Thank you for stopping by today!
We look forward to seeing you next time!

Visit and follow us for more inspiration:

Wednesday, September 26, 2018

Pockets full of inspiration

Hi Everyone,
Jess here today.  I am a huge reader.  I love everything about books.  Remember when you used to have to sign out your books at the library by writing your name on the card in the pocket?  Today I have a project for you using library pockets.


Blank Page Muse Products:

Other Supplies:
Library Pockets
Paper Dolls
Photobooth Photos
Distress Inks
Distress Oxide Ink
Archival Inks
Adhesive
Chipboard Sentiments
Bronze Paint
Vintage Sheet Music
Heavy weight thread
Milk Cap
Die Cuts
Mini flashcard
fabric tape
Frosted Crystal Embossing powder
Cardstock
Paper Distresser

Start by using a piece of silver cardstock. Coat the cardstock using Distress Ink and Oxide Ink.  Once the ink is dry use archival ink to stamp the  Small Crackle stamp.  Using a paper distresser rough up all the edges and cover the front of your library pocket.  
Stamp a piece of vintage sheet music with the postal stamp from the Correspondence  set.  Slide the paper into the pocket and glue it in place.  Add your 3d embossed border to the top of the pocket.  Stitch a small "x" onto your photo and glue it onto the crackled background.  Glue on the milk cap and chipboard sentiment. 
Stamp out the small Butterfly using archival ink.  Add bronze paint to the edges and cut the butterfly in half.  Add the wings to a paper doll and slide her into the pocket. 

This will complete your front cover. 


 Line a second pocket up to the backside of your first pocket.  Using a piece of fabric tape attach the pockets together.  Line the backside of your first pocket with a vintage airmail envelope.  Use postage stamps from the Correspondence  set in various spots.
Using archival ink stamp a Hot Air Balloon.  Color the balloon using various shades of blue distress ink.  Fussy cut your balloon and use the bronze paint to cover your raw edges.
Adhere the balloon to the page.  Add a paper doll, chipboard sentiment, and die cut globe.  Using the smallest  of the Feathers stamp them all around your page.  

   Use patterned scrapbook paper to cover the pocket on your next page.  Add the Pointing Hand and Feathers to the top of the pocket.   

Use the   Small Crackle stamp to add age to a tiny flashcard.  Use bronze paint around the edges. 
Add paper doll with die cut suitcase into the pocket.
Here are the middle pages. 


For the back of the second page(your back cover), stamp on a plain piece of cardstock. Use the script stamp from the Correspondence  set, the  Small Crackle stamp, Sequin Waste, and the  Feathers.  I used various shades of archival inks in browns and reds to create my background.  Glue the paper to your pocket.  Rip a piece of patterned scrapbook paper and add it to the edge.  Stamp out a couple Feathers using archival ink and fussy cut them,  Add the tiniest hint of blue using distress inks to the feathers and edge in bronze paint.  Cut a small slit in your photo and slide the feathers in to make them appear to be wings.  Glue remaining pieces to complete your book.     
I hope you enjoyed this project as much as I enjoyed creating it.


Thanks for coming by!
Please visit the following for more inspiration!


Friday, September 15, 2017

Ink


Hello Peeps,
  Today's card is one of my favorites.  I think it can be used for many different occasions. I like the old time effect that the Sin City Stamp Set Correspondence Pens, Ink & Postage gives to the card. I have created the card using the collage technique.

Supplies:
  Grunge stamp
  Various collage pieces
  Brown  and black ink
  Cream colored card stock
  Foam Tape

Step 1:  Stamp the background using the script background stamp in brown.


Step 2:  Using brown ink blend/ink the edges of the card layer.  Add grunge spots to age/fill in the layer.  Not shown in this picture but, added to layer was additional stamping of the flourish stamp from this set to fill  in the open spaces.


Step 3:  Stamp in black ink various stamps: pen, ink well, postage stamps and cancellation mark.  Cut out all of these stamps to be added to card.


Step 4:  Start assembling card layer by adding various collage pieces using foam tape to give the layer depth.
  I even stapled one of the pieces onto the layer.


Step 5:  Continue to layer on the pieces including the stamped pieces from the stamp set. Placement of collage pieces is always by personal preference.  I choose to rough up the edges of this layer to give it an even greater aged look.


Step 6:  Attach to cream card base.


I hope you like this card as much as I do.  As always, feel free to take this design and make it your own by adding which ever pieces you like.
Please share your designs with us at Sin City Fan Page on Facebook.

X

Copyright Text

Blank Page Muse 2018 Sin City Stamps 2013