Showing posts with label Flamingo Row. Show all posts

Thursday, May 16, 2024

Bookmarks and More


Sue here with bookmarks for you today.

Bookmarks are always good to have around for a little gift to give to your friend that likes to read. 
Here are 2 bookmarks using the stamp flower image, but completely different.  One is stamped on black card with white pigment ink.  The other stamped on white card with colored inks.  I also made a pocket for the bookmark.

Stamps used:

Blank Page Muse Special Day Flowers Hello Friend stamp set

Blank Page Muse Flamingo Row rubber stamp

See more on my blog. 

Thanks for stopping by.  Come back again soon.


Saturday, October 19, 2019

Beach Tote

Hello! Kelly here today with a quick tip on making those plain grocery bags into something spectacular!!


I don't know about you, but I have lots of those reusable totes for groceries, the beach, and shopping in general. You know the ones, they usually have a big logo on one side and are made of plastic but are reusable. Well, I was headed to the beach the other day and I was looking for a tote to put all of the towels into when I came across one with pink palm trees all over it...now I am not sure where I got this one, it doesn't have the store logo on it but it did need a make-over!! Here is what it looked like...not the prettiest bag I have ever seen but I thought I could make it work with some stamps and ink!


So with that thought, I pulled out my Stazon Inks and the following stamps - 

 
Just stamp the images onto the tote with Stazon and let dry for a few minutes, your tote is now ready for the beach. 


Stazon ink can be used on many items such as hard plastic, fabric, shrink plastic, cellophane, glass, leather, metal, and more!!

Check out our other projects here - 
The Blank Page Muse- https://blankpagemuse.com/

Monday, July 22, 2019

Snail Mail Envelopes

Hello! Isn't it fun to receive colorful snail mail? My postman, who is a big burly guy,  always wonders what is in those colorful packages and I tell him glitter and girly stuff!

Today on the blog, I have some colorful and quick snail mail envelopes that you can create with Blank Page Muse red rubber stamps, they stamp the best!!


Supplies -
Flamingo Row
Correspondence Pens, Ink and Postage
Unicorn Wishes
 5" x 7" white envelopes
Distress Oxide Inks in several colors
VersaFine Clair Ink - Nocturne

To create all three of these envelopes, start with laying out the stamps and then stamping with VersaFine Clair ink leaving an area for the recipients' address. Then using DO inks and a blending tool add random bits of color to the envelope.

  Front of the envelope

 
Back of envelope


Check out the links below for all of your red rubber stamp needs at Blank Page Muse and follow us for lots of very cool projects!

The Blank Page Muse Stamps - https://blankpagemuse.com/


Wednesday, March 27, 2019

Flamingo Card

Hello BPM Fans!!

Today I would like to show you how I created a Flamingo card for the Under the Sea theme this month.  I was a bit out of my element for the projects this month and I am not a big ocean/sea fan. I like to sit in my pool in the summer, fewer animals in my pool and no sand to drag into the house later! I work a lot of hours and I like to have time to create and not spending all my time cleaning house!


Supplies used 
Blank Page Muse Stamps -

(Shop now and save! Use code BPMDtKelly2019 to save %15 off your total order!)

Other supplies used - 
tissue paper
ink in 3 pink colors
black ink
markers
glue stick
stamp platform
foam tape
white embossing powder
Versamark ink
black cardstock
white watercolor paper
white card base

1. Using the different pink inks, stamp them randomly in a line on a piece of white tissue paper with stamps from the Background Grunge sheet and the Hearty Doodles sheet, then using the black ink, stamp the Open Weave Fishnet in a line on white tissue paper. I used the circles from the Background Grunge stamp and repeatedly stamped them over each other. I used the script stamps from the Correspondence Pens sheet and stamped it in a line on the white tissue paper. 

Quick tip - To tear the tissue paper, use a fine line brush with very little water and draw a line down the tissue paper, tear along this line to give you a nice torn edge.

2. Taking one of your stamped tissue pieces, glue it down about 2/3 from the edge of the black cardstock. Repeat with the other two layers. 


3. Using the stamp platform, stamp the Flamingo several times onto watercolor paper then color the flamingo with markers. I used several colors over each other to get the effect I was looking for on the feathers. Then fussy cut the flamingo and glue it over the layered tissue paper. 
4.  Next, using the Dear Beach sentiments the were cut apart, stamp in Versamark ink onto black cardstock and heat emboss with white embossing powder. then trim down to fit across the card front. 


This card could be used for any occasion!  Don’t forget to check out the stamps at Blank Page Muse.

The Blank Page Muse- https://blankpagemuse.com/


Tuesday, August 21, 2018

Born to Stand Out Card

Hey There BPM Fans,

If you know a teen, then you know it can be difficult to find the right card for them. Whatever, the occasion, this is a sure a winner. It is simple, bright, and full of fun. Maybe just to brighten their day or as a pick me up during a difficult time. Let your special teen know they are not alone and you are in their corner.
Born to Stand Out Card

Blank Page Muse Stamps:   www.blankpagemuse.com
Art Journaling Mixed Media Stamps Set 1 Pam Bray Designs
Just Us Girls Line Figures Stamp Set
Flamingo Row Red Rubber Art Stamps by Pam BrayDesigns
         
Other Supplies:
  • black ink pad
  • white cardstock 
  • rainbow ink pad
  • clear mounting block
  • black marker
  • black cardstock
  • orange card base (5x7")
Directions:
1. Ink the striped background stamp with a rainbow ink pad and stamp onto white cardstock.  Make three impressions and carefully cut them out.

2. Next, adhere them to the middle of a orange card base.  Leave a narrow gap between each panel to create a split panel background with three distinct parts.

3. Stamp a feminine figure onto white cardstock and use a black marker to color it in to create a silhouette. Carefully, cut out the silhouette and adhere it between two of the rainbow striped panels.

4. Ink an encouraging sentiment stamp with black ink, stamp it onto white cardstock, and matte it with black cardstock.  Finally, doodle a simple narrow border around the card with a black marker.

A Closer Look:
 

            Blank Page Muse Shop http://blankpagemuse.com/
            Facebook Fan Page https://www.facebook.com/groups/bla...
            Instagram - Shop https://www.instagram.com/blankpage...
            Instagram - Blog https://www.instagram.com/blankpage...
            Twitter https://twitter.com/BlankPageMuse
            Pinterest https://www.pinterest.com/blankpage...

To learn more about our designer Karen, please visit her blog, Art & Soul.

Wednesday, August 15, 2018

Artist Trading Coins Tropical Dreams


Hello all

It is officially summer and boy it is hot out there. Who is dreaming of far away exotic places and tropical paradises? I am so i made these tropical themed artist trading coins to tide you over while you wait to win the lottery. 
 If anyone is going to Barbados can i squeeze into your suitcase?


Start off by applying ink to die-cut card circles. 
They need to be 2.5 inches in diameter. 


Next take a light green ink or any light colour and stamp feathers onto the background.


Then take a slightly darker ink and use a texture stamp to add another pattern to the background.


Stamp out the little pieces and colour them in before cutting them all out.


Place the pieces on to the coins and glue them in place.


Product List

Circle nesting die
Card
Ink pads
Colouring Pencils
Small gems


Please visit us for more inspiration at the following links...

That's Crafty  UK And Worldwide here http://www.thatscrafty.co.uk/blank-page-muse.html


Pinterest https://www.pinterest.com/blankpage...


Thank you for visiting and please send me a postcard if you go anywhere exotic. 

Monday, July 23, 2018

Standing Tall Flamingo ATC's

Hey Friends,
For my set of ATC's, I created a simple background with a border stamp. Then, I stamped the large flamingo onto pattern paper and fussy cut it.  To make the quote more visible, I painted over it with a stroke of pink watercolor paint.  Sometimes things can be simple yet still stunning. 
Don't forget to share your projects with us on the Blank Page Muse Fan Group.


https://blankpagemuse.com/flamingo-row-red-rubber-art-stamps-by-pam-bray-designs-pb007/
visit www.blankpagemuse.com
Follow us on Facebook and Pinterest.
Join the Blank Page Muse Fan Group...HERE

Thanks for stopping by!

Monday, June 4, 2018

Special Guest Mitsyana Wright has a colorful play with Pam's cute Flamingos!


Good Morning! Today we have a very special treat to share and make your morning colorful and fun! Great for a Monday, right?? We have a very special Guest Designer, Mitsyana Wright. We were so thrilled when she agreed to have a play with Pam's new flamingo stamps! So fun! Please hop over to her blog and leave some love!
*****************

Hey, Crafty Friends!! 
Boy, is it HOT! I don't know where Spring went but it's long gone and hiding!
My kids are already out for summer break and they are enjoying all the sunshine. swimming, running, lots of screaming laughter... that's what we're down for in these next couple of months. All of which reminds me of my of my childhood days growing up in Hawaii. Tropical weather and visits to the zoo where at the foot of the entrance gates flamingoes await visitors. Yup, those were the days. They were a bit stinky but those flamingoes sure were pretty! Lots of these majestic birds standing on one leg or rubbing beaks, occasionally spreading their wings for a stretch. How I want to share memories like those with my children.

So, when Blank Page Muse released my good friend Pam Bray's newest stamp set, it brought back all kinds of feels! I immediately fell in love with these stamps!! And when Kim (owner of Blank Page Muse) and  Pam asked if I would like to create with these stamps, I literally squealed!! I've always loved Pam's designs and of course, I had to jump at the opportunity! What's even better is that all of these stamps are made of deeply etched red rubber! So I know the impression is gonna be amazingly crisp and clear! And boy, was I right! It makes a HUGE difference, especially with detailed stamps such as these!

And in the spirit of my childhood memories, I created this #10 sized Tropical Flamingo Card.


Supplies Used 
Pam Bray Flamingo Row (Blank Page Muse)
Tim Holtz Tropical Dies (Sizzix)

Tim Holtz Stitched Ovals (Sizzix)

Tim Holtz Labels (Sizzix)
Mixed Media Paper (Strathmore)
Sun Drenched (Paper House)
Chalkboard Stack (DCWV)
Cardstock- Light Green, Orange
Vellum
VersaFine (Tsukineko/ Imagine Crafts)
Tim Holtz Distress Markers- Worn Lipstick, Picked Raspberry, Hickory Smoke (Ranger)

Clean Color Real Brush Marker- No. 052 Bright Yellow, No. 023 Scarlet Rd (Zig/ Kuretake)
Eileen Hull Blends- Leaf, Frog, Melon (Clearsnap)
MISTI Stamping Tool (My Sweet Petunia)
Hemp Twine
Mixed Media Glue
Foam Adhesive

Aqua Brush (Pentel)

Stylus


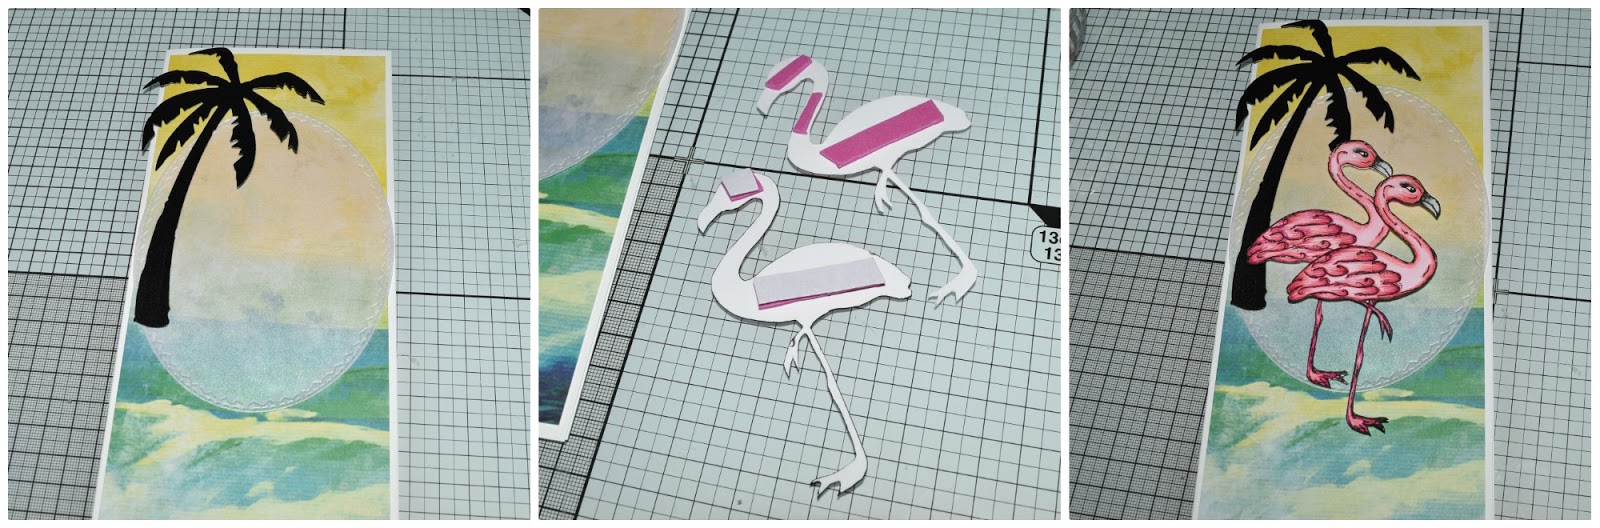
I started by stamping my faves from the set... FLAMINGOS!! I stamped them onto mixed media paper using Versafine Onyx Black ink.  Then colored in m images using my Tim Holtz Distress Markers. First coloring most of the bird with Worn Lipstick. I blended out the color using a water brush then went back in to add a second layer using Picked Raspberry to add more depth. Then colored the beaks with Hickory Smoke.


Once I was satisfied with my coloring and the images were completely dried, I cut out both flamingoes by hand with scissors.


I die cut monstera leaves out of light green cardstock using Tim Holtz's Tropical Dies by Sizzix. I cut 3 leaves altogether.


Then shaded around the edges using Eileen Hull's Blends inks in Leaf, then in Frog.


After the ink was completely dried, I used a ball stylus to add dimension and shape the leaves.


Using the leftover scraps from my flamingoes, I stamped these little stemmed flowers using more Versafine ink. I didn't need the stems so stamping the entire stamp perfectly wasn't necessary. As long as all the flowers were intact I was good to go!


I colored these dainty flowers using, my Zigs in Bright Yellow, blended out toward the center with a water brush, then added Scarlet Red in the centers and blended outward with the water brush.


Once the flowers were all dried, I fussy cut them out, then creased each petal down the center to give them more dimension.


For the hibiscuses... again used dies from the Tropical set, and die cut from orange cardstock. I shaded along the edges using the Melon Blends ink.


I separated each petal from the flower and creased and folded them, then re-attached them to the cut-out centers with glue.


Disassembling them then re-assembling them gave them a whole lot more dimension.


For the card base, I cut patterned paper from PaperHouse's Sundrenched collection

to measure 3-3/4" x 9".


I used my Xyron Mega Runner to mount it onto a 4-1/8" x 9- 1/4" card base made from 110 lb white cardstock.


I  wanted a center focal point that wouldn't block out all that gorgeous ocean scenery. So, I die cut an oval out of vellum using Tim Holtz's Stitched Ovals. I ran the oval through my Xyron Crative Station with a 5" permanent refill cartritdge. Then adhered it to the card front.


I anchored the oval with a palm tree cut from black chalkboard paper die using the palm tree die from the same Tropical die set.


I attached foam adhesive sheets to the back of the flamingoes and attached them to the oval then arranged the flowers and leaves and tucked in loops made from hemp twine.


I thought the "I'll stand by you... Today, Tomorrow, Always" sentiment went perfectly with this pretty pink couple. So I stamped it onto more mixed media paper and die cut it out using a label from the Tim Holtz Labels die set and shaded the edges with Eileen Hull's Sunshine blends ink.


And at the very last minute, I decided to re-mount the card front with a black mat made with more of that deep black chalkboard paper. It gives a nice balance of black throughout the card, don't you think?!


And here is my finished card...


CLOSE-UPS


I hope you enjoyed this card tutorial and definitely take a peek on over to Blank Page Muse!! Pam Bray has so many more amazing stamps sets you need to check out!!

Thanks for stopping by!!

Until next time...
HAPPY CRAFTING!!

~Mitsyana

Copyright Text

Blank Page Muse 2018 Sin City Stamps 2013