Good Morning! Today we have a very special treat to share and make your morning colorful and fun! Great for a Monday, right?? We have a very special Guest Designer, Mitsyana Wright. We were so thrilled when she agreed to have a play with Pam's new flamingo stamps! So fun! Please hop over to her
blog and leave some love!
*****************
Hey, Crafty Friends!!
Boy, is it HOT! I don't know where Spring went but it's long gone and hiding!
My kids are already out for summer break and they are enjoying all the sunshine. swimming, running, lots of screaming laughter... that's what we're down for in these next couple of months. All of which reminds me of my of my childhood days growing up in Hawaii. Tropical weather and visits to the zoo where at the foot of the entrance gates flamingoes await visitors. Yup, those were the days. They were a bit stinky but those flamingoes sure were pretty! Lots of these majestic birds standing on one leg or rubbing beaks, occasionally spreading their wings for a stretch. How I want to share memories like those with my children.
So, when
Blank Page Muse released my good friend
Pam Bray's newest stamp set, it brought back all kinds of feels! I immediately fell in love with these stamps!! And when Kim (owner of Blank Page Muse) and Pam asked if I would like to create with these stamps, I literally squealed!! I've always loved Pam's designs and of course, I had to jump at the opportunity! What's even better is that all of these stamps are made of deeply etched red rubber! So I know the impression is gonna be amazingly crisp and clear! And boy, was I right! It makes a HUGE difference, especially with detailed stamps such as these!
And in the spirit of my childhood memories, I created this #10 sized Tropical Flamingo Card.
Supplies Used
Mixed Media Paper (Strathmore)
Chalkboard Stack (DCWV)
Cardstock- Light Green, Orange
Vellum
VersaFine (Tsukineko/ Imagine Crafts)
Tim Holtz Distress Markers- Worn Lipstick, Picked Raspberry, Hickory Smoke (Ranger)
Clean Color Real Brush Marker- No. 052 Bright Yellow, No. 023 Scarlet Rd (Zig/ Kuretake)
MISTI Stamping Tool (My Sweet Petunia)
Hemp Twine
Mixed Media Glue
Foam Adhesive
Aqua Brush (Pentel)
Stylus
I started by stamping my faves from the set... FLAMINGOS!! I stamped them onto mixed media paper using Versafine Onyx Black ink. Then colored in m images using my Tim Holtz Distress Markers. First coloring most of the bird with Worn Lipstick. I blended out the color using a water brush then went back in to add a second layer using Picked Raspberry to add more depth. Then colored the beaks with Hickory Smoke.
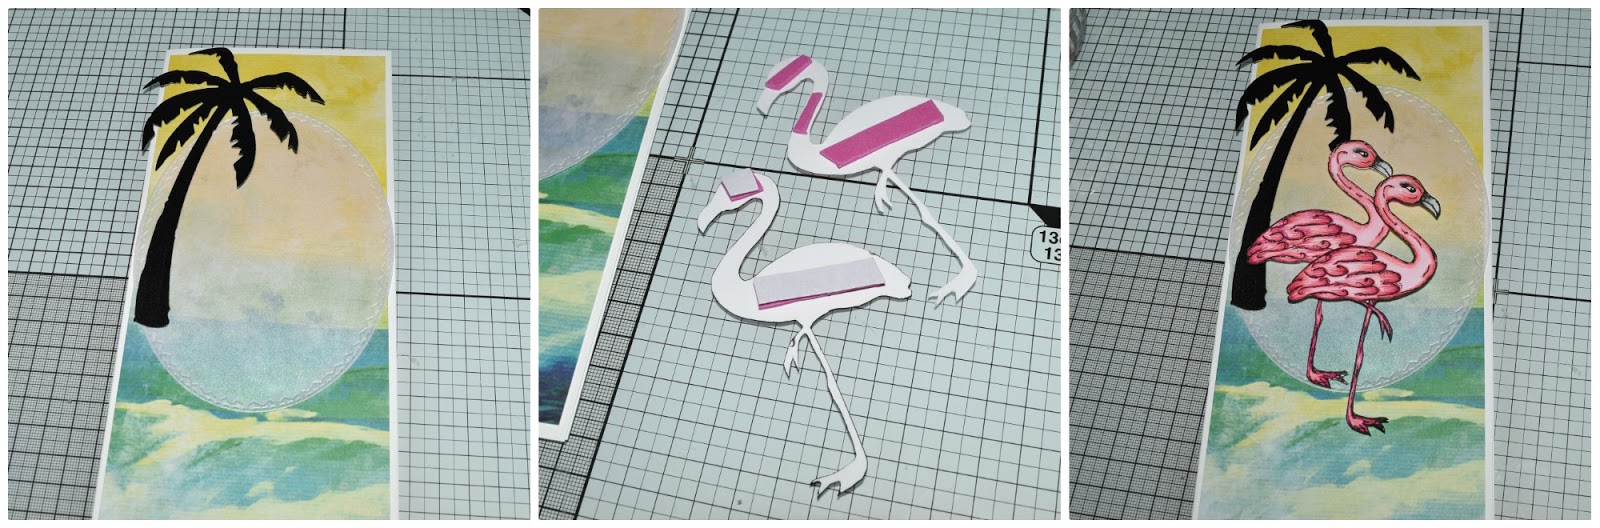
Once I was satisfied with my coloring and the images were completely dried, I cut out both flamingoes by hand with scissors.
I die cut monstera leaves out of light green cardstock using Tim Holtz's Tropical Dies by Sizzix. I cut 3 leaves altogether.
Then shaded around the edges using Eileen Hull's Blends inks in Leaf, then in Frog.
After the ink was completely dried, I used a ball stylus to add dimension and shape the leaves.
Using the leftover scraps from my flamingoes, I stamped these little stemmed flowers using more Versafine ink. I didn't need the stems so stamping the entire stamp perfectly wasn't necessary. As long as all the flowers were intact I was good to go!
I colored these dainty flowers using, my Zigs in Bright Yellow, blended out toward the center with a water brush, then added Scarlet Red in the centers and blended outward with the water brush.
Once the flowers were all dried, I fussy cut them out, then creased each petal down the center to give them more dimension.
For the hibiscuses... again used dies from the Tropical set, and die cut from orange cardstock. I shaded along the edges using the Melon Blends ink.
I separated each petal from the flower and creased and folded them, then re-attached them to the cut-out centers with glue.
Disassembling them then re-assembling them gave them a whole lot more dimension.
For the card base, I cut patterned paper from PaperHouse's Sundrenched collection
to measure 3-3/4" x 9".
I used my Xyron Mega Runner to mount it onto a 4-1/8" x 9- 1/4" card base made from 110 lb white cardstock.
I wanted a center focal point that wouldn't block out all that gorgeous ocean scenery. So, I die cut an oval out of vellum using Tim Holtz's
Stitched Ovals. I ran the oval through my Xyron Crative Station with a 5" permanent refill cartritdge. Then adhered it to the card front.
I anchored the oval with a palm tree cut from black chalkboard paper die using the palm tree die from the same Tropical die set.
I attached foam adhesive sheets to the back of the flamingoes and attached them to the oval then arranged the flowers and leaves and tucked in loops made from hemp twine.
I thought the "I'll stand by you... Today, Tomorrow, Always" sentiment went perfectly with this pretty pink couple. So I stamped it onto more mixed media paper and die cut it out using a label from the Tim Holtz Labels die set and shaded the edges with Eileen Hull's Sunshine blends ink.
And at the very last minute, I decided to re-mount the card front with a black mat made with more of that deep black chalkboard paper. It gives a nice balance of black throughout the card, don't you think?!
And here is my finished card...
CLOSE-UPS
I hope you enjoyed this card tutorial and definitely take a peek on over to
Blank Page Muse!! Pam Bray has so many more amazing stamps sets you need to check out!!
Thanks for stopping by!!
Until next time...
HAPPY CRAFTING!!
~Mitsyana