Showing posts with label Hearty Doodles. Show all posts

Monday, June 24, 2019

Dragonfly Mini Art Journal Page


Hello Blank Page Muse Fans!  Today, I thought I would share a mini art journal page that was recently added to my Bullet Journal.  This is a 8.2" X 5.5" format size, so the design could be used on an over-sized card as well, or expanded into a full sized 8.5 X 11 page with room to add more stamped dragonflies.


Supplies:
8.2" X 5.5" notebook page
Dragonfly Stamp
Flower border
Happiness Blooms from Within Sentiment Stamp
United Rings Stamp from Hearty Doodles set
Black Pigment Ink
White Pigment Ink
Clear embossing Powder
Distress Crayons [Gelatos or similar water based ink can work, in this case Mermaid Lagoon and Peacock Feathers by Tim Holtz Distress Oxides were used]
Brush [A watercolor brush with it's own reservoir was used in this case]
Water

Instructions:
1. Scribble a mid-range green Distress Crayon across the top of your blank page filling in half of the page.  Taking your blue, scribble from the bottom to the middle of the page. Overlap a bit in the center. 


2. Using your brush and some water, brush across the page, blending the crayons and diluting the colors.  Pull edge to edge, drawing out the color to the paper borders.  It should look like a light wash of color framing the heavier colored center. Once  it's all blended out, allow to dry.


3. Once dry, stamp out corner (upper left) to opposite corner (bottom right) in black pigment ink the flower border and emboss.


4. Stamp Sentiment with black pigment ink centered on page, then embossed.


5. Stamp the dragonfly on the left side, near the text and the flowered border stamp. Emboss with the clear powder.


6. Inking up with white pigment ink, stamp the Linked-Circle stamp a bit randomly, filling in some of the negative space and open areas.  Emboss using the clear embossing powder.


I found this page was super easy and an inspirational way to enjoy the beginning of the summer months.


More ideas & crafts by Mercy

Want an extra 15% off on your next order? Use this code on your order! Good until June 1, 2019. BPMDtMercy2019

Monday, May 13, 2019
Clockwork Tag

Don't you just love steampunk?
Look at this beautiful tag that Suzette made using stamps from Blank Page Muse!


  1. She began by covering the tag with coffee stained book paper for a vintage look. 
  2. Next she added gesso in areas to push back the background some. 
  3. When that was dry she stamped the tag using Vintage Analog Alarm Clock Rubber Stamp and Versafine Black Ink.
  4.  Some Sepia Golden Fluid Acrylic was added, taking care not to cover the clock-face. 
  5. Finally, she stamped the background with  The Hearty Doodles Art Rubber Stamp Set and stuck on some gears.

Thank you so much for stopping by. I do hope you enjoyed this tutorial. Remember to subscribe so you don't miss a post and look us up on social media (links below).

Happy crafting!
Suzette


Monday, May 6, 2019

Inked Embossed Folder Card

Hello! So glad you stopped by to check out this quick project today! 
It is a quick and easy way to color a background.


Supplies –
Music Embossing Folder
Archival Ink Jet Black

I don’t know about you but I like to get many different uses from my tools and supplies because then it feels like you have a lot of stuff to play with, this technique is a great way to get dual duty from your embossing folders! 


Simply ink the raised side of the embossing folder with your choice of ink, slide in your paper and run it through your embossing machine or die cutting machine then open the folder and see the wonderful results.  Think of the possibilities!


The Blank Page Muse- https://blankpagemuse.com/

Thursday, April 25, 2019

A Mighty Flame Art Journal Page

Hi all
I am back with a layered art journal page using The Blank Page Muse Stamps.


Products used 
Lindy's Magicals California Poppy, Oktoberfest Orange, Oomp papah Pink, 
Ranger Archival inks Burgundy, Vermillion, Black
DecoArt Gesso, Modeling paste
StencilGirl(R) Doodle It Bigger


Instruction:
Use a stencil mask on the blank page.
Apply texture stamps to the background.


Apply a layer of gesso
Add red and yellow inks to the page.
Apply another layer of gesso.


Add more texture stamps and emboss some of them with embossing powder.
Stamp out the steampunk dragon and spray with ink.
Cut out and add to page


Finish with a sentiment.


Thank you for visiting

The Blank Page Muse Shop http://blankpagemuse.com/
That's Crafty  UK And Worldwide here http://www.thatscrafty.co.uk/blank-page-muse.html
FB Fan Page https://www.facebook.com/groups/bla...


Wednesday, March 27, 2019

Flamingo Card

Hello BPM Fans!!

Today I would like to show you how I created a Flamingo card for the Under the Sea theme this month.  I was a bit out of my element for the projects this month and I am not a big ocean/sea fan. I like to sit in my pool in the summer, fewer animals in my pool and no sand to drag into the house later! I work a lot of hours and I like to have time to create and not spending all my time cleaning house!


Supplies used 
Blank Page Muse Stamps -

(Shop now and save! Use code BPMDtKelly2019 to save %15 off your total order!)

Other supplies used - 
tissue paper
ink in 3 pink colors
black ink
markers
glue stick
stamp platform
foam tape
white embossing powder
Versamark ink
black cardstock
white watercolor paper
white card base

1. Using the different pink inks, stamp them randomly in a line on a piece of white tissue paper with stamps from the Background Grunge sheet and the Hearty Doodles sheet, then using the black ink, stamp the Open Weave Fishnet in a line on white tissue paper. I used the circles from the Background Grunge stamp and repeatedly stamped them over each other. I used the script stamps from the Correspondence Pens sheet and stamped it in a line on the white tissue paper. 

Quick tip - To tear the tissue paper, use a fine line brush with very little water and draw a line down the tissue paper, tear along this line to give you a nice torn edge.

2. Taking one of your stamped tissue pieces, glue it down about 2/3 from the edge of the black cardstock. Repeat with the other two layers. 


3. Using the stamp platform, stamp the Flamingo several times onto watercolor paper then color the flamingo with markers. I used several colors over each other to get the effect I was looking for on the feathers. Then fussy cut the flamingo and glue it over the layered tissue paper. 
4.  Next, using the Dear Beach sentiments the were cut apart, stamp in Versamark ink onto black cardstock and heat emboss with white embossing powder. then trim down to fit across the card front. 


This card could be used for any occasion!  Don’t forget to check out the stamps at Blank Page Muse.

The Blank Page Muse- https://blankpagemuse.com/


Thursday, March 21, 2019

Dress Form Card

Hello Ladies,
Karen here and I'm bringing a card with a bit of vintage antique which is not my usual style. The muted colors and brown distressed edges are the trademark of the vintage look. The simple dress form suited the seamstress theme I had in mind. This sentiment is perfect to lend that extra bit of support to someone struggling with life's circumstances. Sometimes a simple act of encouragement can really lift someone's spirit. Don't forget to share your creations with us on the Blank Page Muse Fan Page.
BPM Stamps:
Mannequin Tags 2 Rubber Stamp Set
Chicken Wire Mesh Background Texture Art Rubber Stamp by Pam Bray Designs
Hearty Doodles Art Rubber Stamp Set
Everything is Going to be Alright Word Stamp


(Shop now and save! Use code BPMDtKaren2019 to save %15 off your total order!)

Other Supplies:
ink pads (black, rust, blue, green, brown), clear mounting block, ink applicator tool, buttons, liquid adhesive, card stock (craft & maroon), card base (6x6")

Directions:
1. Stamp three mannequin figures each with a different color ink.  Carefully, fussy cut each image.
 

2.  Use brown ink to stamp a honeycomb pattern irregularly creating a wide border along all the edges.
 

3. Adhere the three mannequin figures attaching the center figure with foam tape for added dimension. Stamp the sentiment with black ink near the top right corner.

4. Use black ink to stamp a scratchy speckled pattern subtly along the edge.  Use an ink applicator to lightly distress the edge of the card with brown ink. 

5.  Matte the finished piece on maroon card stock.

6.  Adhere a random collection of buttons at the base of the mannequins.  Attach the matted piece onto a white card base (6x6") leaving a narrow border.

A Closer Look:


www.blankpagemuse.com

Save 15% off your BPM rubber stamp order when you use discount code
"BPMDtKaren2019"
The Blank Page Muse- https://blankpagemuse.com/
Facebook Fan Page- https://www.facebook.com/groups/blankpagemuse/
Instagram Shop- https://www.instagram.com/blankpagemuse/
Instagram Blog- https://www.instagram.com/blankpagemuseblog/
Twitter- https://twitter.com/BlankPageMuse
Pinterest- https://www.pinterest.com/blankpagemuse/boards/

To see more projects by our designer Karen, please visit her blog Art & Soul.

Wednesday, February 20, 2019

Big Dreams

 Hello, hello! Samantha here, back to share another project with you.
     Emboss resist ink blending is one of my favorite card making techniques. It's almost magical to see the embossed image start to become more and more defined as you layer the ink on. BPM stamps are awesome for this technique as they stamp incredibly well.

 
     For this card you will need the following:

  • The linked circles stamp from the
    Hearty Doodles stamp set by Katie Lamb
  • The Dream Big Dreams sentiment stamp
  • Green A2 sized card base
  • Black cardstock panel cut to 5 1/4" x 4"
  • White cardstock panel cut to 7" x 7" 
  • Black cardstock panel cut to 2 7/8" x 2 5/8"
  • White cardstock panel cut to 2 3/4" x 2 1/2"
  • Black ink
  • Pink, blue, and yellow inks for blending
  • Sticky embossing ink pad
  • Clear embossing powder


     To begin you will need to take your linked circles stamp and stamp it repeatedly all across your large white panel, using the embossing ink pad. Make sure you overlap the images frequently. This mimics the look of a full background stamp.


     Cover your stamped panel in clear embossing powder and set with your heat tool.


      Start by applying your yellow ink over the panel. I like using a large USPS envelope as a craft mat when I do my ink blending.


      Next blend in your blue ink.


     Finally use your pink ink and blend in any remaining white spaces. 


Trim your panel down to 5 1/8" x 3 7/8". Don't throw your scraps away! I'm going to show you how to use them to make another card in a different blog post. 


     Layer your embossed panel onto the large black panel and then adhere to your card base.

     
     Ink your sentiment stamp up in black ink. I am so impressed with the way these stamps ink up. There's never any ink beading.


     Stamp onto the small white panel and then adhere that to the small black panel. Attach to the center of the card and you're done!


     I hope that you will be inspired to make a similar card of your own. Thank you so much for taking the time to read my tutorial. I hope you have a wonderful day. Until next time!
~Samantha

Looking for more inspiration?
Click the links below!
The Blank Page Muse Shop
Facebook Fan Page
Instagram- Shop
Instagram- Blog
Twitter
Pinterest


Thursday, January 31, 2019

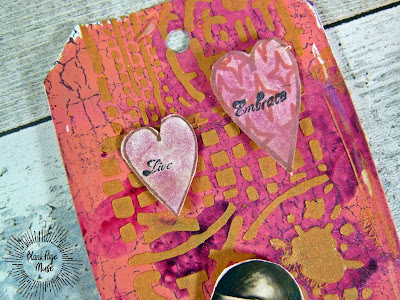
Love Story

Love is in the air as we approach Valentines Day.
 Do you have a secret admirer? 
I have a quick tag to share today.


Stencil
Colored inks
Gold Mica Powder
Modeling paste
Vintage love clip art
card


Use colored inks to color the background of your tag, With black ink, use the crackle stamp next. Place stencil over the tag. Mix some gold mica powder in with a bit of modeling paste and spread onto the stencil, covering all of the tag. Lift up stencil and let the modeling paste set before adding your stamped hearts. 


For more idea's, please visit the following:
Blank Page Muse Shop http://blankpagemuse.com/
            Facebook Fan Page https://www.facebook.com/groups/bla...
            Instagram - Shop https://www.instagram.com/blankpage...
            Instagram - Blog https://www.instagram.com/blankpage...
            Twitter https://twitter.com/BlankPageMuse
            Pinterest https://www.pinterest.com/blankpage...

Copyright Text

Blank Page Muse 2018 Sin City Stamps 2013