Showing posts with label Winged Skeleton. Show all posts

Wednesday, October 23, 2019

Winged Skeleton Card

Hi Everyone, Michelle here with a card to portray my favorite Holiday...Halloween!
I know it's late, but I could not resist. I hope you'll enjoy and be inspired to create your own!


 Supplies:
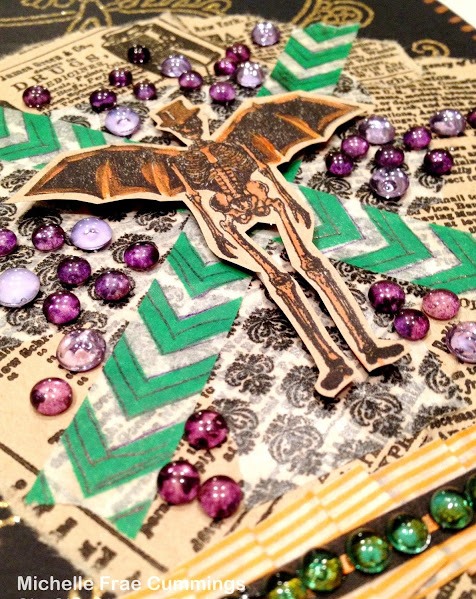
  • Winged Skeleton and "Dead men Tell No Tales" from Halloween Bingo Stamp Set
  • Dew and Diamond drops
  • Vintage news print
  • Scrapbook Paper
  • Assorted washi tapes
  • Pumpkin Smooch
  • precision scissors
  • Black stamping ink
  • Adhesive, foam tape, and a pen.

Start by trimming your scrapbook paper to be a card size of 4"x6".
Next attached several torn pieces of the vintage news print. 
Place some decorative washi tape in the center of the card and some pleat a bit near the bottom.
A few more strips of washi tape were placed on the card before I added decorative detail with the liquid smooch.
Stamp the winged skeleton and the saying onto the back side of the vintage newsprint paper. 
Cut out and color lightly with the smooch.
 I added a criss-cross of washi tape to the center of the card before adding the skeleton with foam tape.


Decoratively add the dew drops and saying.

Happy Halloween! 
-Michelle
Don't forget to check us out at all of our social media sites
The Blank Page Muse- https://blankpagemuse.com/


Wednesday, September 18, 2019

Halloween Trifold Shutter Card

Hello!  Susie on the blog today and I love interactive cards!

My favorite one to make is called a Trifold Shutter Card.  I love it because of all the different surfaces you have to decorate! Added bonus - the recipient can also use it as a bit of home decor because it is free-standing when opened up!  Today I am going to share a quick tutorial for making the card base and show you the Halloween card I made for my mother!

Time to play...


Supplies:
Halloween Takes Flight Stamp Set
Halloween Bingo Stamp Set
Black and white cardstock
Patterned paper
Archival Ink - black
Stamping platform
Scoreboard
Craft knife, ruler
Inks

Directions
Position 5.5" x 12" piece of black  cardstock in scoreboard.
Score at 2", 4", 8" and 10".


Using a craft knife and a ruler, cut a slit between the 2" and 10" score lines 1.5" in from the top and bottom edges.


Fold card as shown, alternating peak and valley folds.  Note: the center section of the card fold in the opposite direction of the top and bottom sections. 


Decorate panels with a mix of stamped images and patterned paper.


The black cardstock panel added onto the front of the card measures 4.25" x 3".
The size and shape of this panel can vary depending upon the size of the stamped image being used.


I have used this card base to create cards for holidays, graduations, anniversaries, weddings and new babies!  Blank Page Muse has stamps that will help you make the perfect card for any occasion!

Thanks for stopping by and I hope you find some time to play today!
Susie


Looking for more inspiration?
Click the links below!


Tuesday, October 15, 2013

Simply Mini Halloween Treat Tags

 If any of you have kids, you know that it's fun to add seasonal treats to their lunches from time to time. Right? I have drawn Jack-O-Lantern faces with a sharpie onto tangerines and labeled a small bag of mini marshmallows as 'snowman poop'!


Copyright Text

Blank Page Muse 2018 Sin City Stamps 2013