Showing posts with label Teri Wils. Show all posts

Sunday, June 27, 2021

Beachy Stamped Summer Card

 Hello friends! It's Teri from Teris Mailbox. I am here posting a summer beach scene card!


This card started with distress ink blending. So much fun! I used Tumbled Glass on the top and Tea Dye on the bottom for sand! I angled it down from the left to appear like a sand dune.


The bush from the Pam Bray Fall Rubber Stamp Sheet set was perfect for the scene I imagined! I stamped it in Walnut Stain Distress ink and added Clear embossing powder. Prior to heat setting, I rubbed the powder off the birdie as I knew I wanted to color him blue for contrast. 


I thought the stamp with the sentiment A Little Birdie Told Me...was perfect for the bottom of the card.

Last step was to trim the piece to allow some of the Kraft Cardstock to show. The twine just adds more texture and interest!

I hope you enjoyed my post. Thanks so much for stopping by today! I'd love to have you follow/subscribe on my social media sites Instagram, Facebook, Blogger and You Tube.  Be well. Be creative!

Looking for more Inspiration? Click the links below!

The Blank Page Muse Shop https://blankpagemuse.com/


Wednesday, June 9, 2021

Layered Leaf Background

Hello friends. I am here today posting for Blank Page Muse.  I loved the variety of leaves in the Leaves Rubber Stamp Set Sheet by Terri Sproul. My design centers around multiple leaves stamped in different Distress Ink colors.


I wanted an unusual color combination, so I selected Olive Green, Seedless Preserves and Fossilized Amber. 


I began by stamping the center leaf on a cream colored A2 sized cardbase. I recommend always starting in the middle and working your way out so you don't end up with an open space. After inking up the stamps, I spritzed to allow movement. I overlapped the stamps for interest. 


I love encouraging stamps and this one was perfect for this card! I clear heat embossed the sentiment using Seedless Preserves ink on Kraft Cardstock. After trimming it down, I cut a piece of cream cardstock 1/2 inch wider than the strip by 4.25 inches. I inked the edges in Seedless Preserves and mounted the sentiment strip on top.


I trimmed the stamped piece to 3.75 x 5 inches. I cut another piece of cream cardstock to 4 x 5.25 inches and inked the edges with Seedless Preserves. This provides a great base for the stamped piece. The last step was to assemble the 3 base layers and add the sentiment strip.

Looking for more Inspiration? Click the links below!

The Blank Page Muse Shop https://blankpagemuse.com/
FB Fan Page
https://www.facebook.com/groups/bla...
Instagram - Shop
https://www.instagram.com/blankpage...
Instagram - Blog
https://www.instagram.com/blankpage...
Twitter
https://twitter.com/BlankPageMuse
Pinterest
https://www.pinterest.com/blankpage...

Thanks so much for stopping by today! Be sure to check out the large variety of rubber and clear stamps from Blank Page MuseI'd love to have you follow/subscribe on my social media sites Instagram, Facebook, Blogger and You Tube.  Be well. Be creative!


Wednesday, May 12, 2021

Watercolor Safari Background

 Hello friends! Today I am posting this colorful safari card for Blank Page Muse.


Check out the colorful textured background created with simple watercolors!


Start with a 5.5 by 11 inch piece of watercolor paper. You will need to decide if you are making a landscaper or portrait card as it will determine the direction of the watercolor strokes. 

You need to wet the paper generously with water and begin laying down you color choices using little additional water.

Once you are happy with the depth of color and before the paint dries, cover it with a piece of plastic wrap. This will allow you to smoosh the colors around as you please. I chose to create these bands of color by gathering the plastic wrap in bands along the longer side of the paper.

I can see this techniques on many diverse backgrounds from sunsets to waves.


Once the paper is dry, carefully remove the plastic wrap. You can now select the best segment of the paper for the finished card!

Load the cut piece into a stamping platform and line the Wildlife Zebra Lion Giraffe Elephant Collage Scene Rubber Stamp up with the paper. This image is stamped with Black Archival ink.


The Dream Big Dreams stamp was a perfect match for this card!

Looking for more Inspiration? Click the links below!
The Blank Page Muse Shop
https://blankpagemuse.com/
FB Fan Page
https://www.facebook.com/groups/bla...
Instagram - Shop
https://www.instagram.com/blankpage...
Instagram - Blog
https://www.instagram.com/blankpage...
Twitter
https://twitter.com/BlankPageMuse
Pinterest
https://www.pinterest.com/blankpage...

Thanks so much for stopping by today! I'd love to have you follow/subscribe on my social media sites Instagram, Facebook, Blogger and You Tube.  Be well. Be creative!


Sunday, April 25, 2021

Background and Focal Point Stamping

 Hello friends! Teri here posting this fun springy card made using one stamp for both the background and the embellishments!


Teal is one of my favorite colors! I created this fun slimline card using the Lotus Flower with Small Dragonfly Stamp.


There are two components for this card! I started by stamping the background using both the flower and the dragonfly stamp on white cardstock with grey ink. I always start near the center and stamp outwards rotating the stamp to assure good coverage. Once I was finished, I die cut with a slimline die. This piece was mounted on a Slimline base with a Teal cover.


Next step was to stamp additional flowers with black ink on Cougar 80 lb cardstock. After coloring with Copics, I fussycut them out individually and arranged them on the front of the card.


The final step was to add this cute sentiment Always keep your face toward the sun.

I do have a fun video documenting the process here:


Thanks so very much for stopping by today! I hope you are inspired to try background stamping. Be sure to check out the huge variety of stamps from Blank Page Muse.

I'd love to have you follow/subscribe on my social media sites Instagram, Facebook, Blogger and You Tube.  Be well. Be creative!


Wednesday, April 14, 2021

It's Raining Kitties!

Hi friends! Teri here with another card using Blank Page Muse products! As soon as I saw this cute kitty and parachuting mice, I knew a scene was in order! The stamps are from the Sending Smiles Whimsical set.


Here are the steps to create this cute Slimline card!

Ink blend the sky, sun and an area for grass using distress inks on a slimline white base cut with a stitched die.


Stamp the Kitty on the grass with two of his mice friends in black ink and color with Copic markers.


Stamp the mice with parachutes randomly falling from the sky using a Copic friendly black ink. Choose any color scheme you like (I went with primary colors). 


Stamp the You are my Sunshine Sentiment stamp on a die cut tag and add to the front of the card. Once done coloring, choose a coordinating color to frame the stamped piece!

I hope you enjoyed this fun whimsical card!
 Be sure to stop by Blank Page Muse to check out the variety of rubber stamps and stencils. 

Thanks so much for stopping by today! I'd love to have you follow/subscribe on my social media sites Instagram, Facebook, Blogger and You Tube.  Be well. Be creative!


Sunday, March 28, 2021

Celestial Unicorn Card

 Hello friends. Welcome back. Today I am sharing this fun card that uses a celestial unicorn set. The stamps are available from Blank Page Muse.


I love the way this one turned out with the muted blues and grays.


Starting with the background.
The first step is to ink smoosh Weathered Wood and Hickory Smoke Distress inks onto an A2 card base.  I  used the Swirled Stencil to add another layer with Chipped Sapphire Distress Inks.
Cut the panel using the Tim Holtz Deckle Edge Trimmer.


The stamps from the Unicorn Wishes Moon Stars & Word Art set were stamped on Cougar Cardstock with Gina K Almagan ink and Copic colored. The moon and stars were coated with Nuvo Glaze to add shine to the pieces.


The pieces were arranged on the card front that was mounted on an A2 grey cardbase.  After stamping the sentiment, I ink blended coordinating inks so It would match the base. Check out the shine!


Thanks for stopping by! I'd love to have you follow/subscribe on my social media sites Instagram, Facebook, Blogger and You Tube.  Be well. Be creative!

Looking for more Inspiration? Click the links below!
The Blank Page Muse Shop
https://blankpagemuse.com/
FB Fan Page
https://www.facebook.com/groups/bla...
Instagram - Shop
https://www.instagram.com/blankpage...
Instagram - Blog
https://www.instagram.com/blankpage...
Twitter
https://twitter.com/BlankPageMuse
Pinterest
https://www.pinterest.com/blankpage...


Wednesday, March 10, 2021

Floral Background with One Stamp

 Hello friends. Today I am presenting this gorgeous purple floral card for Blank Page Muse!


The stamp is from the Fairytale Fantasy Figures Art Stamp designed by Terri Sproul.  


Stamp the background first with an alcohol marker compatible ink. I use Gina K Almagon ink. Remember to always start with a center image first so you can work your way out to the edge and stamp small portions to fill in the blanks.


Chose your colors and  make the images come to life!  I used my favorites purple and a muted green. Once the coloring is complete, trim down so you can mount on black paper and then on an A2 white base. I elected to do a landscape oriented card. The black frame really picks up the  floral outline.

Use a label die cut to cut the base for the sentiment Bloom Where You are Planted. The label is popped up with foam tape to provide depth.  The black and white twine provides a pop of interest. Be sure to attach the twine before adding the card base. I tape the ends securely on the back to be sure.


Thanks so much for stopping by today! I'd love to have you follow/subscribe on my social media sites Instagram, Facebook, Blogger and You Tube.  Be well. Be creative!

Looking for more Inspiration? Click the links below!
The Blank Page Muse Shop
https://blankpagemuse.com/
FB Fan Page
https://www.facebook.com/groups/bla...
Instagram - Shop
https://www.instagram.com/blankpage...
Instagram - Blog
https://www.instagram.com/blankpage...
Twitter
https://twitter.com/BlankPageMuse
Pinterest
https://www.pinterest.com/blankpage...


Sunday, February 28, 2021

Water-colored Hexagon Card

 Hello friends! This is version two using my favorite watercolor smooshing technique. I used Nuvo Shimmer Powder Watercolors to achieve the layered look on the background.  The Wild Berries Background Coloring Stamp from Blank Page Muse has quickly become one of my favorites! Check out the first video post here: https://youtu.be/jBDbsyy5sxA.


It all started with the smooshed backgrounds. I created two at one knowing I wanted to create 2 cards with the same background stamp. I used the one on the top for this fun card.

I die cut the panel using one of my favorite hexagon shaped dies from My Favorite Things.

I silver heat embossed the sentiment Wishing You the Very Best on a strip of vellum and attached it to the water-colored panel. 

After attaching the colored panel to an A2 base, I trimmed the corners so the entire card is hexagon shaped!

I have a video on my YouTube channel documenting the steps:


I hope you enjoyed this bright and cheery card!


Thanks so much for stopping by today! I'd love to have you follow/subscribe on my social media sites Instagram, Facebook, Blogger and You Tube.  
Be well. Be creative!

Looking for more Inspiration? Click the links below!

The Blank Page Muse Shop https://blankpagemuse.com/

FB Fan Page https://www.facebook.com/groups/bla...

Instagram - Shop https://www.instagram.com/blankpage...

Instagram - Blog https://www.instagram.com/blankpage...

Twitter https://twitter.com/BlankPageMuse

Pinterest https://www.pinterest.com/blankpage...


Wednesday, February 10, 2021

Watercolor Powder Heat Embossed Shaker Card

 Hi everyone, Teri here!
I started with my favorite watercolor smooshing technique.
 I used Nuvo Shimmer Powder Watercolors to achieve the layered look on the background.  The Wild Berries Background Coloring Stamp from Blank Page Muse has quickly become one of my favorites!


I love the way the pink background highlights the shaker pieces!

I started by heat embossing the background on watercolor paper. The Novo Shimmer Watercolor Powder was so easy to use and achieved this wonderful layered colorful background.


I tend to do multiples when I am creating and this was no exception. I made these two backgrounds. The left one is used on this card and don't be surprised to see the other background later this month!


After the watercolor panel was dry, I Die cut a large heart in the center of the panel  and a piece of pink fun foam to create the shaker border.  The front panel was cut to allow a border so attaching it to the base would be easier. 


The sentiment Live, Create and Inspire was silver heat embossed on embossable acetate.
The next step was attaching the fun foam to the base and adding all the sparkle! Once that was done, I added the top panel over the opening.

Check out the video here: 


Looking for more Inspiration? Click the links below!
The Blank Page Muse Shop
https://blankpagemuse.com/
FB Fan Page
https://www.facebook.com/groups/bla...
Instagram - Shop
https://www.instagram.com/blankpage...
Instagram - Blog
https://www.instagram.com/blankpage...
Twitter
https://twitter.com/BlankPageMuse
Pinterest
https://www.pinterest.com/blankpage...

Thanks so much for stopping by today! I'd love to have you follow/subscribe on my social media sites Instagram, Facebook, Blogger and You Tube.  Be well. Be creative!


Sunday, January 24, 2021

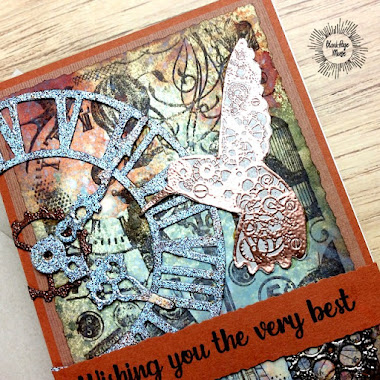
Create a Vintage Layered Card

 I love steampunk, vintage and layered cards. These all came together for me with this great layered card I am posting for Blank Page Muse.


Check out all the dimension created by using multiple layers!


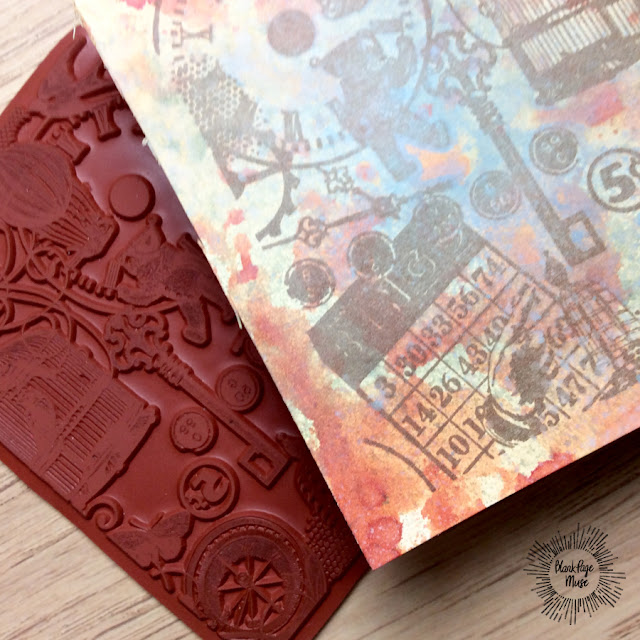
It all started with the Bingo Collage background stamp stamped on natural color Cougar cardstock and smooshed with Distress Inks.


 Check out these great layers! I love the Hummingbird Steampunk Cog Gears Stamp, cut from a cereal box and embossed with copper powder.

Check out the video here: 


The Wishing You the Very Best sentiment was stamped on Kraft.  The base was cut using a deckle edge trimmer. I inked the edges with Vintage Photo Distress Ink.  This was layered on Ginger and Dark Orange Cardstock.


Thanks so much for stopping by today! I'd love to have you follow/subscribe on my social media sites Instagram, Facebook, Blogger and You Tube.  Be well. Be creative!

Looking for more Inspiration? Click the links below!
The Blank Page Muse Shop
https://blankpagemuse.com/
FB Fan Page
https://www.facebook.com/groups/bla...
Instagram - Shop
https://www.instagram.com/blankpage...
Instagram - Blog
https://www.instagram.com/blankpage...
Twitter
https://twitter.com/BlankPageMuse
Pintrest
https://www.pinterest.com/blankpage...


Copyright Text

Blank Page Muse 2018 Sin City Stamps 2013