Showing posts with label gelli plate background. Show all posts

Wednesday, February 16, 2022

Feel like having a "Purple" day?

 Hi Stamping Fans!

Hope you are enjoying the DT inspiration here at the blog this month - I'm loving the new year and my resolution to make time for stamping and crafting - so far so good! Hope you are all getting lots of creativity time as well!


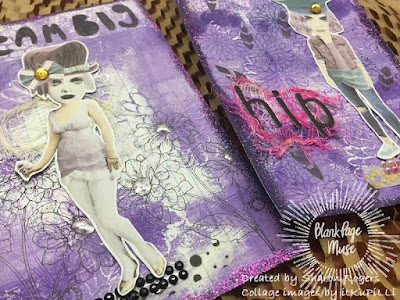
Today I have some "purple" themed altered index cards to share using lots of different products available in the BPM Store - I love when you can combine a range of products!
I love working to a colour theme as well and using some fun quirky collage images with stamps, stencils, paint & ink!


Stamps and Stencils used:
Dream Big Stencil designed by Magda Polakow
Feather Stencil designed by Donna Gray


Remember if you use the code BPMSharon at the store checkout you can save 15% on your stamp order - what better excuse do you need to go check out the huge range and nab some rubber stamps to create with! AND remember you can also use this code for discount at the "I Brake for Stamps" store as well! Fantastic way to build you stash of stamps and save some money!


Saturday, July 3, 2021

"Mori" is Feeling Spooky!

 Hi BPM Fans

Today I am sharing a "Spooky" altered index card for our "Holiday" themed month!

I love Stephanie Eaton's Fun & Quirky character stamps so today I have used one f my favs from her designs!


Supplies:
Blank Page Muse Stamp: Stitches "Mori" Dia de los Muertos designed by Stephanie Eaton
Blank Page Muse Stamp: Word Stamp "Spooky"
Gelli Print "Mop Up" Printed Index Card
Black Archival Ink
White Cardstock
Copic Markers
General supplies: scissors, glue or double sided tape, embellishments

Instructions:
Stamp your chosen images on white cardstock.


Colour your stamped images with Copics or your preferred colouring medium and fussy cut.


Arrange your stamped images on a gelli printed background with your chosen embellishments. 
I had used this index card to "mop up" ink and paint from my small gelli plate and brayer which I was playing with - love the effect you can get from printing with the excess paint and inks - also picked up the text BPM rubber stamp image as well!


Hope you're enjoying our rubber stamp creations!

Make sure you pop over to the store to grab your "holiday" rubber stamps to create with!

Happy creating!

Sharon

Don't forget to check us out at all of our social media sites
The Blank Page Muse- https://blankpagemuse.com/

Tuesday, April 13, 2021

Woodland ATCoins

  Hello crafty friends, Kelly on the blog today with Blank Page Muse

I used several of the Woodlands stamp set by Donna Gray to create a set of ATC Coins. 


Supplies - 

Gelli prints
Markers
Watercolors
Washi Tape
2 1/2" circle punch

These ATCoins were punched from gelli printed papers and the support is a cereal box. I glued this sandwich together with the ATC Coin Artist ID stamp, then stamped the Woodlands critters onto white cardstock and colored them with markers. I use watercolors and washi tape to enhance the critters. Fussy cut out all of the critters and then glued them down to the coin front. I now have coins ready for trading!


Thanks for stopping by and be sure to check out all of Blank Page Muse's links below.


Sunday, February 17, 2019

Time Flies.....

Hello Again Fans!
Are you loving this months theme "Things with Wings"?
Soooooo many Blank Page Muse Stamps to create with for this theme - my tag art today uses three different stamps from the fab range at the Store!
 
You know I love to decorate tags so I hope you enjoy my mixed media double tag creation today!
Supplies List:
Blank Page Muse Stamp: Feathered Pair of Wings
Blank Page Muse Stamp: Birds on Wires Silhouette Border designed by Terri Sproul
Blank Page Muse Stamp: Feather Art designed by Pam Bray
Gelli Plate Printed Double Tags note: you can cut your own tags to size from your gelli prints if you don't have any!!
Embossing Ink Stamp Pad, Black Fine Embossing Powder and Embossing Powder in Complimentary Colour
Black Archival Ink Pad
White Tissue Paper
Kraft Paper
Collage "Characters" used here by Art Tea Life
Various embellishments: string, muslin cloth, cork style border strip etc.
Tools: heat gun, scissors, glue
 
 
Instructions:
Use pre printed tags or cut your own from gelli plate printed card. I always have some extra things on hand to grab and create with!

Use the Feather Art stamp with embossing ink and embossing powder to randomly add some more dimension to the printed background and add a little "sparkle"!


Use the Black Archival Ink to stamp the Birds on Wires onto white tissue paper. Tear out the stamped image.


Use Gel Medium to adhere the tissue paper stamps onto the tag background. Tearing the image allows it to "blend" into the background better than a straight cut edged piece of tissue. Be careful when adhering the tissue down as it can tear easily once wet. Allow to dry.


Whilst your tag background is drying stamp the wings and sentiment onto Kraft Paper using the clear embossing ink pad. Use fine black embossing powder and heat. Fussy cut the wings and tear the sentiment.


Gather your collage elements, stamped images and embellishments. Glue the embossed and fussy cut wings to your collage character. Soooo cute!!!!!

Arrange all of your elements onto the tag background and adhere everything with glue. To finish tie some string to the top of each of the double tag.
 

I always like to stamp extra images so I can make more than one tag at a time. I created another double tag with my extras:
 

Happy Stamping and have a great week!!!
Sharon :)
And as always don't forget to visit us at all of these Social Media Sites:

The Blank Page Muse- https://blankpagemuse.com/


Monday, September 17, 2018

Inked up for School!

Hi Blank Page Muse Fans!

 
Who can believe it's already September?
Here in Australia I am looking forward to the warm weather arriving as soon as possible.
- I am so over Winter LOL!
As you know our theme here at the Blog is "Back to School" for those of you who have kids returning to school after Summer Holidays!!!
I hope you enjoy the altered quirky "ink pot" character tags I have to share today - I think they are fun and would make good bookmarks for kids to use at school!


Supplies:
  • Blank Page Muse Stamp Set: Correspondence Pens, Ink & Postage Art
  • Blank Page Muse Stamp Set: Fairytale Fantasy Figures
  • Black & White Embossing Powder
  • Embossing Ink Pad
  • Manilla Tags: Size used for this creation 6cm x 12cm
  • Scraps of Gelli Printed Card
  • Old Puzzle Book Pages
  • Acrylic Paint
  • Collage Paper Doll Elements: used for this creation Art Tea Life "Little Paper Dolls"
  • General Supplies: scissors, glue, heat gun
  • Embellishments: washi tape, muslin cloth, string, wool, sticky mesh

Instructions:
Start by gathering your supplies so you have everything at hand - these are really quite simple to make even though there are a few "layers" and "elements" to them!


Start by making your little paper doll ink pots! Stamp the "Swan Ink" pot into your Gelli prints with embossing ink and heat emboss with the black powder. Fussy cut the stamped ink pot.


Next step is to cut out your paper doll elements. Use here are little round faces with "hair" and a bow along with some legs! Glue them all together. LOL too cute!


Next step is to prepare the tags ready to add your little Ink Pot Characters. Using the pages from the puzzle book or any text book or old school book cover the entire tag using a glue stick. You can fold the edges over and glue to the back for a neat edge or just trim around the tag once dry.


Use 2 colours of paint for each tag and use a spatula to spread a very thin layer over the tags. Use paint colours that match your ink pot backgrounds. Allow to dry.


Use your choice of stamps from the Correspondence Set to cover the tag backgrounds. Use your embossing ink pad and the white embossing powder.


Add some fibre/wool to the tops of the tags along with some torn washi tape, bits of sticky mesh and muslin cloth. Tag backgrounds are now complete and ready to add the Ink Pot Paper Doll collages!


Adhere your little paper doll characters to the tag backgrounds and you have the completed tags!


Thanks for joining me today - hope you feel inspired to get stamping!
I will be back later in the month with another fun creation!
PS.

We have so much going on in the Social Media "Scene" that you really must check out all of our links for amazing inspiration and to keep up to date with all the "News"!!!
Blank Page Muse- https://blankpagemuse.com/


Tuesday, July 25, 2017

Wallflower ATC's- Quick idea's

 I was inspired by the book "The Perks of Being a Wallflower"not my usual style of ATC but I like how they turned out as mini Art Journal pages/ ATC's.

Sin City Stamp set used:  Wildflower Yikes


They were pretty quick makes, the backgrounds are gelli prints I had in my stash, So I just stamped over them. The first one and the third one  are supposed to look like graffiti on a wall.

The one in the middle is stamped on the background and colored using pencils.

 I wrote a quote from the book on all 3 ATC's
 I know it makes them look a bit grunge , but I like the effect.


 You can't see it very well in the picture, but the scary flower has a bit of glitter( the top of the leaves)

To purchase the stamps for this project, please visit www.sincitystamps.com 
For more inspiring paper-craft projects from the Design Team, be sure to visit us at the Sin City Blogand follow us on Facebook.  Also, share your creations with us and join the Sin City Stamps Fan Page HERE.

Thanks for visiting!

Copyright Text

Blank Page Muse 2018 Sin City Stamps 2013