Showing posts with label cards for boys. Show all posts

Wednesday, July 3, 2024

Such a Boy Thing

 Hi everyone, Steph Ackerman here today.

Today I am using some amazing products from Blank Page Muse and I Brake for Stamps.


Blank Page Muse Stamps:  Let's Get Away
Blank Page Muse Paper Pack: Tattered & Worn

Mixing and matching assorted stamps provides a very unique card for the special guy in your life!    This fishing scene, one of eight images comprising the Let's Get Away stamp set, was stamped, punched and added to a ribbon which embellished the card.

Details can be found on my  blog.

Thanks for stopping by.


Steph

Looking for more Inspiration? Click the links below!
The Blank Page Muse Shop https://blankpagemuse.com/

Save 15% of your Blank Page Muse orders with discount code:  BPMSteph


Saturday, June 3, 2017

Father's Day Greeting


Greetings!
Chris here and today I am excited to share this Father's Day greeting card I created with Sin City Stamps!

To recreate this card you will need
Sin City Stamps Sequin Waste  Light
Sin City Stamps Tall Ship with Sails 
Cardstock - Kraft, Light Brown, Dark Brown
Brown Ink
Jute
Letter Stickers
Gold Sharpie

Step 1

Stamp Sin City Stamps Tall Ship with Sails  onto Kraft cardstock with brown ink.

Mat the stamped image onto dark brown cardstock.

Step 2 

Stamp Sin City Stamps Sequin Waste  Light onto Kraft cardstock and then mat with dark brown cardstock. 

Step 3

Cut a 3" x 5"  piece of light brown cardstock and add to the card base.

Step 4 
Add Stamped ship to card.
 Step 5
Tie knot in jute cording and add to card.
 Step 6
Add Sin City Stamps Sequin Waste  Light block to card and add letter stickers.  (You can see in this picture, I colored the letters with a gold sharpie.  For some reason it does not show up in the top photo.)
Hope you are inspired to get stamping!
Visit our Fan Page for more inspiration and share your Sin City Stamps creations!

Monday, September 7, 2015

Creating a Masculine Card with Sin City Stamps


Hi Chris here and today I would like to share with you how to create this stunning masculine card. I was trying to explain to my daughter how easy this card was to make and she said show me.  So with her help, I have my first ever video to share with you! Now being that its my first I will apologize for the shadows in advance.  I am working on correcting that!  But the video does show how simple this card is to create!

Here are the supplies you will need:

Sin City Stamps: Sequence Waste; Ship; Wish
Tim Holtz Tissue Tape
Tim Holtz Distress Inks: Antique Linen, Mermaid Lagoon
Tim Holtz Distress Markers: Wild Honey
Water Brush
Ranger Archival Ink : Jet Black
Corrugated Paper
Altered Trading Card (The Paper Studio)
Black and White Cardstock

And here is the 1st attempt at video!


Monday, June 15, 2015

Father's Day Classic


Hi!  Chris here today sharing this classic Father's Day Card that was super fun and yet easy to whip up in a short amount of time.  I started with these supplies:

Sin City Stamps: Classic Spark; Terri Sproul Alphabet Set 
Pacon: Multi Media paper
Cardstock
ColourArte: Radiant Gels -Copper Pearls (altho link shows the color looking more coppery-  my jar looks more pearly)
ColourArte Twinkling H2Os - Mandarin Citrine, Iridescent Blue
Ink- Ranger Archival Jet Black, Ranger Tim Holtz Cracked Pistachio, StazOn Jet Black
Distress Marker - Squeezed Lemonade

To start out I painted my background using the ColourArte Radiant Gels on my Multi Media paper
After the was dry, I stamped the over the paint with my StazOn and my background stamp from the Classic Spark Collection. I love how it kind of reminded me of a 50's diner floor!  Perfect for the theme of my card!


I then matted that background piece onto black cardstock to fit my card.

Before I got too far along I stamped the inside of my card and then stamped and matted my greeting. 

I then stamped the car image again on my Multi Media paper using the Ranger Archival Ink.  I then proceeded to "color" in my image.  I used the Cracked Pistachio on the car body by stamping my ink pad onto by craft sheet and picking up the ink with my water brush.  
I have to admit that at first I stamped with my Memento Ink pad, forgetting I was using water.  In the first image you can see the ink bleed into my color , the second image uses the Archival ink.  

I added the Iridescent Blue Twinkling H2Os to any parts of the car that would be chrome or white walled.  I added the Squeezed Lemonade Distress Marker to the headlights and then a touch of the Mandarin Citrine for a bit of extra shine.   I then fussy cut out my car and added it to the front of my card. 

I then stamped DAD using the Terri Sproul Alphabet onto my MultiMedia paper and matted that onto black cardstock.  


Hope you enjoyed my project!


Monday, May 18, 2015

Graduation Wishes


Hi Chris here and today I would like to share with your this graduation card I made for my nephew with Sin City Stamps and ColourArte Twinkling H2Os and Radiant Gels. For my card I used:

Sin City Stamps: Globes;  Ship; Sequence Waste
Inks: Memento Ink (Tuxedo Black), StazOn (Black)
Distress Inks: Old Paper, Tea Dye, Weathered Wood, Scattered Straw
Distress Markers: Barn Door
Multi Media Paper : Pacon
Gauze Paper : DCWV
Brads, journaling pen, foam mounting tape, water brush, distress tool

To begin this card I started by stamping the Sin City Stamps Globes onto multi-media paper.  Your paper should be about an inch smaller than the size of your finished card.  I then tore the edges of my paper for a worn look.  (Hint: When tearing if you want to see the paper fibers in your tear, tear the paper toward you.  If you want a "neater" tear and no fibers tear away from you. )


I then wrinkled my stamp paper into a ball.  I admit it was hard to crinkle up that stamped image but the result was worth it *wink*

After I straightened out my paper I was left with this...

I then inked the crinkled stamped paper with Old Paper then Tea Dye Distress Ink. I was trying for a wrinkled map look so  I just kept inking til I liked the amount of color.  I then matted my paper onto a piece of gauze paper using brads.  


I then took a piece of scrap paper and painted it with the ColourArte Radiant Gels (Indian Copper) .  If I did this over again I would choose a thicker. sturdier piece of cardstock.  After the Radiant Gels dried I stamped over the background using Sin City's Sequence Waste and StazOn.  


I then matted my stamped Globe paper onto this background piece.  

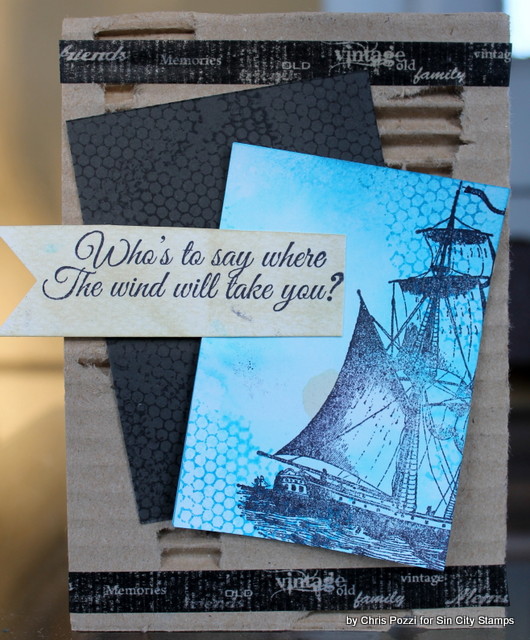
 I then stamped the Sin City Ship onto my multi-media paper.

After fussy cutting out my image, I started by coloring my image first with ColourArte Twinkling H2Os (Meridian Blue) on the water.  Then colored the flags using my Barn Door Distress Marker.  I then used my water rush to paint the ship using Distress inks using Old paper for the sails, Scattered Straw for the boat trim, and Weathered Wood for the sky.


I added a hand written sentiment and attached the ship to my card using foam mounting tape. For the inside I hand wrote.... Congratulations on completing the first part of your journey into the future.  


Copyright Text

Blank Page Muse 2018 Sin City Stamps 2013