Showing posts with label Valentines Day. Show all posts

Friday, February 11, 2022

Love U xxx

 Hi Stamping Fans!


Can you believe we are already into the month of "Romance" for 2022? I've created a romantic page in one of my art journals using rubber stamps to compliment a collage image!
Stamp links are below and if you want to see the process pop over to my blog by clicking "here"!


Here are the links to the stamps I used from the BPM Store:
Alphabet Letter Sheet designed by Terri Sproul

Remember if you use the code BPMSharon at the store checkout you can save 15% on your stamp order - what better excuse do you need to go check out the huge range and nab some rubber stamps to create with! AND remember you can also use this code for discount at the "I Brake for Stamps" store as well! Fantastic way to build you stash of stamps and save some money!


Tuesday, February 23, 2021

Go Splash Yourself!

I was in the grocery store earlier and the selves are stocked with Valentine's day stuff. I love the day after Valentine's day when all that candy is 50% off. I'm an Anti-Valentine's day kind of girl and sadly they just don't made cards for that. So I made my own. 


Rubber stamps used:

Additional items needed:
  • Imagination
  • Scissors
  • Alcohol markers 
  • ink- Palette, hybrid acid free
  • Sharpie marker
  • Card stock
  • Glue Stick

1. Begin by stamping your mermaids tail. While the ink is drying you can cut your card stock into 2.5" x 3.5"
2. Color in your mermaid tail and write "Go Splash Yourself" on a scrap piece of paper. 
3. Cut out your stamps and letters. At this time I also ripped my blue paper and glued it to my prettier red card stock paper. I then glued the words and tail down.
4. Added a boarder around the card using a sharpie and a white gel pen.
5. The heart is a store embellishment, I found in the clearance aisle. But you could cut a heart out by head or us a die cut. Use your imagiantion.


Hope you enjoyed this Anti-Valentine's day card. If you have any questions feel free to message Lasheet and if you choose to make your card tag her and Blank Page Muse. Thank you, happy crafting!! ♥


Looking for more Inspiration? Click the links below!
The Blank Page Muse Shop https://blankpagemuse.com/


Thursday, February 11, 2021

A Lovable Cat Card

 Hello, this is Ana coming to you once more with a card that was created to send Valentine's Day good wishes to a far away friend. They recently moved to Georgia, and due to the holidays, we haven't been able to talk much. I thought this would be a perfect card for them. This card is also great for someone whom you haven't spoken to in a while. Using this loveable cat stamp from Mama Kat with her Kittens Rubber Stamp by Rick St Dennis and a fun pun, makes a perfect Valentine's Day card.


Supply list:

Instructions:

Start by cutting a piece of watercolor paper to fit the size of your card base. Make sure it is about 1/2" smaller all around from your card size so that you can mount on two other layers and they will all can be seen. In other words cut:
  • First card base (red): size of your card, 
  • Second card base (white): 1/4" smaller than your card, 
  • Third card base (watercolor paper): 1/2" smaller than your card.

Adhere the two first layers (red and white) on to your card base. The card is ready to be worked on.
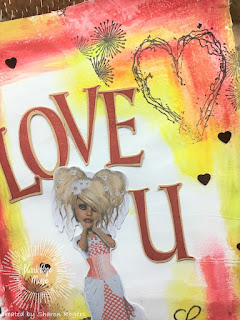
Next, Stamp the Mama Kat on to the watercolor paper and color image. 
Watercolor markers were used in this image.


After you have colored your image, mask it with masking fluid so that you can work on the background. 

Tip: If you don't have masking fluid, you can stamp the image on a separate piece of paper and fussy cut it out to then glue on to your background.  
For the background use whatever media you have on hand. Watercolor markers were used for this background.
Once you have applied the watercolor, with a wet brush go over streaks of color to disperse the ink on your paper and give it the blotchy look.
With an eraser, remove the masking fluid.
Now that you have the main image for your card, go ahead and mount it on top of your white card base.
By adding a strip of patterned paper to the left hand side of the card, a different element is added to decorate the card.
Use a banner or tag to add your sentiment. You can print it out to then cut it out. Using puns always adds a fun element to cards.


 The little kitten in the stamp makes a perfect paw to hold a string. Use your crafters knife to make a small slit above and under the kittens paw. Insert the string and glue the heart balloon to the end of it.


Finish the card by adding sequin in different spots of the card just to give it some additional interest.

Now that your card is finished... go ahead and send it to someone you love to share a wonderful smile.


Thank you for visiting. I hope you create and be happy - Ana

Be sure to follow us at:

The Blank Page Muse Shop https://blankpagemuse.com/


Monday, January 14, 2019

Fancy Love

I love making Valentines Day Cards!  Maybe because I love the color RED!   And Valentines Day Cards are a perfect excuse for me to use lots of RED!


For this Card I paired the LOVE greeting from the Love Faith & Family Vintage Art Stamp Set with the heart from the Alice in Wonderland Set 1
This is for one full sheet of red rubber art stamps, vintage designs and words to create cards and scrapbook pages or art journals.

I embossed the hearts with simple clear embossing powder.   I embossed the LOVE greeting with the Seth Apter Ancient Amber Embossing powders.


I hope you are inspired to get stamping!   ~ Chris

Supplies used
Love Faith & Family Vintage Art Stamp Set
Alice in Wonderland Set 1
Seth Apter Ancient Amber Embossing powders.
Card stock
Embossing ink
Clear embossing powder

Follow us
The Blank Page Muse- https://blankpagemuse.com/


Saturday, January 12, 2019

Vintage Valentine

                                    Hello all Cathy here and ready to get 2019 rolling.
I have a shabby pink vintage Valentine card for you. I really like of the look of the shabby style for making vintage cards. You can grunge it up but then add a bit of color and then it becomes shabby vintage to me. I hope you will join in the fun and make a shabby vintage card with me.

Stamps Used: Faded page text 
                       Heart lock & key
                       Love
Other Supplies: Craft cardstock
                          Flower die
                          Heart die
                          Pink cardstock
                          Glitter
                          Twine
                          Brown & Black ink
                          Foam squares

Die cut flowers on the side of craft card stock.  In brown ink, stamp the  Faded page text  randomly  all over the background. Edge it with the same brown.
 Next take Heart lock & key and a darker drown ink and stamp randomly on the left side of the die cut flowers.
 Close up of the Heart lock & key on the craft cardstock.
Die cut a heart from pink cardstock. You can use a heart punch if you have a large one.
Stamp the Love saying onto the heart.
 Next get your card base ready to go. Wrap the pink twine around the left side of the craft cardstock you have stamped on. Tape it on the back to hold it in place.
Glue the craft cardstock on to the base of the pink card. Add foam squares to the heart and add it on top of the twine. 
 Lastly add some pink glitter inside the flower die cut.

This is a shabby vintage Valentine card for you.
Come join the fun here.

The Blank Page Muse- https://blankpagemuse.com/

FB Fan Page-  https://www.facebook.com/groups/blankpagemuse/

Instagram Shop-  https://www.instagram.com/blankpagemuse/

Instagram Blog-  https://www.instagram.com/blankpagemuseblog/

Twitter-  https://twitter.com/BlankPageMuse

Pintrest- https://www.pinterest.com/blankpagemuse/boards/


Thursday, January 10, 2019

Valentines Day Inspiration

Hello, this is my very first post with Blank Page Muse, how exciting! I love simple, yet elegant designs. Combining vintage and Valentines Day really allowed me to show off my style!
Enjoy!


I started off with a Valentines themed tag and then decided to attach it to some scrapbook paper giving it a vintage kind of look. I will probably end up adding this to my journal but you could also make an adorable card.

Blank Page Muse Stamps used:

Background Grunge
Hearty Doodles 

Other supplies:
  • A tag 
  • Gesso
  • Acrylic paint. I used pink and white.
  • Black pigment ink pad
  • Embossing powder
  • Heat gun
  • Brown ink pad
  • Blending tool or make up sponge
  • Adhesive


Follow the steps below to see how I made this card.

Coat a tag with gesso. When dry, paint it with a sponge. This gives a nice soft effect. I used pink and white acrylic.

Valentines1


Stamp all over the card with the rose stamp (from the grunge set) using pigment ink. Immediately add embossing powder and heat with an embossing gun/ heat tool.

Valentines2

Valentines

Set that aside. Stamp some hearts on a piece of cardstock. Emboss these, color and cut out. 

Valentines4

Valentines5


Valentines6

Valentines7


Glue the hearts in place. Using a light brown ink, go over areas with a blending tool to give the tag a vintage look.


Valentines8

Valentines9

Using a blending tool and a black ink pad, add shadows to the edges.

Valentines10

Attach some ribbon at the top of the tag.

Valentines11

Cover a piece of cardstock with scrapbook paper.

Valentines12

Valentines13

Lastly, attach the tag. 

Valentines14


Below are some photos of the finished piece.

Valentines1


Valentines1


Valentines1

Thank you so much for stopping by. I do hope you enjoyed this tutorial. Remember to subscribe so you don't miss a post and look us up on social media (links below).

Happy crafting!
Suzette

FB Fan Page-  https://www.facebook.com/groups/blankpagemuse/
Instagram Shop-  https://www.instagram.com/blankpagemuse/
Instagram Blog-  https://www.instagram.com/blankpagemuseblog/
Twitter-  https://twitter.com/BlankPageMuse
Pintrest- https://www.pinterest.com/blankpagemuse/boards/

Wednesday, January 9, 2019

Oh! How I Love You, Won't You Be Mine?

Hello and welcome to the Blank Page Muse Blog! I know it is only January but it is time to get started on  those Valentine projects that you have been waiting to do until after the holidays.

I wanted to create a card for my hubby as this year we will celebrate 33 years of marriage, I can't believe we have been together that long!


Supplies -
Blank Page Muse Stamps used -
     Script stamp from Correspondence sheet by Katy Leitch
     Hearty Doodles by Katie Lamb
     Romance Classic Couples
Pink and white cardstock
Blank white card and envelope
Heart patterned paper
Ribbon
Love die cuts
Adhesive, foam and double stick tape
Gold embossing powder
Versamark ink
Heat tool


With the  Versamark ink, stamp the Romance Classic Couples  onto white cardstock, the  Script stamp around the edges of the pink cardstock and the medium heart from the Hearty Doodles onto the left-hand corner of the envelope. Sprinkle the still wet stamped images with gold embossing powder, shake off excess and heat emboss.


Layer your papers as shown. Place your ribbon at the bottom of the card and secure the ends at the back of the card.


Die cut up to 5 love words. Glue each one together. This will add dimension. Adhere to the card.


 Attach the gold embossed couple to the card with foam tape.


Assemble the card as shown.


Stamp and gold emboss a small heart on the upper left of the card.


What a romantic card!
 Hope you enjoyed this card and watch for more Blank Page Muse designs soon.

Looking for more Inspiration? Click the links below!

Copyright Text

Blank Page Muse 2018 Sin City Stamps 2013