Showing posts with label Dress Forms. Show all posts

Sunday, February 23, 2020

Guest Designer Sari/Granne! Quick Idea~Shiny Paper & Embossing to make your stamps POP!

Please welcome back Sari with a super shiny fun, Quick Idea Card today!


I got this beautiful piece of paper with golden text and vintage feeling, I knew the Vintage Mannequin stamps would be perfect with it. I also used one stamp from Background Grunge Art -set by Pam Bray. Other supplies: 2 embossing powders, Distress Ink, golden ribbon, tapes and some ready die cuts.

Yours,
Sari

 Stamps used:

Stamp and emboss


Fussy cut and layer the stamps!

Let them shine!


Come back and play in our stamp challenge using at least 3 stamps, no digis.
Have an amazing day!

Friday, August 10, 2018

Layered Artist Trading Coins

Hi Everyone,
Jess here today.
Have you jumped on the Artist Trading Coin bandwagon yet? They are super fun and quick to make.  Today I will show you how I made a bunch of coins using a single sheet of cardstock.  


Blank Page Muse Stamps Used:


Other Supplies:
Jet Black Archival Ink
Distress Inks
Tim Holtz Chit Chat Stickers
Adhesive
Gel Pens
Circle Punches


Start by stamping your largest images on a sheet of white cardstock. Using masks, made from post it notes, add your smaller images until you have filled the entire sheet.  
Using the two and a half inch punch(this is the ATC size) randomly punch out circles.  
Once you have punched as many circles out as you can go back with smaller circle punches and punch out more.  Use as much of the paper as possible.  
Here's an example of the different size circle punches I used to create the coins.  
Use Distress Ink to add color to your coin.  Flick water to create drips and splatters. 
Don't forget to ink your edges!
Layer your circles together and glue them down.  Don't feel you have to use the entire circle.  Experiment with your layers.  Trim the circles up if you like.  
Add word stickers and highlight areas using gel pens. 


I hope you enjoy and share your coins with us in the fan group.


Thanks for coming by!
Please visit the following for more inspiration!

FB Fan Page-  https://www.facebook.com/groups/blankpagemuse/

Instagram Shop-  https://www.instagram.com/blankpagemuse/

Instagram Blog-  https://www.instagram.com/blankpagemuseblog/

Twitter-  https://twitter.com/BlankPageMuse

Pintrest- https://www.pinterest.com/blankpagemuse/boards/

Tuesday, July 10, 2018

The Golden Days of Travel

Hi Blank Page Fans,
Jess here today.  

Remember when people used to get dressed up to go on vacation? You never used to see people on airplanes in pajamas and yoga pants.  I can't imagine these ladies not looking put together.  I pictured them shopping in Paris and sending a postcard to a friend back home.  
Here are the supplies you need to gather to create your own postcard.

Stamps used:

Other Supplies:
Jet Black Archival Ink
Archival Ink in Coffee and Hydrangea
Distress Collage Medium
Distress Markers
Distress Collage Paper
Distress Ink
Cardstock
Stabilo Pencil
Clear Gesso

Let's get started!
Stamp out your main images across the postcard using Jet Black Archival ink.
Create masks, using post it notes, and stamp all over to fill in white space. 
Once you have finished stamping your background use Distress Collage Medium to apply Distress Collage Paper to various areas of the postcard. 
Add your paperdoll and color in the dresses using Distress Markers(to make sure the ink stays on the image coat your paper doll in clear gesso).   Add Distress Ink to the edges to make the postcard appear to be vintage.  Use your Stabilo pencil to add shadows around the paper doll and around the edges of the collage paper.  
Turn your postcard over and add the Script and postmark stamp to the back.  Use Distress Ink to age the paper.  Color in the postmark using Distress Ink. 
Just like that your card is complete.  
Here are a few more glamour shots.


It was really fun to see how many stamps I could add to the collage feel of the card.  I haven't done a masking technique in a long time and it was fun to play around with it again.  
I hope you feel inspired to play with your stamps too.


If you're looking for more inspiration stop by these great places:
The Blank Page Muse Shop https://blankpagemuse.com/ FB Fan Page https://www.facebook.com/groups/bla... Instagram - Shop https://www.instagram.com/blankpage... Instagram - Blog https://www.instagram.com/blankpage... Twitter https://twitter.com/BlankPageMuse Pinterest https://www.pinterest.com/blankpage...


Happy Stamping,
Jess

Saturday, January 6, 2018

Turquoise dress Form Card


Hello There Cathy N here with a quick idea for this month's challenge.
The challenge color play is: turquoise, sliver and sparkle...

 I started out with a scrap sheet of watercolor paper and painted in the turquois and sliver colors
Next I stamped chicken wire stamp, Olde Tyme HandsOld style key with top hat (didn't ink the hat part) , small wavy flourish and a border stamp
 I stamped a feathered pair of wings on black cardstock and embossed in white. Then I stamped the dress form and colored it with colored inks. I assembled the card as shown and added some bling.

To purchase the stamps for this project, visit www.blankpagemuse.com

 chicken wire stamp,
Olde Tyme Hands,
 Old style key with top hat(didn't ink the hat part)
 small wavy flourish
 border stamp
 dress form
 For more inspiring paper-craft projects from the Design Team, be sure to visit us at
Blank Page Muse Blog
Follow us on Facebook!
join us and share your projects on
The Blank Page Muse Fan Group
 

Thanks for visiting!

Monday, October 9, 2017

Magic Night - Halloween Gift Bag

Hi Ladies,
Even without any Halloween Stamp Sets I was still able to create this spooky gift bag.  Using texture stamps, lines of text, & vintage keys, I created this creepy background.  The next time you think you don't have the design you need, spend a bit more time looking at stamps beyond their obvious uses.  You may be surprised at how creative you can become.


Supplies:
1. Fairies &  Blossoms 2 Rubber Stamp Set - Fairy Poem Sentiment Word Art
2. Hearty Doodles Art Rubber Stamp Set - background grunge circles.
3. Dress Forms Steampunk Rubber Stamp Set - Vintage Keys Small Border Rubber Stamp
4. Circle punch
5. Gold spray mist
6. Chipboard witch's hat
7. Black, purple, green ink pads
8. Chalk
9.  Mounting block
10. Glitter glue
11. Plain gift bag
12. Gold stars & ribbons
 
Directions:
1. Use a circle punch to cut a 2.5" circle of white cardstock and position it in the upper right area of the background paper. Carefully, hold it still while applying yellow chalk lightly around the circle. Next, remove the circle mask to reveal a glowing aura around the moon.


(Punch a gold glitter circle and attach it over the chalk circle with foam tape.)


2. Use black ink to repeatedly stamp a script background making sure to overlap the edge of the paper. To make a second generation image, don't re-ink the stamp and just re-position it and press it to the paper again. You may even apply a third generation impression. With each impression the intensity of the design lightens. Re-ink the stamp and continue to fill the background with first & second generation impressions leaving occasional empty spaces. (sample below: 1st - 3rd generation stamping)


3. Stamp the sentiment using purple ink in an open white space.  Create more variety to the background by randomly stamping a texture stamp using purple ink making sure to overlap the edge of the paper.
 

4. Use black ink to stamp a candelabra in the lower right corner.  Add a chipboard witch's hat to the left of the sentiment.

5. Add more layers by repeatedly stamping a cluster of keys in opposite corners.  Use the multi-generational stamping technique to add depth to the background. 

6. Next, randomly stamp some lime green texture impressions.  Gently apply black chalk around the edges of the stamped artwork to create an eerie haze.

7. Finally, add glitter glue to the candle flames and apply a few splashes of gold mist.  Embellish with small gold star stickers and attach the stamped artwork to a plain gift bag. Carefully, trim away any overhanging paper and tie a coordinating ribbon to the handles.


A Closer Look:

To purchase the stamps for this project, visit www.sincitystamps.com

For more inspiring paper-craft projects from the Design Team, be sure to visit us at the Sin City Blog and follow us on Facebook.  Join the Sin City Fan Group. HERE

To learn more about our designer Karen, please visit her blog, Art & Soul.
Thanks for visiting!

Wednesday, June 24, 2015

Art Journal with Lanette

Hello All Lanette Here!

Today I'm going to share a pretty little Art Journal Page with you :)

First lets take a look at my finished page ,then we can take a look at how I made it.


Sin City Supplies Used: Dressform Stamp SetArt Journal 3 Stamp Set

Other Supplies Used: Stazon Ink,

Now lets look at my process......

I started by randomly stamping a few of the Dressform Stamps with a waterproof ink, I used Stazon.


After  stamping I covered my Page completely using a mix of Art Anthology Colorations Spray.


 Next I stamped my Text using a few quotes from the Art Journal 3 Stamp Set, to add a bit of a pop I embossed my images.

Next I colored my verses with a contrasting Colorations Spray.


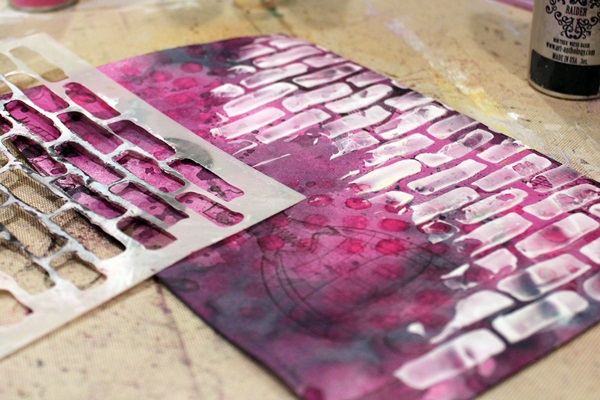
Now it was time to add a bit of texture to my page, using a stencil and some modeling paste I added these fun bricks along the side of my page.


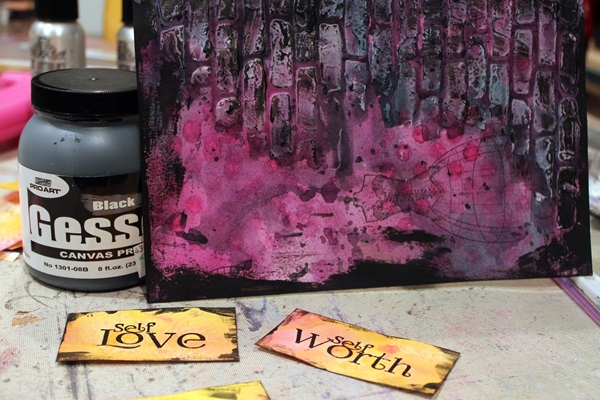
Just to frame and add a bit of a grungy look to my page I used my finger to roughly added a bit of black gesso around my page and over my bricks.


before I added my verses to my page I randomly stamped around the page with this pretty little flourish stamp from the Art Journal 3 Stamp Set.


 And there you have it a quick but pretty page in your Art Journal!


Thank you so much for stopping by today!

I hope that I have inspired you to have some inky fun of your own!

After all time flies! You gotta get inky when you can!

Remember to like us on Facebook and stop by the store for all your stamping needs!!

As always feel free to stop by my blog Stacks of Scraps anytime!

Copyright Text

Blank Page Muse 2018 Sin City Stamps 2013