I know that they can seem really intimidating at first but I assure you that once you get the hang of it you'll be an old pro in no time.
Let's get started!
Be sure to use code BPMDtSamantha2019 at checkout to save 15% off of your next order
You will need the following:
- Blue A2 sized card base
- Heavyweight vellum
- White card panel cut to 5 3/8" x 4 1/8" (card panel 1)
- White card panel cut to 5 1/8" x 3 7/8" (card panel 2)
- Sticky embossing ink
- Gold embossing powder
- Coloring medium of your choice
- Sequins, beads, or gems of your choice
- Acetate or plastic packaging cut to 5 1/4" x 4"
- 1/4" wide foam tape (I prefer to use tape that is 1/4" in thickness as well)
- Double sided adhesive tape
- The feathers and bird stamps from the Flower & Bird Sketches Art Rubber Stamp Sheet Set
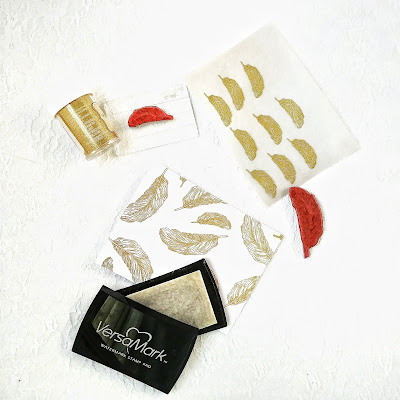
Using sticky embossing ink, stamp the large and medium feathers all across card panel 1 and use the medium feather to stamp numerous times on heavy weight vellum. Cover both in gold embossing powder and heat set.
Fussy cut the feathers from the vellum and set aside.
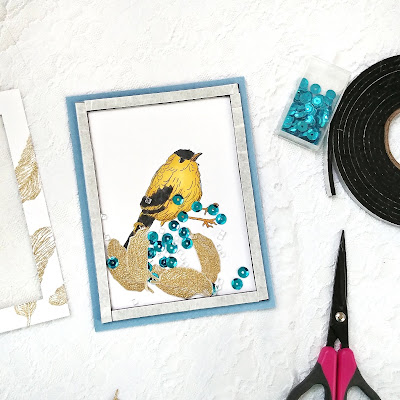
Stamp the bird onto card panel 2. Color with the medium of your choice. I used markers and colored my bird to look a little like an American Gold Finch. Adhere card panel 2 to your card base.
Turn card panel 1 over. Measure and mark on all four sides at .5". Cut along the lines. Alternatively you can use a die but sometimes I like doing it this way.
This gives us the frame for the front of the shaker card. Place double sided adhesive along the inner sides of the back of the frame and place double sided adhesive along the edges of the acetate or plastic packaging.
Remove the backing from the adhesive and place the acetate onto the back of the frame.
Take your foam tape and run it all along the outside of card panel 2.
Before removing the backing from your foam tape fill the well with some of your vellum feathers and any other shaker filling you'd like. I went with sequins and clear acrylic gems. Attach the frame to the foam tape and glue a few of the feathers to the outside of the frame.
That's all! Not so hard, is it? I cannot wait to see what you are inspired to create with your Blank Page Muse stamps! Be sure to tag us on social media so that we can ooh and ahh over your work.
Until next time,
Samantha
Looking for more inspiration?
Click the links below!
The Blank Page Muse Shop
Facebook Fan Page
Instagram- Shop
Instagram- Blog
Twitter
Pinterest


No comments:
Post a Comment
Thank you for visiting and leaving your kind words!
~~~
A note regarding the GDPR and EU ePrivacy Regulation:
Those leaving a comment on any post on this blog do so on the understanding that their name and personal details will be visible to anyone who visits this blog.
People entering a piece of artwork into any competition or giveaway promoted here, they do so in the knowledge that their name and blog link are visible to all who visit this blog and in so doing have published their own personal details and consented to our use of that personal information should it be selected as a winner.
Thank you.