Showing posts with label holiday. Show all posts

Friday, March 6, 2026

Sparkling Happy Fun-Filled

 Hi everyone, Steph Ackerman here today using an amazing stamp from Blank Page Muse.


Blank Page Muse Stamp: Sparkling, Happy, Fun-Filled


Use the stamp as the focal point on an oval shaped card.
Use 3 different sized layers to create the card and stamp onto pattern paper.


Embossing the stamped phrase really helps it pop.

Thanks for stopping by.

Steph

Looking for more Inspiration? Click the links below!
The Blank Page Muse Shop https://blankpagemuse.com/

Tuesday, January 3, 2023

Have a Sparkling Holiday Season

  Hi everyone, Steph Ackerman here!

 Today I am using some amazing stamps from Blank Page Muse and I Brake For Stamps.


Ink the stamp in several colors of ink and heat emboss. 
The phrase was then die cut with TLC Designs Tiny Vine Oval. 

Create a black card.
Wrap pattern paper with ribbon and adhere to the card.
Add the die cut sentiment.

The full tutorial can be found on my blog.

Thanks for stopping by.

Steph

Looking for more Inspiration? Click the links below!
The Blank Page Muse Shop https://blankpagemuse.com/

Save 15% of your Blank Page Muse orders with discount code:  BPMSteph

Monday, November 28, 2022

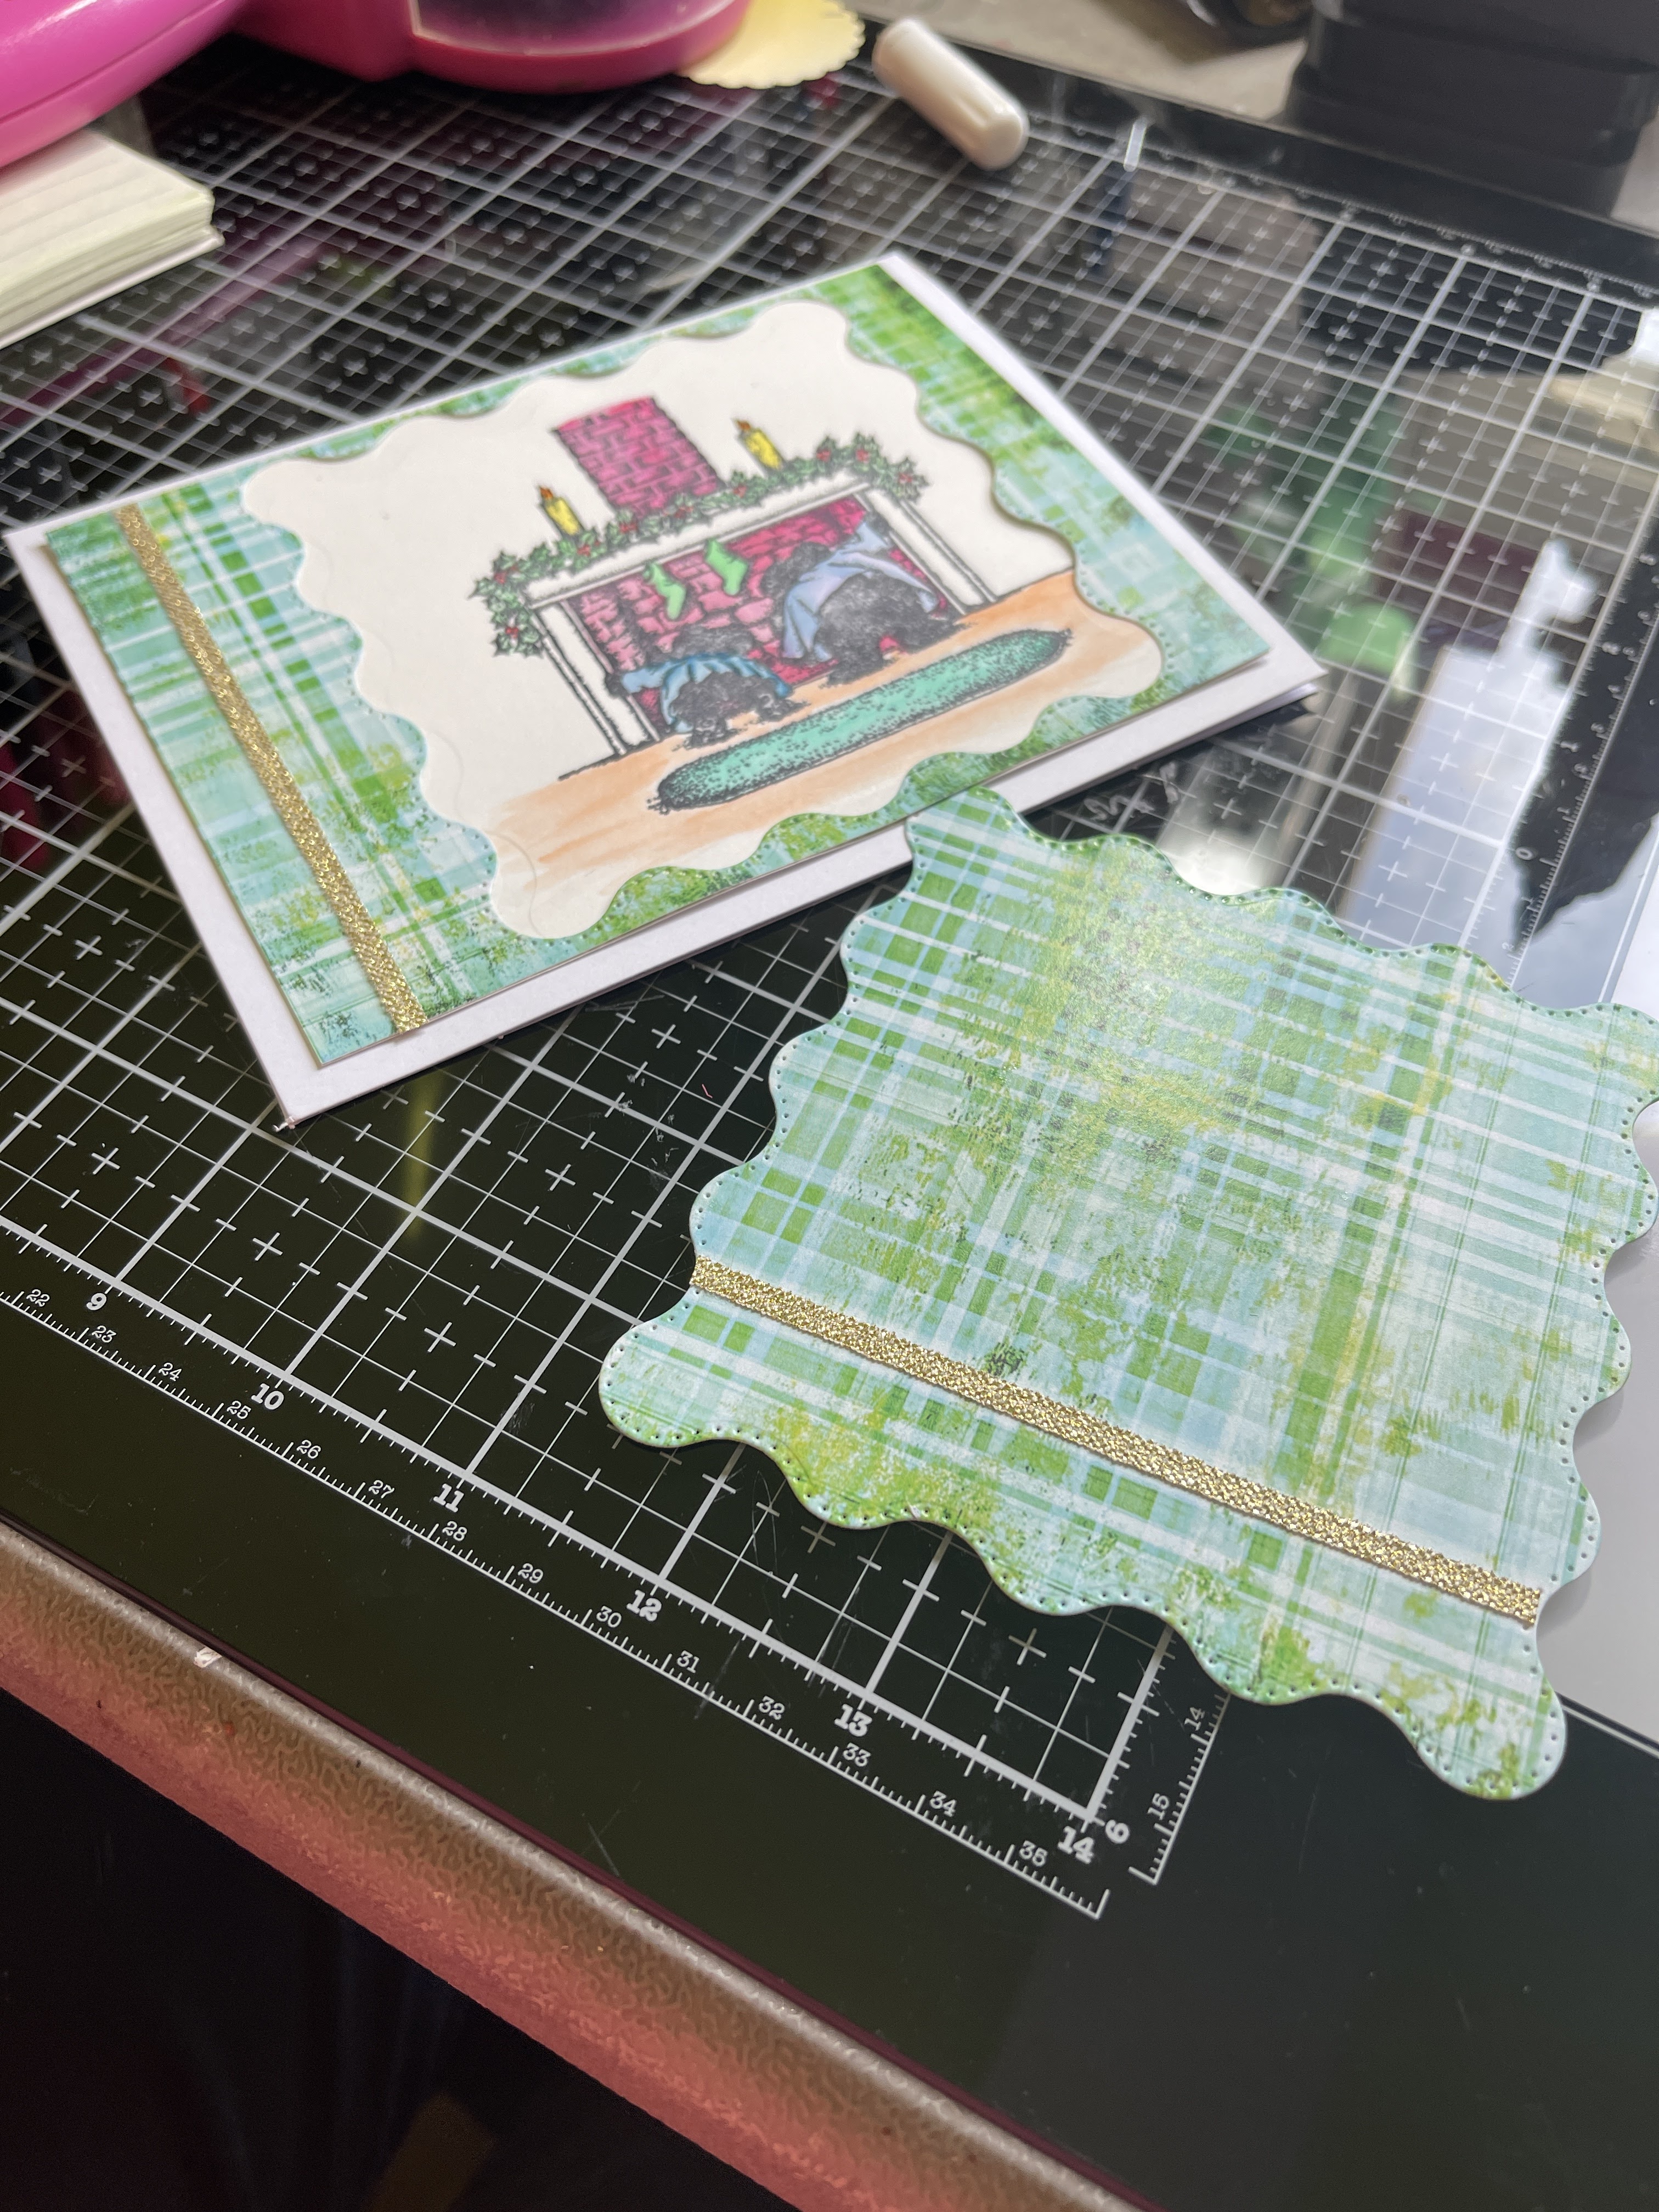
Looking up the Chimney Shy Bear Stamped Card

 Greetings!  Today I am excited to share this adorable Shy Bear stamped Holiday Card! 

The Shy Bear stamps from I Brake for Stamps are so fun to play with. 


And as we are nearing the holiday season I wanted to create some quick stamped cards!


Supplies needed to recreate this card:

I Brake for Stamps Looking Up The Chimney Shy Bear

Blank Page Muse Cyan Consortium 6x6 inch sheets Paper Pack designed by Pam Bray

Archival Ink. Large scalloped square die, water color inks or markers, 5 x 6 1/2 inch car base, Mixed media paper, gold ribbon, gold gems, sticker flourish

Cut your mixed media paper to 4 1/2 x 6 inches.  Stamp I Brake for Stamps Looking Up The Chimney Shy Bear with archival ink.  Using your favorite watercolors inks or markers and a water brush color your stamped image. 


Adhere entire stamped image to your card base. 

Cut your green plaid paper from the Blank Page Muse Cyan Consortium 6x6 inch sheets Paper Pack designed by Pam Bray to 4 1/2 x 6.   Using your scalloped square die, die cut square window to highlight your stamped image. (note this show the back side of the papers.)


Adhere die cut paper window over stamped image. Save your die cut square for inside of the card. 


Add gold ribbon to card front and die cut square as shown.   


Add gold gems as accents to your card. 

Adhere square to inside of card and add gold flourish to finish your card. 


I hope you are inspired to get creative with your stamps and papers from Blank Page Muse and I Brake For Stamps.  Don't forget to use my discount code BPMChris. 


Be sure to follow us at 

The Blank Page Muse- https://blankpagemuse.com/


I Brake for Stamps-https://ibrakeforstamps.com/


FB Fan Page-  https://www.facebook.com/groups/blankpagemuse/


Instagram Shop-  https://www.instagram.com/blankpagemuse/


Instagram Blog-  https://www.instagram.com/blankpagemuseblog/


Twitter-  https://twitter.com/BlankPageMuse


Pintrest- https://www.pinterest.com/blankpagemuse/boards/


Thursday, July 1, 2021

Snowflake Medallion Greeting Card

 Greetings!  Today I am sharing this card I created to coordinate with this month's challenge theme - Holidays! I admit, I was not ready to think of winter holidays quite yet, but it never hurts to get a jump start on creating those holiday cards. 

This card features  Medallions Ornate Patterns & Flowers by Michelle Frae Cummings Art Rubber Stamp Sheet Set which I thought looked like snowflakes. So let's get started. 


To recreate this card you will need:

Blank Page Muse Supplies:

Other Supplies:

 Card base and envelope,
Blue embossed card stock,
White and blue ink,
Stickles,
Skate and snowflake die cuts, 
 
white jute


Start by stamping your  Medallions Ornate Patterns & Flowers by Michelle Frae Cummings Art Rubber Stamp Sheet Set onto blue card embossed stock with white ink. 
Note: I used the back side of the embossed card stock. This allowed my to have a flat surface but still be able to see the embossed pattern.  


Stamp Large and small medallion repeatedly.


Using Stickles add sparkle to your stamped medallions. 


Adhere die snowflakes to card background. 


Once dry, cut stamped blue card stock into three (3) strips and adhere to your card base as shown.  Add stickles to your die cut skate blade and adhere to card.  Finish off your card with a simple jute bow. 


I hope you are inspired to get creative with your Blank Page Muse Stamps. 


Be sure to follow us at 

The Blank Page Muse- https://blankpagemuse.com/


FB Fan Page-  https://www.facebook.com/groups/blankpagemuse/


Instagram Shop-  https://www.instagram.com/blankpagemuse/


Instagram Blog-  https://www.instagram.com/blankpagemuseblog/


Twitter-  https://twitter.com/BlankPageMuse


Pintrest- https://www.pinterest.com/blankpagemuse/boards/


Thursday, June 24, 2021

Happy 4th of July Greetings Card

 Hi everyone! It's me, Tonya, 4th of July is right around the corner so I'm using the happy sentiment and the scroll stamps from the Sunshine Cherub Sun Flowers Art Rubber Stamp Sheet and the Stars Slim Sized Mixed Media Stencil to create this patriotic card. 


Supplies 

BPM: Sunshine Cherub Sun Flowers Art Rubber Stamp Sheet

BPM: Stars Slim Sized Mixed Media Stencil

Patterned and Plain Cardstocks

Watercolor Paper

Various 4th of July Images or Printables 

Extra Heavy Gel

Spatula 

Blue, White, Gray, Tan Inks

Ink Dauber

Black Waterproof Ink

Washi Tape

Scissors

Paper Cutter

Brush

Glass Tray

MISTI Stamping Tool

Thread and Gauze

Foam Pop Dots

Beacon Adhesive: Zip Dry Adhesive 


Place Stars Slim Sized Mixed Media Stencil on top of a piece of watercolor paper and secure with a couple of pieces of washi tape. Apply Extra Heavy Gel with a spatula over the stencil.


Remove and let dry.


Cut stenciled image 3"x6" and lightly ink area in two different shades of blue inks. Apply white and gray inks to a glass tray, add water to each color and load a brush with each color (separately) and add splatters to stenciled area. 


Place scroll stamp onto the MISTI Stamping Tool, ink with black ink and stamp onto a piece of watercolor paper. Now center and place "happy" sentiment onto the stamped scroll image before inking and stamping onto the stamped image. Ink lightly over stamped area with a tan ink. Once dry fussy cut image out.


Fold a piece of 8"x8" cardstock in half to create the base for the card. Adhere a piece of solid colored cardstock to stenciled image before gluing to card base. Fussy cut several patriotic images out, layer along with the stamped happy scroll image and add foam pop dots to the back before placing on card. To finish off add loops of thread and gauze under images.
As always if you have any questions about this project please let me know.


Also if you aren't following Blank Page Muse on their other social medias you can find them on:

The Blank Page Muse Shop https://blankpagemuse.com/


Thanks for stopping by, hope your day is awesome and enjoy creating! 


Tuesday, December 22, 2020

Snowman Snow Globe Ornament

Click the link below to see how you can make your own Snowman Snow Globe Ornament!


Blank Page Muse stamps used - Country Vintage Christmas stamp set

Holiday Ornament by Kelly Parker
Check out how this ornament was created HERE


Saturday, December 19, 2020

Gnome for the Holidays Card

 How about non-traditional colors for a holiday card? I am a cool colors girl for sure!


Check out these adorable stamps from Blank Page Muse!
This one is the Star Bright Gnome Wintery Tree.


Star by ink blending the sky with Broken China Distress inks on Cougar 80 lb. cardstock. The design started with the evergreen tree stamp and Evergreen Bough Distress Ink!
 I double stamped the trees so the background trees are lighter, highlighting the central tree.


Check out this darling gnome!  I stamped him on Cougar cardstock and colored with Copics. I love the dimension in the beard by using different shades of grey. A little foam tape adds the dimension.


The final step was adding the sentiment and ink blending the yellow stars.

Be sure to check out this set as well as a great variety of red rubber stamps available from Blank Page Muse!

Thanks so much for stopping by today! I'd love to have you follow/subscribe on my social media sites Instagram, Facebook, Blogger and You Tube.  Be well. Be creative!

Looking for more Inspiration? Click the links below!
The Blank Page Muse Shop
https://blankpagemuse.com/
FB Fan Page
https://www.facebook.com/groups/bla...
Instagram - Shop
https://www.instagram.com/blankpage...
Instagram - Blog
https://www.instagram.com/blankpage...
Twitter
https://twitter.com/BlankPageMuse
Pintrest
https://www.pinterest.com/blankpage...


Wednesday, December 16, 2020

Holiday Ornament by Sharon Rogers

Decorate your tree or holiday gifts with this festive ornament by Sharon Rogers! 


Blank Page Muse Stamps Used: PJ Love Gnome Set designed by Pam Bray


Visit Sharon's Blog for the full tutorial! 


Be sure to follow us at 


The Blank Page Muse Shop https://blankpagemuse.com/ FB Fan Page https://www.facebook.com/groups/bla... Instagram - Shop https://www.instagram.com/blankpage... Instagram - Blog https://www.instagram.com/blankpage... Twitter https://twitter.com/BlankPageMuse Pintrest https://www.pinterest.com/blankpage..

Saturday, December 5, 2020

Sugar Skull Poinsettia Snowman

It's beginning to look a lot like Christmas... Glitter is everywhere. Take a look at my studio, glistening, with Blank Page Muse, Red & Green, and Copics! Ok, maybe I do need to just stick with creating art. I am so excited to be here today and apart of the Ornament Showcase featuring Blank Page Muse Stamps. 

I would like you to meet the newest ornament for my tree... My Sugar Skull Poinsettia Snowman! 


I started with wood pieces that I bought a few years ago... you know, those things you just have to have and then they sit in the "one day I will use them" bin. I painted them with White Liquitex Paint and then a slight glossing with ColourArte Primary Elements in my favorite color: Dragonfly Wing. 


Now, time to stamp and color. Use a Sugar Skull from the Day of the Dead Sugar Skulls Marigold Flowers Scared Heart Stamp Set and the Poinsettia from the Classic Christmas Art Set. Stamp the images in Memento, Tuxedo Black Ink and then colored with my Copic Markers and Atyou Spica Markers. 


I had so much fun curled up in front of the fire coloring. 


Once everything is colored, fussy cut out the images.
I hand drew the hat, colored, and cut out as well.
Next start to put the Sugar Skull Snowman together. Cut apart one Poinsettia and use pop dots to add a little dimension to the Snowman's hat. 


Here is a close up of the Poinsettias at the base of the snowman. You can see how beautiful the sparkle is from the Atyou Spica markers. 


I really love this Poinsettia Stamp and so enjoyed coloring them. 

Using my drill, I drilled holes into the sides for the arms to stick in and a hole in the top for a hook to be able to hang it. You can see the support chipboard pieces I used and the hook at the top. 


So my snowman had her own little photo shoot around my home amongst all the Christmas decorations.


I hope you are feeling a little more festive and inspired. ...and don't forget to keep coming back to see all the amazing ornaments and Christmas inspiration the Blank Page Muse Design Team has for you this holiday season. 

Until next time... Happy Creating! 

XOXO, Christine 


Click the links below for more inspiration and to connect with the Blank Page Muse Community!

The Blank Page Muse- https://blankpagemuse.com/


FB Fan Page-  https://www.facebook.com/groups/blankpagemuse/


Instagram Shop-  https://www.instagram.com/blankpagemuse/


Instagram Blog-  https://www.instagram.com/blankpagemuseblog/


Twitter-  https://twitter.com/BlankPageMuse


Pintrest- https://www.pinterest.com/blankpagemuse/boards/


Copyright Text

Blank Page Muse 2018 Sin City Stamps 2013