Showing posts with label canvas. Show all posts

Thursday, October 3, 2019

Urban Life

Hello everyone! Thought I would drop in with a new project today for your walls using Blank Page Muse Stamps.


Supplies used for this project -
Urban Scene stamp 
Script stamp from Correspondence Pens by Katy Leitch
VersaMark Clair Nocturne ink
Distress Oxide ink Cracked Pistachio and Vintage Photo
2" deep 6" x 6" stretched canvas
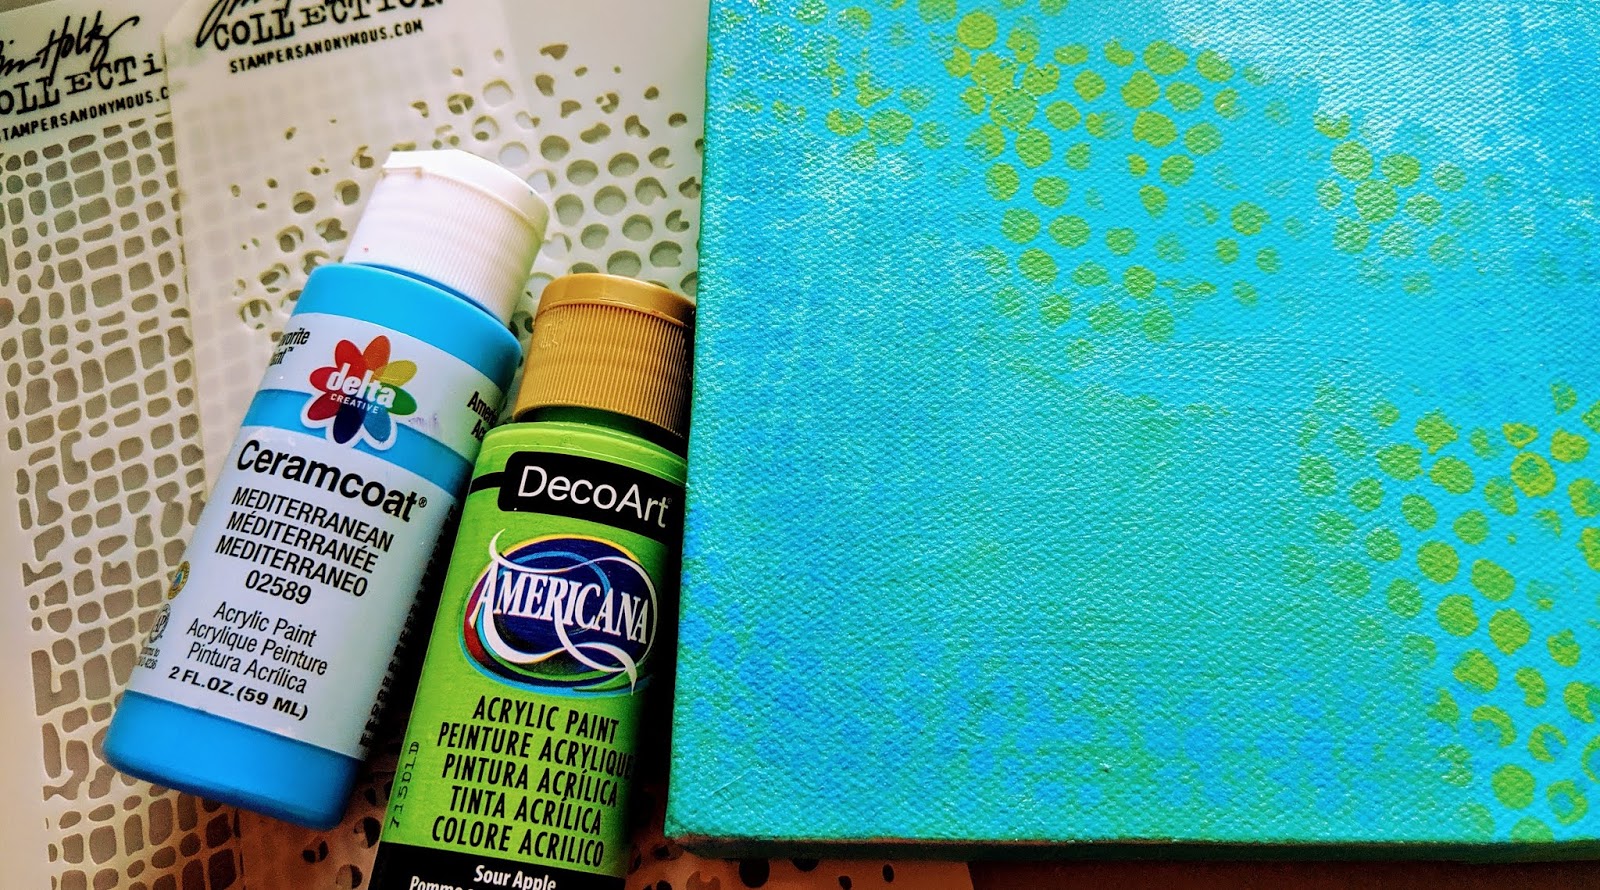
DecoArt paint - teal, lime green, blue
Martha Stewart Teal glitter paint
Tim Holtz stencils - burlap and circles
Sequins
Stickles - Silver
Art Glitter Glue
Wink of Stella clear pen

To start the project, paint it all over with teal paint, let dry. Stencil with lime green and blue on opposite corners. Sponge on the glitter paint in select small areas, let dry.



Using the Distress Oxide ink and a blending tool, apply ink to white cardstock in about a 5" x 5" area, sprinkle with water and let dry. Stamp the Urban Scene stamp onto inked cardstock with VersaMark Clair ink. Tear the edges towards you on each side, this allows the edges to be more feathery and take on ink better. Ink blend the edges with the VersaMark and Vintage Photo ink.


Stamp the script stamp randomly on the canvas. Then using the glue, attach the stamped image to the canvas using an old credit card to smooth out the surface. When this step is dry, use Wink of Stella on the bird in flight for some more shine. Apply the sequins with the glue and add a small dot of Silver Stickles to each center.


Hope you liked this wall decor piece and please share your creations in the Blank Page Muse Facebook group!!

The Blank Page Muse- https://blankpagemuse.com/


Friday, November 10, 2017

Thankful


Hi!  Chris here and today I would like to share my project I created for Sin City Stamps! 
I love the colors and textures of fall leaves (even if my allergies don't like them!)  So I decided to try to recreate them! 
To recreate this project you will need:

6x8 Canvas
Thankful die cut
Card stock - green, white and orange (for die cut)
Distress inks
Spanish Moss
Glue gun

Start by stamping your leaves onto green and white card stock. 


Fussy cut all the leaves.  Dip "white" leaves into distress ink.


Here are some of the finished leaves.

Glue Spanish Moss to bottom left of "back" side of canvas.


 Attach leaves to canvas.


Finish by adding the die cut Thankful to canvas. You can see all the texture in the close up!


Hope you are inspired to get stamping!

Monday, November 6, 2017

Autumn's Splendor Canvas by Jenn

Hello Sin City Stampers!! Today I want to share this adorable home decor for Fall, titled "Autumn's Splendor". This is my favorite time of year with all of the falling leaves and beautiful colors. I hope this season is as inspirational to you as it is to me!

Here is how I made it...
Gather your supplies to start.
  1. Small canvas
  2. Black gesso
  3. Background stencil
  4. Spray inks in autumn colors (I used green, orange, and purple)
  5. Spray inks in an array of browns and golds
  6. Crackle paste
  7. Iridescent spray
  8. Flowers
  9. Tiny pine-cones
  10. Black ink pad
  11. Gold ink pad
  12. Clear or iridescent embossing powder
  13. Heat tool
  14. Pearlizing medium

Sin City Stamps : (click on pictures to purchase)

Alright! Let's get started on this fun Fall project!


1. Cover your canvas entirely with black gesso and allow to dry.
2. Using a gold ink and the stamp shown, randomly apply to dry canvas
3.Sprinkle over stamped areas with clear or iridescent embossing powder, heat set and let dry.
4. Arrange your flowers and embellishments on canvas to get an idea of how you want it to look.
5. Using watercolor paper and an array of brown and gold sprays, create a background as shown. 
**TIP:(to get the effect shown, spray ink on a craft sheet and dab your paper onto it. Start with your lightest color and continue to the darkest color one at a time and be sure to dry in between each color)
6. Stamp your owls onto the water-colored background using black archival ink. Cut out the larger owl (or whichever you choose) and set aside.
7. Use crackle paste through a background stencil all over your canvas and let the paste dry completely. You can use a heat tool to speed up drying, however allowing it to dry naturally will result in a much better crackle look.
8. Once dry, start spraying ink colors light to dark in random areas all over the canvas. Dry color before applying the next. Adding a spritz of water to sprayed color will help spread into cracks.
9.Apply a sentiment. Use a clear gluing agent to cover the sentiment area and let dry. This ensures that any more ink applied will not cover lettering.

Here are a few close-ups to show detail.


Finally, add your owl using foam dots to add depth. Add flowers and brush them lightly with a pearlizing medium. Once everything is dry, cover your owl with a small piece of plastic and spray canvas with iridescent spray! Just adds that nice shimmer!!
There you have it! A wonderful addition to your Fall decorations!! Thanks so much for joining me today and I hope that I have inspired you to get creative this colorful season! Be sure to head over to our online store to see all of the great stamps available to you!! http://sincitystamps.com/
xxJenn


Wednesday, April 5, 2017

Steampunk ATC Canvas

 Hi All, today I am going to show you how to make this steampunk canvas. The canvas is ATC sized so very small, that makes it a quick and easy but (very) fun project!

Supplies used:

Sin City Skeleton  head on vintage key stamp
A small canvas about 3.5 x 2.5 inch
Metallic paint in Copper, Moss Green and Purple
Black acrylic paint
Stencil
Gear and wings dies
Die cutting machine
Black cardstock for the gears
White cardstock to stamp on
Chipboard for the wings
A silver wax or paint
Scissors
Colored pencils or markers
Glue


 Step 1- Paint the canvas in metallic green and let dry.


 Step 2- Use a stencil to create a background using the copper metallic paint.

 Step 3- Die cut the gears and the wings, and stamp the Skeleton  head on vintage key stamp onto white cardstock.

 Step 4- Paint the wings metallic purple.

 Step 5 Color the Skeleton  head on vintage key stamp and cut it out.

Step 6 - Add some silver wax or paint to the gears to give them a metal look.

Step 7 -Adhere all parts to the canvas like in the picture.


Hope you are inspired!
For more inspiration with Sincity stamps, pls visit our Facebook page - or the Sin City Fan page, you are very welcome to post your projects using Sin City Stamps there so everyone can see them.

To purchase these fab stamps pls visit -  http://sincitystamps.com/

Thanks so much for stopping by.

Monday, January 23, 2017

Heart Canvas


Hi Mo here again, almost Valentines day so thought to do a heart canvas for my Sin City inspiration post.

Supplies used:
Sin City stamp set Skeletons Halloween
Sin City stamp set Wing it
Canvas 10 x 10 cm
Tissue paper
Acrylic paint in : Desert turquoise, True Red
Fluid acrylics in Cobalt Teal Hue and Primary yellow
Metallic silver paint
Triple thick gloss glaze
Decoupage glue for napkins
Waterproof stamp ink in black
Heart wings die and machine
Chipboard ( I used a box from a frozen pizza)
Craft mat
Paintbrushes
Baby wipes or wet cloth
Permanent black marker.
Adhesive


1. Paint the canvas turquoise.
2. Die cut the heart, wings and crown from your chipboard.
3. Paint the heart red and the wings and crown silver.
Set aside to dry.


4. Cut a piece of the tissue paper big enough to cover the whole canvas and use a waterproof ink to stamp the Ornate Metalwork look stamp to make the background.
5. Paint the backside of the tissue paper with the turquoise paint to get a brighter color when it is glued to the canvas.


6.Using a paint brush, spread some black paint onto your craft-mat and press the Ornate Metal work stamp into the paint then quickly stamp it onto the heart.
7. Repeat this step using the Wing it set stamps onto the silver painted wings.
8. Clean the paint off the rubber stamps quickly using a baby wipe or wet cloth.


9. Adhere the the tissue paper to the canvas with decoupage napkin glue.

10. Apply a layer of gloss glaze on the heart and let dry

11. Paint a piece of the chipboard with red paint and stamp the sentiment from the Wing it set on it.

11. Cut out the words (as shown above) and use the marker to line the edges black.

12. If you want to add more color to the canvas (as I have done), mix yellow and turquoise translucent paints to achieve a brighter color.

13. Attach all your pieces to the canvas with adhesive.


Thanks for visiting!


To purchase the stamp supplies used in this project please visit www.sincitystamps.com


For more inspiring paper-craft projects from the Design Team, be sure to follow us on Facebook.


Monday, April 4, 2016

Imagination Mixed Media Canvas


Hi Chris here and today I am sharing my first mixed media canvas I created for Sin City Stamps. I want to say that this is so different from what I normally create but I loved the quote and I just let my imagination go!

Sin City Stamps Supplies
Die Cuts- Ballon, Frame, Flower Outline, Daisy Border Chain, Stars
Silver/Blue 1/2 Round Flat Back Embellishments

Other Supplies -  canvas, Gesso, Molding Paste, Beacon Fabric Adhesive, Glossy Accents, StazOn Ink (Brown), ColourArte Twinkling H2Os (yellow rose, sky blue, persimmon, moss green, blue bayou), miscellaneous small alphabet stamps, brown journaling pen. Graphic 45 Paper,  paper lace doily, sand paper

To create this canvas I started by first applying Gesso to my entire canvas. I then added some texture to my background by applying some molding paste over the Pattern 2 Stencil

I then added some patterned papers and die cuts onto the canvas. 
I continued layering a few more dies cuts and some lace.  You'll notice that the colors don't necessarily match.  That won't matter once I am done. 

In added my gear charms and bits of a paper doily and then applied gesso again over the whole project. 

I then stamped my Globes Stamp using my StazOn Ink. 


I then randomly painted my canvas using my ColourArte Twinkling H2Os. I just kept laying colors until I was satisfied.  I then painted my balloon with Twinkling H2Os


I then used a combination of my alphabet stamps and my journaling pen to add my quote. I topped the balloon with my butterfly button.  I then sanded my edges to smooth the edges and lightly sanded my gears to allow the metal to shine through. Once again here is my finished project. I hope you are inspired to step outside your comfort zone and create something!   Just let your imagination take you away! 


Copyright Text

Blank Page Muse 2018 Sin City Stamps 2013