Showing posts with label Distress Oxide. Show all posts

Thursday, January 15, 2026

Everything has beauty by Cathy N

 Good morning, Cathy here with a great card for you.


                                                                     Stamps Used:

                                                                 From heaven angel

                                                                 Handwritten note

                                                                 Star bight stencil


*Make a background with distress inks and oxide.

*Stamp From heaven angel in black ink and color with copic markers and add glitter to wings.

Saturday, October 18, 2025

Halloween tag

 Hello, my name is Cathy and I'm a returning design team member. I have made a tag for today's post. 


                                                                       Stamps Used:

                                                       Halloween corner cobweb pair

                                                        Silhouette style bare tree

                                                        Jack-o lantern

                                                        Raven 

                                                       Words


* Make tag out of burnt orange cardstock
* Stamp words and   Halloween corner cobweb pair and Silhouette style bare tree around tag. Edge with brown oxide ink.


*Stamp Jack-o lantern once on tag and then on white cardstock to color with copic markers. Cut out and add to tag.
* Stamp Raven on tag on top of jack-o' lantern and color in with copic markers. 


* Add some Halloween ephemera to the tag.


Thursday, September 5, 2024

Cactus Silhouette at Sunrise

Good morning my stamping friends! When I saw the silhouette cactus image, I knew I wanted to create a sunrise background to stamp the image on.  I love how the Oxide Inks blend creating an early morning sunrise. 


I Brake for Stamps used: 

Other supplies: 
Tim Holtz Distress Oxide Inks 
Squeezed Lemonade
Festive Berries
Spiced Marmalade
Blending brushes
White Cardstock
Card base
Staz-on Black Ink
Stamp Platform
Parchment Paper
Gems


First blend the Tim Holtz Distress Oxide Inks: Squeezed Lemonade, Festive Berries and Spiced Marmalade with blending brushes.  I always start with the lightest color and work toward the darkest color.  


On a stamping platform or acrylic block stamp the cactus image.  I choose to make this a sunrise, so the reddest ink is at the bottom half of the card. 


To get the placement of my sentiment on straight I place parchment over the stamped image on the stamp platform.  I like using baking parchment with the lines. Then I stamp the sentiment on the parchment to see if it is straight.  Once I am happy with the placement, I carefully remove the parchment and stamp directly on the inked image. 


I necessary trim the edges of the stamped cardstock and then mount on the card base. Add gems if desired. 


What do you think of my desert sunrise?  Give it a try!  
Until next time, Happy Stamping! ~Lyneen


Please visit our social media sites for more stamping fun!


Monday, August 5, 2024

Spooky Night Cemetery Crypt

Happy Halloween in August! Lyneen here, I don't think it is too early to start creating your spooky cards, tags and decor for Halloween. I am sharing a tag today; I masked to the spooky cemetery. This technique can be used for cards too. 


Stamp from Blank Page Muse
The Cemetery Crypt can be purchased as a single stamp or as a part of a full stamp set.

Cemetery Crypt Cross Halloween Rubber Stamp

Can also be found in the Halloween Takes Flight Rubber Stamp Set


Other Supplies
Aall & Create Tag Die #30
Tim Holtz Distress Oxide Ink Dusty Concord, Squeezed Lemon and Carved Pumpkin
Stazon On Jet Black
Stamping Platform
Gems
Ribbon


Die cut the white and black layers of the tag. Stamp image on paper and fussy cut.


Stamp the image with StazOn ink on the white die cut tag.  I like to use a stamp platform when stamping.  


Cover the stamped image with the mask.  With Tim Holtz Distress Oxide Ink Dusty Concord, Squeezed Lemon and Carved Pumpkin


Lift the mask off and lightly ink the moon with Tim Holtz Distress Oxide Ink Squeezed Lemonade. Leaving the cross and crypt black and white.   


Mount the inked tag on the base black tag. Add die cut paper hole enforcements, adhere to the front and back of the card. Tie festive ribbons onto the tag. Finally, add a few gems for a bit of bling.  


Your tag is ready for any Halloween gift bag, host gift or add it to the front of a card. 

Please visit our social media sites for more stamping fun!

I Brake For Stamps - https://ibrakeforstamps.com/

The Blank Page Muse- https://blankpagemuse.com/

FB Fan Page- https://www.facebook.com/groups/blankpagemuse/

Instagram Shop- https://www.instagram.com/blankpagemuse/

Instagram Blog- https://www.instagram.com/blankpagemuseblog/

Twitter- https://twitter.com/BlankPageMuse

Pinterest- https://www.pinterest.com/blankpagemuse/boards/


Monday, April 15, 2024

Just A Note

Hello, Lyneen here,
      I love vintage and distressed cards!  How about you?  For this card I created the vintage background paper with Blank Page Muse stamps. I stamped on velum for effect!


For this card I used the following from Blank Page Muse:

Vintage style Postcards background Art Rubber StampsTTS114-01 

Correspondence Pens, Ink & Postage Art Rubber Stamp Sheet by Katy Leitch SCKTL-001 (Stamps, Pens, Script background)


To learn how I created this card visit my blog HERE!

Please visit our social media sites for more stamping fun!

I Brake For Stamps - https://ibrakeforstamps.com/

The Blank Page Muse- https://blankpagemuse.com/

FB Fan Page- https://www.facebook.com/groups/blankpagemuse/

Instagram Shop- https://www.instagram.com/blankpagemuse/

Instagram Blog- https://www.instagram.com/blankpagemuseblog/

Twitter- https://twitter.com/BlankPageMuse

Pinterest- https://www.pinterest.com/blankpagemuse/boards/


Sunday, January 2, 2022

Winter Village Card

 Hello from designer, Heidi!   I was thinking of an idyllic Christmas morning scene when I made this card, but it really could be used all winter long, OR you could start a stash for next year!


I masked off the building in this scene and then sponged a wintery sky using Distress Oxide inks in Shaded Lilac, Tumbled Glass and Spun Sugar.  I sprayed the background with water to get texture.  I then added some depth to the black stamped lines by adding some black marker on some of the trees.  This makes some trees appear more toward the foreground and some more in the background.  

I colored the buildings with markers and then added plenty of glitter glue to depict the snow.  I also added some white gel pen snowflakes.


This stamp is part of the I Brake for Stamps line. 
It is called Small Christmas Sheet and includes other super sweet images in the set.  

You can also find more inspiration at the links below:

The Blank Page Muse- https://blankpagemuse.com/

FB Fan Page- https://www.facebook.com/groups/blankpagemuse/

Instagram Shop- https://www.instagram.com/blankpagemuse/

Instagram Blog- https://www.instagram.com/blankpagemuseblog/

Twitter- https://twitter.com/BlankPageMuse

Pintrest- https://www.pinterest.com/blankpagemuse/boards/

Saturday, December 12, 2020

Bright and Colorful Ornaments

Hi BPM Fans! Betty here with a bright and colorful Ornament.

 I hope you are having fun seeing all the amazing ornaments the Blank Page Muse Team has created for the holidays!   The ornament I created can be used on your Christmas tree or can be used all year round to hang wherever you please. The double-sided ornament is made from chipboard, stamped, and sealed with Glossy Accents so they will last for many many years. They make great stocking stuffers and gifts. Plus they are fun to make!
I hope you will give them a try and enter it into our monthly challenge. The theme is Celebrate and it can be any holiday.

SIDE 1                           SIDE 2

Supplies:
  • Blank Page Muse Stamps: Background Grunge Stamp Sheet by Pam Bray and Small Butterfly by Pam Bray
  • Chipboard - either 30pt or 22pt
  • Ornament die or circle die, minimum size 3". I used Lawn Fawn's Stitched Circle Tags Dies
  • Black solvent ink, such as Staz-On
  • Acrylic stamping block
  • Washi tape
  • White gesso
  • Washi tape - this is for texture. Use any pattern.
  • Distress ink or Distress Oxide: Squeezed Lemonade, Spiced Marmalade, Peacock Feathers, Seedless Preserves, Black Soot
  • Distress ink applicator
  • Distress Collage Medium or Mod Podge (matte or glossy)
  • Strong white glue
  • Glossy Accents or Diamond Glaze
  • Paint brush
  • Black 1/4" wide ribbon - approximately 9"
  • Optional items: Charms
Instructions:
  • Using an ornament or circle die, cut 2 die cuts with chipboard
  • Using a paint brush, apply a thin layer of Gesso on one side of each of the die cuts. You will only need to do one side since we will be gluing these two pieces together. Let dry completely.
  • Adhere the washi tape in various areas
  • Apply another thin coat of Gesso and let it dry
  • Using the black ink pad and background stamps, stamp a few of the background images. When stamping chipboard, I find it easier to place the chipboard on top of the larger stamps and rub it.
  • Apply another thin coat of Gesso, making sure you can still see the stamps through the Gesso. Let it dry.
  • Now stamp your focal stamps. Design your ornament how you like it! Let the ink dry.
  • Apply the colorful distress inks in various places. Apply the Black Soot in on the edges of the ornament.

  • Using a paint brush, apply a coat of the Distress Collage Medium or Mod Podge. Let it dry.
  • Using a paint brush, apply a generous coat of Glossy Accents. Add the charm while it is still wet. Add a little extra Glossy Accents to make sure the charm is secure. Let it dry.  NOTE: If you have charms that have the ring on top, break it off with two jewelry pliers. Hold the charm with one pliers and twist off the ring with the other pliers.

  • Using strong white glue, adhere the two back sides together to form the ornament.
  • Insert a charm in the ribbon and tie the ribbon onto the ornament. If you used a circle die, you will need to punch a hole and thread your ribbon through. Your masterpiece is done!

I hope you give this ornament a try. Check out the Blank Page Muse Art Rubber Stamps store for a large collection of amazing red rubber stamps, stencils, paper and more!

I had so much fun making these ornaments that I just had to make a steampunk Santa ornament with the same background stamps I used above, along with two stamps from the Steampunk'd Christmas Holiday set. 


Thank you for stopping by and I hope you have a wonderful holiday season!

Friday, November 30, 2018

Falling Leaves

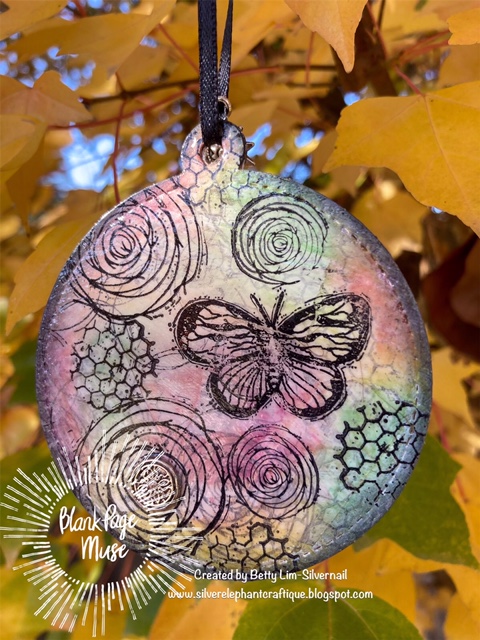
Cathy here with a Fall card for you. This card reminds me of walking in the woods when the grass is high and the dry leaves just float lazily down to the ground.
Stamps Used:
 Flower & Leaves Border by Pam Bray
 Smaller Tree Leaf by Pam Bray

Other Supplies Used:
White cardstock
Watercolor paper
Distress Oxide ink
Brown inks
Sequence mix
Foam tape
Glue

                                                                     
 Starting with the watercolor paper, create a background using the Smaller Tree Leaf  stamp using distress oxide inks.
Use fall colored inks and smooch them onto a craft mat then spray some water to activate the colors. Press the watercolor paper into the wet ink and leave out to dry. Repeat until you are happy with the results.

Ink the Smaller Tree Leaf   with brown ink and stamp all over the paper. Cut out and set aside.
Take a white card base and stamp  Flower & Leaves Border by Pam Bray with a light brown ink on the bottom of the card. Then stamp it again in a darker brown color ink in different spots on the bottom of the card.
Next arrange the leaves falling from the top of the card at one corner to the bottom of the card in the opposite corner.
On the other side you add your sequence from the top of the card to the bottom of opposite side of the card.

Visit us for more inspiration! 

FB Fan Page-  https://www.facebook.com/groups/blankpagemuse/

Instagram Shop-  https://www.instagram.com/blankpagemuse/

Instagram Blog-  https://www.instagram.com/blankpagemuseblog/

Twitter-  https://twitter.com/BlankPageMuse

Pintrest- https://www.pinterest.com/blankpagemuse/boards/

Copyright Text

Blank Page Muse 2018 Sin City Stamps 2013