Showing posts with label easel cards. Show all posts

Saturday, May 13, 2017

Embossed Resist Card Background

Hi There!
I love creating unique backgrounds because it is so much fun to emboss and then watch as the image pops out once you apply ink over it. You can easily create beautiful backgrounds by repeatedly stamping a single design and then heat embossing the image. Use a sponge applicator to add 2-3 shades of pigment inks over the embossed design. Go ahead and have a little playtime...you can build up a stash of backgrounds to pull out when you need that last minute card.
Supplies:
  1.  Art Journaling #2 Rubber Set (Sin City Stamps) 
  2.  Inhale Exhale Art Stamp Sheet (Sin City Stamps) 
  3.  Flower on Stem Art Rubber Stamp (Sin City Stamps) 
  4.  Watermark Ink Pad
  5.  White Embossing Powder
  6.  Heat Gun
  7.  Anti-Static Bag- or cloth bag of cornstarch
  8.  Pigment Inks / Sponge Applicator
  9.  White & Pink Cardstock
  10.  Pattern paper scraps
  11.  Water Color Paints / Waterbrush
  12.  Dimensional Foam Pads
  13.  Permanent Black Ink Pad 
  14.  Transparency (vellum)
  15.  Card base (5x7")
Directions:
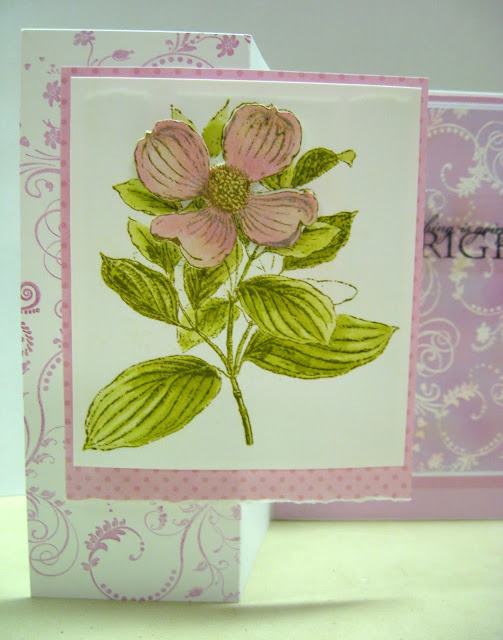
1. Fold the front panel of a white card base in half vertically. (Z-Fold Card)
Stamp the flourish repeatedly on the left half of the card front with pink pigment ink.

2. Adhere pink cardstock to the inside panel leaving a narrow white border.
3. Wipe white cardstock with an Anti-Static Bag (or cloth bag of cornstarch) to prevent static cling attracting stray grains of embossing powder to speckle the paper. Stamp the flourish stamp repeatedly with Perfect Medium. Be sure to overlap the edge of the paper and to rotate the stamp with each new impression to fill the page with a random design. Apply white embossing powder, remove the excess powder, and heat set.

4. Stamp the flower image twice with green pigment ink. Use watercolor paints to shade the leaves on one image. Next, paint the petals of the second image and fussy cut. Assemble the flower with dimensional foam tape and matte with patterned paper.  Tear the lower edge of the matte.
 5. Apply pigment ink over the embossed design with a sponge applicator. Matte with white cardstock.
(TIP: After applying ink over the embossed design, wipe the entire image with a facial tissue to remove any small beads of ink that are clinging to the heat set powder. The slick plastic surface of melted powder will resist absorbing the ink and will remain wet leading to the possibility of transfer to your fingers or smudging and ruining your project.)
6. Adhere the matted flower image by applying adhesive only to the left front half of the panel.

7. Use permanent black ink to stamp a sentiment onto transparency. Apply a small amount of adhesive to discreetly attach it. (TIP: Cut the transparency longer than the image in order to fold the excess, add adhesive to the flaps, and attach it behind the stamped background panel.)


A Closer Look:


Sin City Stamps:

To purchase these stamps, please visit www.sincitystamps.com

For more inspiring paper-craft projects from the Design Team, be sure to visit us at the

Sin City Blog  and follow us on Facebook.
You can also join our Fan Page HERE.

To learn more about our designer Karen, please visit her blog, Art & Soul.
Thanks for visiting!

Thursday, April 3, 2014

Two Cards for Spring

Hello there SCS stampers.  Barbara here, and I am so glad you stopped by today.  This month, we are being sponsored by Ecstasy Crafts, a fabulous company with some of the most gorgeous products.  The best part is we get to combine their products with Sin City Stamps products.


For my first project, I made this beautiful birthday easel card.  Easel cards are so simple to make, yet really make a statement when the recipient can sit it out for display without it falling over.

Supplies used:


Sin City Stamps:  Steampunk CircusMetal MadnessPam Bray's Fall Collection

Ecstasy Crafts:  Reddy Flowers & Cross 3D Die Cuts No. 83703; Starform 1290 Gold Floral Rectangular Frame Stickers

Cardstock:  Vineyard Weave (Bazzill), Ivory, Lavender (Paper Studio)

Ink pads: Versamark, Gold Encore, Old Paper Distress Ink,

Silhouette and cutting file:  Easel card, Egg shaped card

Spellbinders Die:  Lacy Labels Two

Detail clear and gold embossing powders

3/16" square adhesive foam (Darice)


Directions:


I used my Silhouette to cut out this card, but you can also cut Vineyard cardstock to measure 5-1/2" x 8 -1/2".  Score at  4-1/4" and 6-3/8".

I also used my Silhouette to cut the layers for the card.  You can use any similar die cuts you have, or cut pieces of cardstock slightly smaller than card front, in 1/8" increments, and either leave as a rectangle or punch corners with a decorative punch.  Use what you have.  It is easy.  Distress edges with Old Paper distress ink.

Center the Ivory layer over the card front and carefully fold back the card base at the 6-3/8" score line.  Use a pencil to mark center line.   
Apply adhesive to the bottom half of the Ivory layer.

You will adhere only the bottom half of the Ivory layer. 

Ink up only the center of the Metal Madness background stamp with Versamark ink.  I left the borders uninked.  Lay half of the layer over the inked stamp and burnish with your fingers.  Then do the opposite side to fill in.

Emboss with clear embossing powder.

Peel off gold frame sticker, keeping the sticker close to the paper while peeling it off.  This helps avoid pulling up the tiny cut out pieces, which will remain on the sticker paper and can be used, too.  I will show you this in my next post.


Adhere frame sticker over lavender layer.
Adhere to Ivory layer.
Now, to make the focal image.  Use foam dots to layer Reddy die cut Roses together, following the easy numbered directions. I used tiny pop dots for dimension.  Here is a close up of the layers.
Adhere 3D roses to center of card front.

For the inside, I stamped Happy Birthday onto a scrap of Ivory cardstock with Versamark and embossed with gold detail embossing powder.


Then I trimmed out the Happy Birthday piece using the die to make my pencil marks for cutting and edged that with Gold Encore metallic ink.

I used the Spellbinders die to cut out the fancy label from Vineyard, and edged it with Gold Encore ink pad and layered the Happy Birthday piece over center of die cut label.


Trim a piece of Ivory cardstock to 4" x 5-1/4", edge with Old Paper distress ink. Stamp May Your Day be Filled With Happiness using onto ivory card stock with Versamark and gold detail embossing powder.  Adhere to inside of card.


Adhere label piece beneath sentiment.  Apply glue only behind the central portion of the label.


This will act as a stop for the easel.


For my next card, I used the same papers and my Silhouette to cut out an egg shaped card.  If you google egg shaped cards, you should be able to find templates online.


First cut out card base from Vineyard cardstock.


Cut out two scalloped layers from Ivory (1/4" smaller) and Lavender (1/8" smaller) than the card base.  One Ivory piece will be used for the inside later.


Edge Ivory card layer with Old Paper distress ink, adhere to card base.

Stamp background image from Pam Bray's Fall Collection onto Lavender layer with Versamark ink and clear embossing powder.


Adhere to card base.


To make the focal image, layer all of your pieces as before, with foam dots.  Here is a pic of the pieces for this one.


And here is a close-up of the piece when completed.

Attach to card front.

Adhere the second Ivory layer to the card inside and Happy Easter die cut over that.

I still had these little butterflies on my desk that spoke to me and said, you are perfect for this card.  They are actually made from dried paint and punched out.  You can visit my blog here to see how I made them.  Here are a couple of close-ups of how pretty they look.


I hope you enjoyed my cards today and will give these products a try.  You can get all you need from both Sin City Stamps and Ecstasy Crafts to complete them and many more.  Be sure to check out the blog this month to see what the rest of the design team are cooking up for.  

Have a wonderful, creative weekend!  

Barbara

Copyright Text

Blank Page Muse 2018 Sin City Stamps 2013