Showing posts with label Faber Castell. Show all posts

Wednesday, April 22, 2015

A bit of Wonderland


Hello All Lanette Here!

Today I am going to share a page out of my Art Journal. I love my journal because there is no rhyme or reason for it, its only purpose is for me to get a bit of color on my hands. Which really is my happy place. :)

So first,  lets start by taking a look at my finished page, then I will show you how I made it! :)


Sin City Supplies Used:  Alice Art Rubber Stamps & Rosette Hearts

Other Supplies Used: Art Anthology Gesso, Dylusions Paint, Faber Castell Pitt markers, White Uni Ball Pen,

Now lets look at my process. Using a bit of foam I started painting squares and rectangles. I just kept picking colors and moving around the page, again no rhyme or reason.


 Here is a look after I finished making my squares and rectangles, not perfect but pretty!


Next I decided I wanted to add a image of Alice to my page. So I added some gesso to make the perfect spot for her.


I just love adding a bit of Wonderland to my Art Journal!


 A bit of doodling and a bit more stamping....


 Next it was time to color and a dd a few more stamps. I added a bit more color using my Pitt Markers and Rosette stamps.
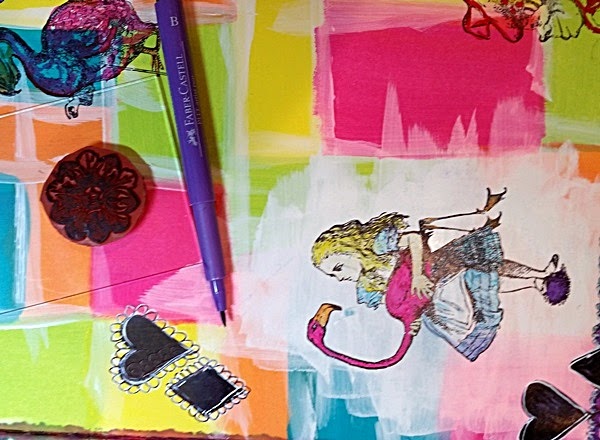

  Lots of doodling and a bit of coloring and that's it a pretty page to share! Easy peasy no rhyme or reason just some colorful fun!


And just a few details for fun!


Thank you so much for stopping by today!

I hope that I have inspired you to have some inky fun of your own!

Remember to like us on Facebook and stop by the store for all your stamping needs!!

As always feel free to stop by my blog Stacks of Scraps anytime!

Thursday, February 5, 2015

Blooming Butterflies Canvas


Tamiko here with my first post for Sin City Stamps..  Woohoo!  My process was pretty long.. so I am going to just jump right in.  I hope you enjoy!

It wasn't until cutting my sheet of stamps called Bingo from the Art Rubber Stamp Line, that ideas began to flow, of how I would use portions of this set.  The cling rubber was already applied so it is was easy to just cut.. and place on an acrylic block or just stamp freely as I often do!  

Here is my canvas.  


A few of my supplies included:


  • Plate of Rubber- Bingo
  • Cottonwood Canvas Board
  • Faber Castell Gelatos
  • Workable Fixative
  • Matte Medium
  • Wet napkins
  • brush
  • few gel pens for details/lines
  • Faber Castell Big Brush Pitt Pen
  • Napkin
  • Tissue paper
  • Gesso
  • ink pads
  • dabs of acrylic paints


I started out picking some of my favorite gelatos and building a background on my canvas board.

I then rubbed then into the canvas.. Decided I wanted them to blend a little more so I added white gelato.  To tone down the colors,  I kept a wet napkin nearby to moisten my fingertip.and rub everything in.. I also clean my fingertip between color changes.  Very important.. Especially if the colors you have if combined.. give you brown.. when you DON'T want it.. :)


I also framed it with my black gelato.  Then I sprayed a workable fixative on it. so I could continue to layer and not lose my colors, due to additional wet medium being applied...


I stamped my butterfly sentiment on it and it didn't come out like I wanted.. So when in doubt.. GESSO IT!! :)  Gesso is your friend!!


Looking Better already!!  I added more gelatos to get color back. and decided.. that workable fixative.. didn't work so well for me after all on this project!  Or maybe I was using it wrong?  Either way.. I knew I had to change something.. Add tissue!


I knew I wanted some texture so I used some tissue paper in my background.  I applied some matte medium and smoothed it out. I also placed the matte medium on top as well.


I added more gesso because .. I just wasn't pleased again!  ::thinking third try is a charm:: (fingers crossed) Then I decided.. I still  really want to use my butterfly quote.  so then I saw a napkin nearby and decided I would also use that!


The napkin was 3ply and with a small tear. I was able to separate all 3 layers.  I fussy cut the flower and butterfly I needed for my canvas board.


OooO Lala.. pretty


Here comes the matte medium! I applied it not only to the napkin, but the whole picture!


Then I decided to add a little acrylic over my corner to stamp on top of.  Then my image was fine!  I used a few gel pens to do some line work on images through my piece.  I love how it twinkled!

I want to thank you for coming by!  It's FRIDAY, which means it's the weekend baby!  Enjoy it.. and come check out Sin City Stamps and CREATE SOMETHING!! 

Saturday, February 22, 2014

Mixed Media Sin City Stamps Design Team How the time Flys


Mixed Media Project
How The Time Fly's


Here is my next Sin City Stamps Design Team project

I used a canvas 6x6x2 from Michaels

Created different layers
Spraying with Shimmerz different colors onto the wet gesso

Then adhered a sheet of Tim Holtz Idea-Ology Tissue Wrap, Melange
Colored it with Gelatos by Faber Castell

Hint:  I don't wait until the Shimmerz are dry - I put the Tissue Wrap on with Gel Medium and the color will seep thru the Tissue Wrap giving you a very cool effect.


For Step by Step you can see the Video Tutorial below.


I also included a list of supplies below with links to where I purchased them.


The Die Cut is from Sin City Stamps it's from the Clock Die Cuts


use a chipboard label from the Label Chipboard Pieces from Sin City Stamps


Supply List

Canvas - Michaels
Strips of Scrapbook paper (this is to just build layers)
Gesso
Shimmeringz
Tim Holts Tissue Paper 
Different Color Choices from Faber Castell Gelatos
Cheese Cloth

Sin City Design
Domino Charm

The Flowers & Leaves I used are from both Prima & Wild Orchid Crafts
Chip Board Letters - LOVE
I used different stamps with Black Stazon to create texture onto the canvas.

Thank you for taking the time to look at our blog and we hope you enjoyed watching the process of creating.


Please share with your friends.


Wednesday, February 12, 2014

Mixed Media 1st Design Team Post


Hello Everyone..  This is my 1st post on the Sin City Stamps Blog.  I'm so very excited to be part of this Design Team.

When I received my box of goodies my mind just went blank (figures)… Then luckily my daughter asked me to put together a design for her to give to her grandmother.  This is a very old photo from her modeling days and it was a favorite photo… only request I needed to use yellow, pink and blue in it…  

I did a video of the process you can see below.


Here are some close ups


I usually take photos step by step and I apologize that I didn't - I got so into the zone and using the amazing chip board and goodies from Sin City Stamps that I forgot to do it - so happy that I video taped the process.

Products Used

Chipboard:   I used the gear from the Die Cuts - Clock Die Cuts set
Pan Pastels - Magenta & Permanent Green
Sofft Art Sponge
Domino Love Charm

Other products used:
Scrapbooking Paper
Handmade White Paper
Art Anthology Sorbet - Honolulu Blue
Art Anthology Velvet - Blah
Faber Castell Gelatos - White & Blue
Prima Flowers
Golden Fiber Paste
Stencils
Twine
Doily
Cheese Cloth
Washi Tape

Below is a sneak peak for my next Design Team post.


Copyright Text

Blank Page Muse 2018 Sin City Stamps 2013