Happy New Year BPM Fans! Betty here to share a vintage/classic card. You have probably heard of the saying, "Let Your Dreams Take Flight." What does this really mean? What I think it means is that you can still achieve your dreams and goals even if you have come across many challenges. As we enter 2021 with renewed hope and inspiration, it's time to achieve some of these dreams and goals. I made this card to inspire a special person in my life who has had some recent challenges in his life.
I used two Blank Page Muse stamps. One is called World Map Hot Air Balloon Steampunk and the sentiment, Let Your Dreams Take Flight, is from the Vintage Transportation Steampunk set. These are the perfect stamps to use for entering a project in the Blank Page Muse January challenge, “Vintage/Classic.”

Supplies:
- Blank Page Muse Art Rubber Stamps: World Map Hot Air Balloon Steampunk and Let Your Dreams Take Flight sentiment from the Vintage Transportation Steampunk set.
- White cardstock (base card) - 12"H x 6"W folded in half
- White cardstock (card front) - 4-1/4"H x 5-1/2"W
- White cardstock (to stamp balloons) - 4-1/4"H x 5-1/2"W
- Gray cardstock (card mat) - 5-7/8"H x 5-7/8" W
- Newsprint Patterned paper - 5-3/4"H x 5-3/4"W. I used paper from Pink Paislee called Indigo Blue. Substitute with any matching paper.
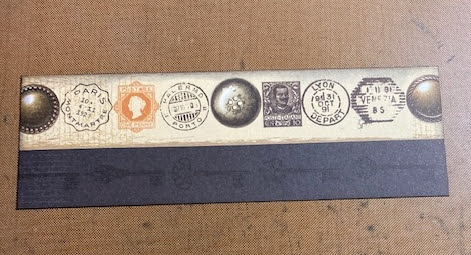
- Postage meter patterned paper (cut 2)- 1-7/8"H x 5-3/4"W. I used Kaisercraft, Miss Empire Collection, Steampunk. Substitute with any matching paper. I also used this paper to cut out 2 tags.
- White cardstock (sentiment) - sentiment trimmed to 3/4"H x 2-5/8"W
- Vintage postage stamps - I used real ones, but you can also use clip-art.
- 3-1/2"H x 4-1/2"W rectangular die (I used an edge that looked like a stamp, but you can use any style)
- Waterproof Black ink pad - I used StazOn
- Distress ink: Black Soot
- Distress ink: Stormy Sky
- Distress ink applicator
- Distress Collage Medium - vintage
- Paint brush to apply collage medium
- Glue stick
- Favorite adhesive
- Scissors
- Paper trimmer
Optional items for the tags:
- 2 brads
- 2 eyelets
- Crop-a-dile or hole punch and eyelet fastener
- 2 pieces of brown twine - 5" each
Instructions:
- Cut all the cardstock as indicated in the supplies list
- Using a 3-1/2"H x 4-1/2"W die, use a pencil and trace the inside of the die to mark a guide for placement of stamps onto the card front (white cardstock). If you don't have a die, use a ruler and mark the dimensions as stated.


- Using a glue stick, put a layer of glue onto the white cardstock. Add some glue outside of the lines as well.

- Arrange the stamps on the cardstock, making sure each piece has glue. Make sure the stamps go over the edges of the guide lines.
- Apply a thin later of Distress Collage Medium (vintage color) over the top of the stamps. Let this completely dry.

- Use the die and cut out the stamps. If you don't have a die, use a paper trimmer to trim where the guide lines are.
- Using a waterproof black ink pad, such as StazOn, stamp 2 balloon images and the sentiment on white cardstock (the picture only shows one balloon. I decided to add two balloons at the end of the project)

- Using Distress Ink Stormy Sky, ink your balloons and sentiment. Fussy cut the balloons and use a paper trimmer to trim the sentiment.

- Using Distress Ink Black Soot, ink the edges of the balloons, sentiment, card front, mat, and base card.
- Using the Kaisercraft, Miss Empire Collection, Steampunk paper or paper of choice, cut off the strip that has the postage meter stamp and adjoining border. One piece will be for the outside of the card and the other will be for the inside. Distress the edges with Black Soot.

- Cut two small tags using the Kaisercraft, Miss Empire Collection, Steampunk paper. If you don't have a die, use a paper trimmer. Distress the edges with Black Soot. Punch a hole and add an eyelet and twine to each tag.


- Add brads and foam tape to the back to the sentiment.
- Time to assemble your card:
- Adhere the gray cardstock onto the base card
- Adhere the newsprint patterned paper on top the gray cardstock
- Adhere the postage meter patterned paper to the bottom of the card, but leave the top edge unglued so the stamps and tags can be added. Adhere the extra strip to the inside of the card.
- Adhere the card front with the stamps to the card. Slip the bottom corner behind the bottom strip.
- Using double-sided adhesive foam tape, adhere the balloons and sentiment
- The tags are NOT adhered, instead, they are to be slipped underneath the strip. This way, the recipient can remove them to see the vintage stamps.


Thank you for stopping by today. I hope you give this card a try. If you have any questions or comments, please leave them below. ~Betty~
The Blank Page Muse Shop https://blankpagemuse.com/
FB Fan Page https://www.facebook.com/groups/bla...
Instagram - Shop https://www.instagram.com/blankpage...
Instagram - Blog https://www.instagram.com/blankpage...
Twitter https://twitter.com/BlankPageMuse
Pintrest https://www.pinterest.com/blankpage..
No comments:
Post a Comment
Thank you for visiting and leaving your kind words!
~~~
A note regarding the GDPR and EU ePrivacy Regulation:
Those leaving a comment on any post on this blog do so on the understanding that their name and personal details will be visible to anyone who visits this blog.
People entering a piece of artwork into any competition or giveaway promoted here, they do so in the knowledge that their name and blog link are visible to all who visit this blog and in so doing have published their own personal details and consented to our use of that personal information should it be selected as a winner.
Thank you.