Showing posts with label spring. Show all posts

Thursday, June 8, 2023

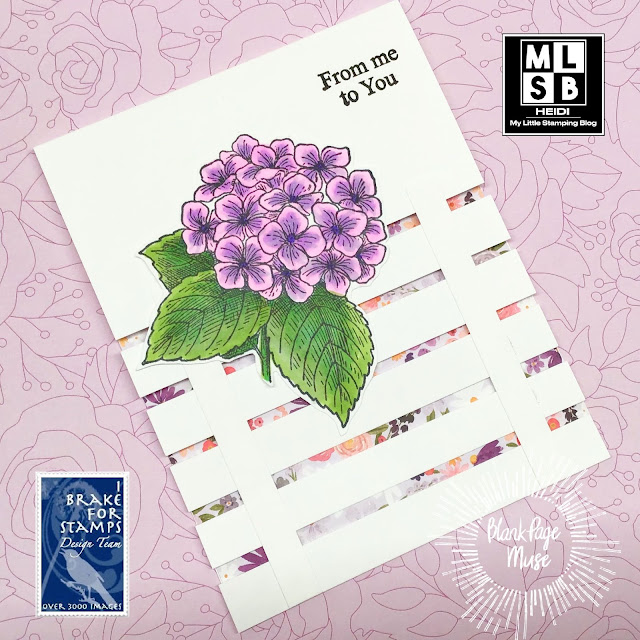
Trellis Hydrangea Card

 Hello from design team member, Heidi.  I am going to share with you today a Trellis card.  These are all the rage and they are not difficult!


1) Start by creating a top fold card and folding it.  Cut 3.25 inches off the front flap.  

2) Create your trellis pieces.  You will need 5 pieces for your horizontal slats that are 4.25 x 0.5 inches, and then for the vertical slats, 2 pieces that are 3/8 x 4 inches, and then for the inside vertical slat reinforcement, 2 pieces that are about a 0.25 x 4 inches.  

So that is 9 pieces total.

3) Now you want to get some washi or low tack tape, and place it FACE UP on your card front.  You have your card folded, and then just arrange the 5 horizontal slats in place.  Start with the bottom one - line it up at the bottom of the back of the card, and then just eyeball the rest to be mostly even.

DO NOT stress out about exact perfect spacing.  

4) Then put dots of glue in place for your vertical slats and place the wider slats for your card front.  I used magnets to weigh these down, but you could use your stamping blocks.  Note that these pieces are too long!  That is a good thing and we will be trimming them later.

5) After a the front is dry, open up the card, and reinforce the inside with the thinner slats. These pieces also are too long and will be hanging off the bottom of your card.  Once it is fully dry, trim the excess.

6) Cut a piece of patterned paper to line the inside of your card.  It needs to cover the open areas, so it must be at least 4.25 x 3.25.  Attach this to the inside of your card.

7) Decorate as you wish!

I used a beautiful hydrangea stamp for the outside of my card.  I colored it and fussy cut it out.  

For the inside, I used a floral border stamp from the same stamp set.  I stamped this in light purple ink, and I did the stamping before I added my patterned paper, just to make it easier.  

I then used some sentiments to finish off the outside and the inside and I was done!

The stamps I used for my card can be found in the I Brake for Stamps store.

Half Sheet Hydrangea Stamp Sheet

Sentiments from Florals Sheet Flowers for You

What do you think? Will you try, or have you already tried a trellis card?

You can also find more inspiration at the links below:

The Blank Page Muse- https://blankpagemuse.com/

FB Fan Page- https://www.facebook.com/groups/blankpagemuse/

Instagram Shop- https://www.instagram.com/blankpagemuse/

Instagram Blog- https://www.instagram.com/blankpagemuseblog/

Twitter- https://twitter.com/BlankPageMuse

Pintrest- https://www.pinterest.com/blankpagemuse/boards/


Monday, March 20, 2023

Happy Easter Card Inspirations


Happy Easter
Supplies used: Spring Bouquet Corner Stamp


Bunnies
Supplies used: Spring Bunnies rubber stamp


Celebrate Today!
Supplies used: Flower & Bird Sketches Stamp set


Because He Lives
Supplies used: Everyday Phrases  and Because He Lives 


Easter Card
Supplies Used: He is the reason for the Season stamp


Looking for more Inspiration? Click the links below!
The Blank Page Muse Shop https://blankpagemuse.com/


Friday, March 10, 2023

Bunny Cards to Inspire you!

 Hippity Hop, its almost time!
Here are some cute as a Bunny - cards to inspire!


Think Spring
Supplies used:   Everyday Phrases and Bunnies with a Watering Can


Little Bunny
Supplies used: 
 Woodlands Set designed by Donna Gray
 Tall Stars designed by Stephanie Eaton


Hip Hop

Supplies used: Jack Rabbit Animal Art Rubber Stamp


Country Bunny
Supplies used: Happy Easter  and Country Bunny


Spring Bunny card.
Supplies used: Flower & Bird Sketches


The Blank Page Muse- https://blankpagemuse.com/

FB Fan Page- https://www.facebook.com/groups/blankpagemuse/

Instagram Shop- https://www.instagram.com/blankpagemuse/

Instagram Blog- https://www.instagram.com/blankpagemuseblog/

Twitter- https://twitter.com/BlankPageMuse

Pintrest- https://www.pinterest.com/blankpagemuse/boards/


Tuesday, October 18, 2022

Think Spring Bird Card

 Hello from design team member Heidi!  Hope you are doing well!

I have an off-season card to share with you today!  I am using the stamp Beautiful Bird Nest that can be found in the I Brake for Stamps shop. 


This stamp is easy to color, I used alcohol markers.  I kept this card simple by just outlining the image in a very light aqua marker and then die cutting the piece, adding some cute butterfly gems.  

The sentiment is from the very large sentiment set called Everyday Phrases.


Thanks for visiting!

You can also find more inspiration at the links below:

The Blank Page Muse- https://blankpagemuse.com/

FB Fan Page- https://www.facebook.com/groups/blankpagemuse/

Instagram Shop- https://www.instagram.com/blankpagemuse/

Instagram Blog- https://www.instagram.com/blankpagemuseblog/

Twitter- https://twitter.com/BlankPageMuse

interest - https://www.pinterest.com/blankpagemuse/boards/


Tuesday, March 23, 2021

Flower Postcard

This postcard was so much fun to make. I put this postcard in an envelope so that the flowers wouldn't get wrapped off in the mail. You could sent this without an envelope just skip the step using craft foam and use really strong glue.


Rubber stamps used:

Additional items needed:
  • Imagination
  • Scissors
  • Alcohol markers
  • Paint brush
  • Water colors
  • Ink
  • Craft Foam
  • Water color paper
  • Card Stock
  • Glue 

1. Cut your water color paper to size. I made mine into postcards 4" x 6." 
2. Then wet the paper. Using water colors I just splashed color all over. If your paint seems to pool in one spot take  a paper towel and pat it dry. This also helps add texture and blending of the colors.
3. Once your water colors are dry. I stamped my flowers on a thick card stock. Then I stamped my postcard where I wanted my flowers to be.


4. Taking alcohol markers I colored everything in. I also colored the green parts on my postcard. Then I cut out the flowers and glued craft foam to the backs of them. Gluing that to the postcards.


5. Don't forget the quote on the top. This stamp set has so many cute quotes to choose from I used the quote, "Stand for something even if it means standing alone"


Hope you enjoyed this flower postcard.
 If you have any questions feel free to message Lasheet and if you choose to make your postcard tag her and Blank Page Muse. Thank you, happy crafting!! ♥


Looking for more Inspiration? Click the links below!
The Blank Page Muse Shop https://blankpagemuse.com/


Saturday, March 6, 2021

Spring Bunny Postcard

Spring Equinox in the Northern Hemisphere will start at 4:37am on Saturday, March 20th (central time) This is the first day of spring, this means our daylight hours will become longer and the temperatures warmer. In the Southern Hemisphere the very opposite is happening.


Rubber stamps used:

Additional items needed:
  • Imagination
  • Scissors
  • Alcohol markers
  • Paint brush
  • Water colors
  • Ink
  • Craft Foam
  • Water color paper
  • Glue 

1. Cut your water color paper to size. I made mine into postcards 4" x 6." If you want white edges like mine. Tape the edges down with washi tape.


2. Then wet the paper. Use a flat (square looking) brush. Take your water color in nay color you choose. Then choose whatever color you wish for the strips. I'm using green in the sprite of spring and St. Patrick's Day. I also splashed/flicked some gold on the background.

3. I then drew a silhouette of a bunny on scrape water color paper and cut it out.


4. Using this Ombre ink I stamped flowers to the bunny. Once the ink dries I slashed/flicked water color all over the bunny.

5. Glue you bunny in place and in black ink. I stamped the quote "Bloom where you are planted" to the top. The quote comes for the Flower & Bird Sketches stamp set.


Hope you enjoyed this Spring Bunny postcard. If you plan to mail these without an envelope make sure you use really strong glue. If you have any questions feel free to message Lasheet and if you choose to make your postcard tag her and Blank Page Muse. Thank you, happy crafting!! ♥


Looking for more Inspiration? Click the links below!
The Blank Page Muse Shop https://blankpagemuse.com/

Thursday, April 4, 2019

Mother's Day Card

Hello!
It's Karen here today.  I just love the versatility of this tree stamp. I have used it numerous times. Once I created an Autumn tree with multi-colored leaves and also for a Christmas card covered in lights.  I accepted the challenge to try to make one for Spring.  I hope you like my cherry blossom tree card for Mother's Day.


BPM Stamps:


(Shop now and save! Use code BPMDtKaren2019 to save %15 off your total order!)

Other Supplies:

  • Ink pads (brown / purple / dark pink)
  • Ink blending tool 
  • Colored pencils
  • Mini flower punch 
  • Pink card stock 
  • Mini pearls 
  • Sentiment 
  • Clear mounting block 
  • Card base (5x7") 
  • Liquid adhesive


Directions:
1. Stamp the rose design randomly onto pink card stock making sure some roses overlap the edge of the card. Alternate using pink and purple ink to create the background.


2. Create a mask of the rose image and place it over the rose previously stamped onto the pink card. Stamp the flourish images to fill in the gaps between roses. To create added depth, some flourishes can overlap roses.


3. Use a sponge applicator to lightly apply ink to color the roses.

4. Stamp the tree image with brown ink onto white card stock. Use a brown colored pencil to add shading to the branches and details to the bark.


5. Punch small flowers from pink and white cardstock.

6. Place a flower into the pad of your palm and gently press the center of the flower with the tip of a pencil in order to curve the flower and give it realistic shaping. Draw a star design in the center of the white flowers to create the stamens.  Layer the white flower on top of the pink flower and adhere a pearl to the center of each flower.


7. Fussy cut the tree and embellish it with the small pink blossoms. Adhere the finished tree to the lower right corner of the card base.

8. Finally, add a sentiment to the upper right corner.

A Closer Look:

www.blankpagemuse.com


            Blank Page Muse Shop - http://blankpagemuse.com/
            Facebook Fan Page -  https://www.facebook.com/groups/bla...
            Instagram - Shop https://www.instagram.com/blankpage...
            Instagram - Blog https://www.instagram.com/blankpage...
            Twitter - https://twitter.com/BlankPageMuse
            Pinterest - https://www.pinterest.com/blankpage...

To see more of Karen's projects, visit her blog Art& Soul.     

Sunday, March 11, 2018

Blank Page Muse Fan Art by Irena Stefanova


Today's Fan Art is by Irena Stefanova.
She is a mixed media card maker from Bulgaria. 
Here she has created 2 lovely spring cards 
From the Blank Page Muse stamp set


See more Fan Art creations here!

Wednesday, May 24, 2017

One stamp- Four ways


Hello my dear crafty friends and welcome to my Sin City stamping tutorial.
This time I decided to make 4 ATC cards with the very same stamp set and with 4 very different techniques.

Product list:
Sin City stamps: Dandelion Wishes with Butterflies

Other products:
White, black and Kraft cardstock
Vellum paper

Black pigmented ink
Clear, colorful and white embossing powder
Clear embossing ink
Heat gun
Colored mists
Gel Medium
Stencils
Texture paste
Gelatos
Acrylic paints
Crackle Glaze

 Step by step instructions:
ATC #1
1. Make two white cardstock ATC card, (2 ½ "x 3 ½")
 Stamp with the same stamp over both cards.
Use the black pigmented ink and heat emboss with clear embossing powder.


2. Use large acrylic block and mist it with 3 or 4 different colors.


3. Wipe the stamped ATC card over the misted block.


4.  Stamp a few butterflies, then using the clear embossing ink, heat emboss them with a mix of colorful embossing powders and glitters.

Hand cut the butterflies.


5. Glue a couple of hand cut vellum stamped butterflies over the first card.
Use a stencil to add Gel Medium over the card.


6. Stamp the small words with Sin City stamps and hand cut one to add over the first finished ATC card.
Ink the edges of the card with paint or ink.

 ATC #2
7. Mist the second white cardstock. Stamp the card. Add color with three different mists directly onto  the card.
As you can see we have a different background with this technique.


8. Use another stencil to add Gel Medium over the second card.


 9. Glue the stamped vellum butterflies over the second card and add another stamped word.

 ATC #3
10. Stamp more images over black cardstock ATC card using clear embossing ink and white embossing powder.


11.Paint over the textured ATC card with Gelatos. Wipe the color with baby wipe to create circles around the flowers.

12. Add some texture with a stencil and white texture paste.

13. Ink the edges and glue two vellum butterflies. Glue the stamped words.


ATC #4
14. Stamp  in the same way as on ATC #3 over Kraft cardstock.


15. Paint over and around the stamped images with acrylic paints.


16. Add a thin layer of Crackle Glaze over the card. Let the glaze dry.


17. Glue a butterfly and the stamped words.


So here all 4 ATC's  together and to tell the truth- I'm not sure if I like one more than the other... 
I think that the black is my favorite, but as you know we all like different things.
So just go and try each and every technique and have fun!

Don't forget to share your Sin City Stamps projects on our Fan Page!

Copyright Text

Blank Page Muse 2018 Sin City Stamps 2013