Showing posts with label gel press. Show all posts

Friday, December 24, 2021

Art Girl Art Journal Page

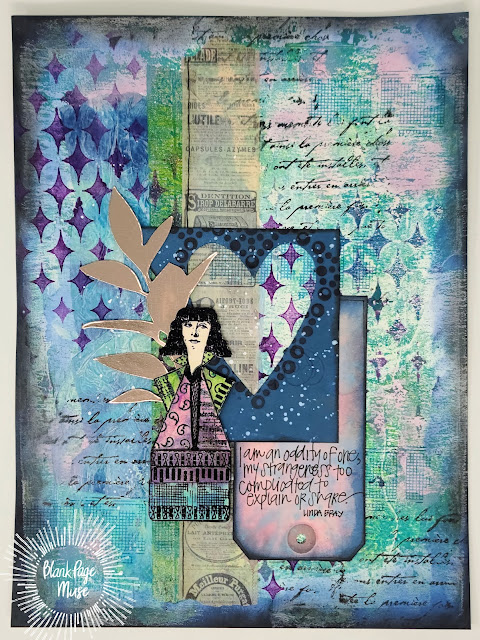
 "I am an oddity of one, my strangeness too complicated to explain or share."  - Linda Bray

One of my most favorite things to create are art journal pages. I have journaled my whole life and when I found a way to bring my journaling and art together it was a very happy day. The art journal pages I share are usually inspired by quotes or song lyrics. There are a whole host of pages that, just like my writing journal, are filled with my private thoughts, emotions, hopes, and dreams. 

Today I have an art journal page I did using the newest stamps and stencils for Blank Page Muse.  

Color Me Perfect Art Doll 

Bedazzled Diamonds Stencil

and my favorite stamp - Handwritten Note


Here are all the supplies I used to create this whimsical art journal page... 


You can jump over to my blog, Scrapbooking Technique to see how I created this art journal page and also to see how I condition my clear acrylic stamps before using them for the first time. 

Also, click the links below for more inspiration and to connect with the Blank Page Muse Community!

The Blank Page Muse- https://blankpagemuse.com/


FB Fan Page-  https://www.facebook.com/groups/blankpagemuse/


Instagram Shop-  https://www.instagram.com/blankpagemuse/


Instagram Blog-  https://www.instagram.com/blankpagemuseblog/


Twitter-  https://twitter.com/BlankPageMuse


Pintrest- https://www.pinterest.com/blankpagemuse/boards/


Until next time, Happy Creating! 

Christine

Saturday, October 23, 2021

Witch Sisters are Brewing It Up!

Hi BPM Fans! It’s Betty here. All the Halloween decorations are up and I’m finishing up my last few Halloween cards. Today I am sharing a card using this red rubber stamp called Witch Sisters and Cauldron Silhouette from Blank Page Muse. I love creating inky backgrounds and using silhouette stamps to make some quick and colorful cards.  

You can save 15% on this stamp and all purchases at Blank Page Muse by using my special code BPMBetty. 

Reminder that Blank Page Muse has purchased the stamp company, I Brake for Stamps! Thousands more red rubber stamps for your creations! Please check out the website for all your stamp needs! 

Please check out my blog for step-by-step instructions on how you can make this card: Betty's Blog


Looking for more Inspiration? Click the links below!


Friday, September 24, 2021

Moments spent with... my Blank Page Muse Stamps!


Happy Friday! Today I have an art journal page to share. This is by far one of my favorite pages I have done. From the techniques and colors to the inspiration behind it.. a special evening filled with wonderful moments with a special person. This page was so much fun to make and I used one of my all time favorite Blank Page Muse stamps: Handwritten Note Art. I also used my new set, Medallions Ornate Patterns & Flowers by Michelle Frae Cummings. As soon as I saw this set, I knew I had to have it! ...and it did not disappoint. It was an absolute blast creating with it. 


If you jump over to my blog HERE, you can see all the steps and techniques used to create this art journal page. Below is a photo of the supplies I used in all their inky & stamping glory! 

Until next time... Happy Creating! 

Christine 

Click the links below for more inspiration and to connect with the Blank Page Muse Community!

The Blank Page Muse- https://blankpagemuse.com/


FB Fan Page-  https://www.facebook.com/groups/blankpagemuse/


Instagram Shop-  https://www.instagram.com/blankpagemuse/


Instagram Blog-  https://www.instagram.com/blankpagemuseblog/


Twitter-  https://twitter.com/BlankPageMuse 

Pintrest- https://www.pinterest.com/blankpagemuse/boards/


Wednesday, November 4, 2020

Technique Gone Wrong or... a HAPPY ACCIDENT!

We all know that phrase, “Happy Accident.” 
As crafters we use it often to describe a project or technique that we attempted, but, it did not go as planned. Well, today, we are going to explore what became my “happy accident.”
This past weekend, with coffee in hand, I entered my studio, determined to learn this technique I saw online.
I felt pretty confident. I had watched all the videos and read about the supplies used…

I got this, yes! …Ummm, No. First try I quickly realized I had to have a Dye Ink Pad. Then the second, third fourth… what am I missing!? Maybe a different paper? Nope. I am back to the drawing board on the original technique I was trying to learn, but I am here today to show you the “Happy Accident” technique that I stumbled upon.


Supplies Used: 
and all these goodies you see below: 


Are you ready to play? Let's go! 

You want to ink up your Gel Press with Dye Ink and a Brayer. Sounds simple, right? I forgot to mention, this little “happy accident” is quite simple, but yet has endless possibilities.


Now, you want to dip your paint brush into your watercolors and Splatter the Gel Press. I used Primary Elements and also just basic watercolors. I will be playing around with other mediums and encourage you do to! ...and let me know how it goes!


Primary Elements Colors Used: Azurite, Forest Green, Mulberry, Wintermist Grey
Before I got started I mixed the Primary Elements Pigment Powders with The Solution. I ended up also doing another row of water than I mixed the main mix in just using my paintbrush. (...I am telling you, I really was approaching this like a science experiment!)


With my paper laid down, I flipped over the Gel Press and laid it on top of my paper, and then smooshed it down


Doesn't that just look cool!? This is the point I got super excited to unveil this masterpiece I have created using this new technique! ...and this is also where I realized that it was a 
"Happy Accident."
(This is not how it was supposed to look per the technique I was trying to learn, but I love how it does look!)


Now it is time to get inky with the Distress Inks!

Ink the edges of your card. I used Weathered Wood. 


Then place a circle stencil down for your moon and ink it up! (I cut mine out with my Silhouette Cameo and stencil paper so I can use over and over again).


Using Fossilized Amber I inked in the circle to create my moon. 


Then rip up a piece of paper and lay it down as a mask and then use Distress Ink to ink up everything below that line. Here I am using Peeled Paint.


Now time to Stamp!

Using the Silhouette Style Bare Tree from Blank Page Muse, I stamped my tree. 


Here is the same technique using different colors and also adding a little more spooky to it! (I am completely afraid of spiders, so I felt very proud of myself for using this creepy guy!)


I hope you have enjoyed playing along with me today and are feeling inspired to go get inky with your Inks, Gel Press, & Blank Page Muse Stamps! It has been a pleasure sharing my "Happy Accident" with you and I am sure there will be more to come! 

Here are some fun outtakes from this creative session: 


Never be afraid of playing and trying new techniques. You never know what you're going to discover! 

Until next time... Happy Creating! 

XOXO, Christine


Click the links below for more inspiration and to connect with the Blank Page Muse Community!

The Blank Page Muse- https://blankpagemuse.com/


FB Fan Page-  https://www.facebook.com/groups/blankpagemuse/


Instagram Shop-  https://www.instagram.com/blankpagemuse/


Instagram Blog-  https://www.instagram.com/blankpagemuseblog/


Twitter-  https://twitter.com/BlankPageMuse


Pintrest- https://www.pinterest.com/blankpagemuse/boards/


Thursday, August 3, 2017

Butterfly Gel Press Greetings


Hi all! Chris here and today I am excited to share this cute card I created with my Sin City Stamps! I was trying to re-create a garden against a brick wall and fence.  I love the mix of the "industrial" look with the elegance of a butterfly!

Supplies:

Sin City Stamps Butterfly Silhouette with Text 
Sin City Stamps Dandelion Wishes 
Embossing Ink
Ink
Embossing Powder
Card stock - white, maroon
Scallop Circle Punch
Fencing Sticker
Brick Wall Stencil
Gel Press Plate
Paint - Red, Brown

Step 1: Spread Red Paint over Gel Press Plate.

Step 2 : Using a brayer,  pull up most of red paint, leaving some around edges.

Step 3: Spread brown paint over the Gel Pate (on top of red paint).  Lay brick stencil over painted plate. 
                                              
Step 4: Lay a piece of scrap paper over the plate and press down.  This removes ink in the stencil area. Gently remove stencil and the remaining paint will be what you use.


Step 5: Lay your white card stock onto gel press and remove.  Let dry.  Your press image should look something like this. 


Step 6:  Stamp Dandelions from Sin City Stamps Dandelion Wishes  onto brick wall. 
     
                                             
Step 7: Add Fence Sticker. 

Step 8: Stamp Greeting from Sin City Stamps Dandelion Wishes onto punch scalloped circle with embossing ink and emboss with White embossing powder. 


Step 9: Add Greeting to card.


 Step 10: Stamp butterfly from Sin City Stamps Butterfly Silhouette with Text .  Fussy cut butterfly and add to card.


Be sure to Join and share your Sin City Stamps creations on our Facebook Fan Page!

Copyright Text

Blank Page Muse 2018 Sin City Stamps 2013