Showing posts with label #blankpagemuse. Show all posts

Friday, October 17, 2025

Do Something that Makes You Happy

 Hi everyone, Steph Ackerman here today using some amazing stamps and stencils from Blank Page Muse.


Blank Page Muse Stencils:  Butterfly Trails Circles, Leaves 2 Collage
Inks:  Distress Oxide: Crackling Campfire, Mustard Seed, Pumpkin Spice


Using the Leaf Stencil, move it about a white panel until you like its position.
Using assorted inks, add color to each leaf.


Place the Butterfly Trails stencil upon each leaf adding dimension to each.
Using the Wet Cement stamp, randomly stamp between the leaves.


Stamp and color the girl with Copic Markers.
Die cut and add her to a scalloped panel.
Place on the background.


Add the panel to green cardstock, then to a brown card.
Stamp the phrase, mat with green cardstock and add to the card with foam adhesives.

Thanks for stopping by.

Steph

Looking for more Inspiration? Click the links below!
The Blank Page Muse Shop https://blankpagemuse.com/


Wednesday, June 18, 2025

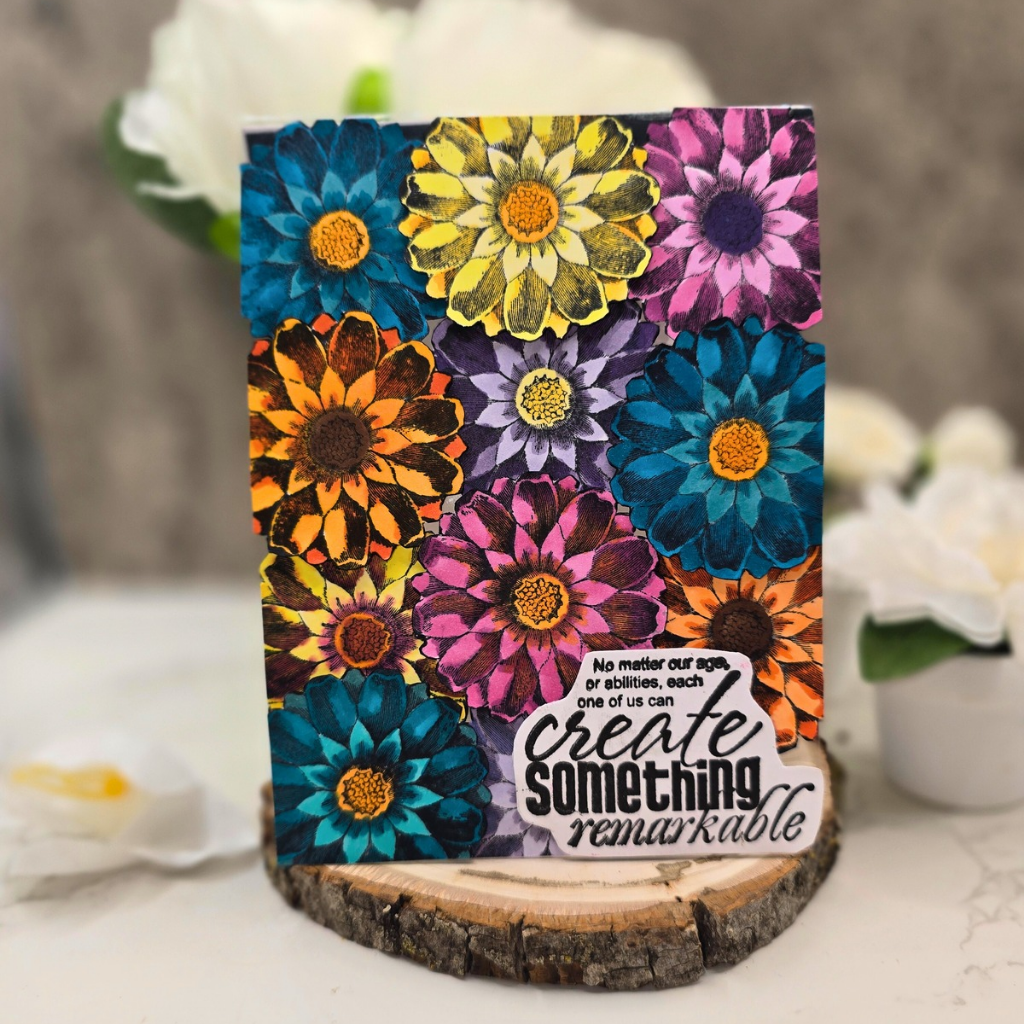
Floating Floral

Hello, friends! This is Lori from Coast 2 Coast Cards. Today, I channeled my inner Jennifer McGuire and created this floating floral card. Who wouldn't love to receive this paper bouquet? The encouraging sentiment is good for many occassions!

I began by stamping the Etched Stone Flower Rubber Stamp eleven times, then colored them with copic markers. I used aqua, yellow, orange pink, and purple markers to make colorful flowers.

After coloring the flowers, I fussy cut them.

I took a piece of thick acetate from my stash, and adhered it to a piece of dark green cardstock using liquid glue onto a 1" flap. I sandwiched the acetate on the back with a piece of white heavyweight cardstock.

Final card. I adhered the flowers with liquid glue and foam squares. I also stamped and fussy cut out Sentiment Word Stamps Create Something. I then attached it to the bottom cornerr of the card with foam squares. Because I used heavy acetate, the card stands up on its own. I hope you enjoy my card!


Wednesday, April 9, 2025

Coastal Vibes Card


Hello, Blank Page Muse family! I'm Lori and this is my first time posting here, so I will tell you a little about myself.  I live at the beach and love all ocean and beach-themed anything. When I saw this stamp set from Blank Page Muse, I knew I had to use it first!  I don't know if you're ready for summer, but I definitely am! I have a coastal-themed card today to get you into the mood!

I started with a light blue piece of cardstock, measuring 7 1/2 x 5 1/2". I scored it at 4 1/4" to make a peek-a-boo opening. Then, I stamped the mermaid, fish, and seaweed from Mermaid Fantasy Narwhal Art Stamp Set onto 80lb white cardstock from my stash. I colored the images with alcohol ink markers, then fussy cut the images. 

I cut panels from the Cyan Consortium 6x6 Paper Pad for the backdrop to my scene. I then adhered the panels with wet adhesive. I attached the fish and seaweed with glue and popped the mermaid up with dimensional squares. 


Inside, I stamped my sentiment onto a panel of white cardstock next to the strip from Cyan Consortium 6x6 Paper Pad

Products used:

Mermaid Fantasy Narwhal Art Stamp Set

Cyan Consortium 6x6 Paper Pad

Light Blue 100lb Cardstock

White 80lb Cardstock

Alcohol Markers

Black Ink

Grey Ink


Saturday, February 2, 2019

Always Believe in Fairies

TEIA!   or Welcome is Fae language! 
Today I am excited to share my take on this months "Things with Wings DT Challenge! 
The Anime Fantasy Fairies & Dragons II Art Rubber Stamp Set was one of my very first Blank Page Muse Stamp sets and is still one of my favorites!! So naturally it was a "go to" for this challenge.  


Blank Page Muse Supplies

Other Supplies
Archival Ink
Stickles (or other Glitter glue)
Sizzix Shadow Box Die
Distress Markers and Water Brush 
White Card Stock
Graphic 45 Papers
Chipboard Greeeting


Stamp Fairy and dragon onto white card stock.

Die cut Shadow Box and set aside. 


Fussy cut fairy and dragon.  (I originally cut the dragon using circle die from shadow box set but changed it up in a later step. )

Color fairy and dragon with distress markers and a water brush.


 Add Stickles  to Fairy wings and dragon horns. Here is a close up of the finished images.

Assemble shadow box and add dragon to inside of box.


 Finish box and fairy to front of box.  Add Always Believe Chipboard greeting to finish.


I really hope this post inspired your imagination and your inner muse!

Copyright Text

Blank Page Muse 2018 Sin City Stamps 2013