Pages

Pages

Tuesday, November 28, 2023

Spotlighted Holli

 Spotlighted Holli

Hi it's Sue with a spotlight technique.

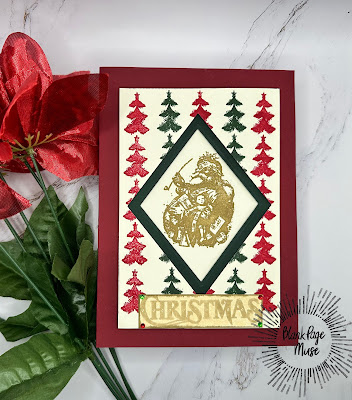
I thought it would fun to spotlight Holli for the holiday.  Spotlight technique can be done is different ways, this is just one.  

Basically what you do is stamp image on cream cardstock layer also on red, and pink layers.  Leave the cream one whole, and cut the colored ones in strips.  

You can get more information on my blog.

stamps used:
Blank Page Muse Holli by Rick St. Dennis

Use the code BPMSue for a 15% discount at Blank Page Muse or I Brake for Stamps

Thanks for stopping by.  Come back again soon.

Monday, November 27, 2023

Have You Tried Mirror Stamping?

Hello! Have you tried mirror stamping? Mirror stamping is when you stamp your image to create an opposite impression of your image. This technique extends the use of your stamps. It requires a stamp larger than the stamp you want to do an image mirror of, a juicy ink and a stamp positioner. 


The birds were colored using a smooshing technique. This is where I spritz some pigment to a craft mat, and I pick up the pigment with the watercolor paper. I dry the paper in between smooshing to create some texture. I also flicked paint to this panel to add more colors. 


I hope you give mirror stamping a try. It takes practice and the right combination of craft supplies but the result gives your stamp another use. Please visit my blog, Maria Giselle's Creative Cuts, for card details.

Find more inspiration by visiting the following blogs:


Thank you for visiting. Have a blessed, brilliant and creative day!


Saturday, November 25, 2023

How to Create a Quick and Easy Elegant Card and tag Combo for the Holidays

 Greetings today I am excited to share this quick and easy card and tag combo I created.  This Card and Tag combo are elegant,  easy to create and would be super easy to mass create for your holiday season.


To recreate this card you will need 

Blank Page Muse Penguins on Ice Winter Holiday Rubber Stamp Sheet  

I Brake for Stamps Florals Sheet Flowers for you Bouquet Happy Birthday Thank you


Start by stamping your "Merry Christmas:" greeting from Blank Page Muse Penguins on Ice Winter Holiday Rubber Stamp Sheet  with red ink onto your stamping paper. 


Mask off greeting.  Stamp your flower line images from I Brake for Stamps Florals Sheet Flowers for you Bouquet Happy Birthday Thank you over the masked greeting using gold ink. I used the large and the medium sized outline flower. 

Continue stamping to fill your background.  Trim stamped image and matte onto a red card stock base. 


Red the same technique to create your tag adding a gold cord bow to finish off your tag. 


I hope you are inspired to get creative with your stamps and papers from Blank Page Muse and I Brake For Stamps.  Don't forget to use my discount code BPMChris. 


Be sure to follow us at 

The Blank Page Muse- https://blankpagemuse.com/


I Brake for Stamps-https://ibrakeforstamps.com/


FB Fan Page-  https://www.facebook.com/groups/blankpagemuse/


Instagram Shop-  https://www.instagram.com/blankpagemuse/


Instagram Blog-  https://www.instagram.com/blankpagemuseblog/


Twitter-  https://twitter.com/BlankPageMuse


Pintrest- https://www.pinterest.com/blankpagemuse/boards/


Friday, November 24, 2023

Platform Pop-up Christmas Tree

Hello! Welcome back to the BPM blog! I hope you had a great Thanksgiving celebration with family and friends. Today's project celebrates the beginning of Christmas season. 


I used the following BPM products on this project:


The digital download includes several papers and ephemera. I am using four of the digital papers on this project. Depending on your project, I had to resize and crop some of the papers to fit my project. I am using Word for Windows in editing the digital downloads. If you have problems downloading the images to Word like I did, I suggest that you convert the image to jpg from png.


I used a die to cut the elements to create this platform pop-up Christmas tree. I heat embossed one of the borders from the stamp set on the tree die cut using silver embossing powder. 


I hope today's project inspires you. Please visit my blog, Maria Giselle's Creative Cuts, for card details. 

Find more inspiration by visiting the following blogs:

Visit our social media sites for more stamping fun!
I Brake For Stamps -https://ibrakeforstamps.com/ 

Thank you for visiting. Have a blessed, brilliant and creative day!


Thursday, November 23, 2023

3 for 27 Cents

Hi there, stamping friends, and welcome by again today.  This is a super fun card that I created using four fabulous rubber stamps from Blank Page Muse.  It's awesome how all the stamps from Blank Page Muse work so well on their own and when combined with other stamps from the store.  These four stamps worked perfectly together for this card that was created for one of my sewing friends.
I used the following stamps from Blank Page Muse:  Tape Measure Stamp (at bottom of card), Vintage Spring Hook & Eye Stamp (twice), 3 for 27 Stamp on a sentiment strip that's also stamped with the Bubble Wrap & Sequin Texture Stamp.  The dress form and scissors are stickers.
You can read more about my card and see additional photos by visiting my personal blog, MyCup Runneth Over

You'll also find lots of great inspiration here almost every day.  And.....if you're looking for something specific (images, sentiments, backgrounds and much more), I'm guessing you'll find it at Blank Page Muse and I Brake for Stamps.  Happy crafting.


Wednesday, November 22, 2023

Happy Fall Gnome

 Hi everyone, Steph Ackerman here today.

Today I am using some amazing products from Blank Page Muse.


Stamp the Guardian and color with Copic Markers.
Die cut and mat with a larger die.
Assemble the card.
Stamp and emboss the sentiment, adding it to the right corner with foam adhesives.


More details can be found on my blog.

Thanks for stopping by.


Steph

Looking for more Inspiration? Click the links below!
The Blank Page Muse Shop https://blankpagemuse.com/

Save 15% of your Blank Page Muse orders with discount code:  BPMSteph

Monday, November 20, 2023

A Vintage Santa, Two Ways

Happy Holidays, friends!

It’s Blank Page Muse design team member Walter on the blog today.  Do you love holiday crafting?  I do - it may just be my favorite time of the year for crafting.  Put on some Christmas music, make a mug of hot cocoa, and make cards or whatever other type of craft you enjoy.  That makes for a fun, and relaxing, evening!

Today I’m sharing two projects that I made with the following items stamps from Blank Page Muse:

The first project was this beautiful vintage Christmas card:


There’s lots of dimension to this card thanks to the use of layers of card stock and double sided foam tape.

The second project that I made was this vintage Santa curio box.  It can also be used as a card if you put a blank piece of card stock on the back of it!


You may read more detail about each project on my blog, where there is also a link to my YouTube tutorial on making the curio box.

Thanks for spending some time with me here today.  I’ll see you again soon!

Find more inspiration by visiting the following :

Thursday, November 16, 2023

Wobbling Santa's Hat

 Wobbling Santa's hat

Hi it's Sue here today to show you fun interactive tags.

It is always good to have tags on hand in your stash for the holiday season, but how about interactive ones.
I actually got a pretty good picture showing the motion of the hat.  Don't you think?  There is a wobble spring behind the hat that makes it move.

You can see a short video and more over at my blog here.

stamps used on these cards
Blank Page Muse Steampunk'd Christmas rubber art stamp sheet
Blank Page Muse Butterfly trails stencil 

            Use the code BPMSue for a 15% discount at Blank Page Muse or I Brake for Stamps

Thanks for stopping by.  Come back again soon.

Wednesday, November 15, 2023

Another Jane Inspired Project!

 Lyneen, here with more JANE!  If you haven't guessed I am a fan of Jane Austen!  I love creating things JANE! Today I have another tag created with Blank Page Muse stamps.  I love the tow Jane inspired plates of Jane images and words.  I really fell in love this the background on this tag. 

“Indulge your imagination in every possible flight.”  Are from a letter Elizabeth writes to her aunt Mrs. Gardiner in Pride and Prejudice. 


To create the tag, I used the following stamps from Blank Page Muse:

Words by Jane Sentiments & Silhouette Images Rubber Art Stamp Sheet SC202

Daisy Flower Art Rubber Stamp TTS117-08


Visit my Blog HERE for a detailed tutorial!  

Please visit our social media sites for more stamping fun!

I Brake For Stamps -https://ibrakeforstamps.com/

The Blank Page Muse- https://blankpagemuse.com/

FB Fan Page- https://www.facebook.com/groups/blankpagemuse/

Instagram Shop- https://www.instagram.com/blankpagemuse/

Instagram Blog- https://www.instagram.com/blankpagemuseblog/

Twitter- https://twitter.com/BlankPageMuse

Pinterest- https://www.pinterest.com/blankpagemuse/boards/


Monday, November 13, 2023

Creating a Sweet Hello Stamped Card

 Greetings!  Today I am excited to share this sweet hello card I created using some of my favorite Blank Page Muse Stamps!  I love different stamps to create collage-y styled cards.


 This card features the following stamps:


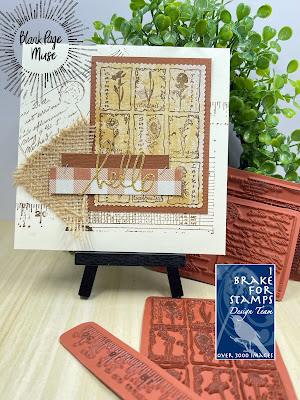
Start by stamping your Blank Page Muse Vintage style Postcards background Art Rubber Stamps  with brown ink.  mask off image and then stamp Blank Page Muse Vintage Farm Receipt Art Rubber Stamp onto your card base. 

Add Blank Page Muse Tape Measure Piece Art Rubber Stamp to your back ground as shown. 

Stamp the Blank Page Muse Summer Wildflowers Postoids Collage Art Rubber Stamp onto golden patterned papers. I chose to cut out the image with my decorative scissors. 


I added a sticker greeting and a scrap of burlap to finish your card. 


I hope you are inspired to get creative with your stamps and papers from Blank Page Muse and I Brake For Stamps.  Don't forget to use my discount code BPMChris. 


Be sure to follow us at 

The Blank Page Muse- https://blankpagemuse.com/


I Brake for Stamps-https://ibrakeforstamps.com/


FB Fan Page-  https://www.facebook.com/groups/blankpagemuse/


Instagram Shop-  https://www.instagram.com/blankpagemuse/


Instagram Blog-  https://www.instagram.com/blankpagemuseblog/


Twitter-  https://twitter.com/BlankPageMuse


Pintrest- https://www.pinterest.com/blankpagemuse/boards/

Friday, November 10, 2023

No Place Like Gnome in the Fall

Hey there, friends!

It’s design team member Walter on the Blank Page Muse blog today.  Autumn in my favorite time of the year here in New England (where I live.)  There is nothing like the sights, smells, and weather during this time.  I just love it - and today’s creation that I’m sharing celebrates it.


I used the following BPM products to create it:

Our gnome friend, Mr. Elderwillow, sparkles thanks to the glitter and metallic gel pens used to color him.


And the pumpkins look amazing thanks to the wonderful design of the stencils.


Both Mr. Elderwillow and the pumpkins blend in so well with the paper printed from the digital printable kit.

You may read more about my creative process on my blog.

Thank you for spending some time on the blog with me today.  See you again soon!

Find more inspiration by visiting the following :


Wednesday, November 8, 2023

A Floral Background on Vellum

Hello! Welcome back to the BPM blog. November is the month of Thanksgiving which is one of inspirations in the creation of this card. I did not use colors of the season for a change. 


I stamped the floral image on vellum with embossing ink repeatedly. I don't want the image to be overlapping, and I want to be able to stamp as much image on the panel so I used the old handy dandy tool Stamp A Ma Jig for placement of the image. 

I used a pearl embossing powder for some shimmer. I melted the embossing powder in between stamping. Vellum can be tricky with repeated heating due to its tendency to warp. To prevent this, give the heat gun plenty of time to warm up before melting the embossing powder. Also, continuously move the heat gun while melting the embossing powder. 


The effect of the pearl embossing powder on vellum is very elegant. 

I added a pop of color to the floral background but instead of adding the color directly to the embossed flower, I colored the image on the back of the vellum.

I hope today's project inspires you. 
Please visit my blog, Maria Giselle's Creative Cuts, for card details.

Find more inspiration by visiting the following blogs:


Thank you for visiting. Have a blessed, brilliant and creative day!