Pages

Pages

Tuesday, April 30, 2019

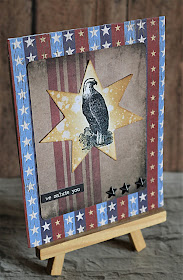
We Salute You

Hello all, Cathy N. here!
I make batches of cards for the solders so they can write home to their loved ones.
I also like to add a personal card to show my appreciation for all that they do for us.
Here is one that I have sent.

Stamp used:
Bald eagle

Other supplies used:
pattern paper
pocket cards
star die cut
white cardstock
black & brown ink
metal stars


 Start out by cutting out a star from white cardstock. Stamp bald eagle in the star.
Color the star with some brown ink. Splatter with water.  
 On a white cardstock base add star pattern paper.  Then layer a pocket card on top.
 Add the stamped star die cut to the card.

 Lastly add 3 metal stars to bottom of pocket card and add saying to other side.
Don't forget you can use my code and get 15% off your stamp order
(BPMDtCathy2019)

Come check out some fun other spots that have Blank Page Muse stamps.


FB Fan Page-  https://www.facebook.com/groups/blankpagemuse/

Instagram Shop-  https://www.instagram.com/blankpagemuse/

Instagram Blog-  https://www.instagram.com/blankpagemuseblog/

Twitter-  https://twitter.com/BlankPageMuse

Pintrest- https://www.pinterest.com/blankpagemuse/boards/

Monday, April 29, 2019

You're a Star!

Hi Again BPM Fans!!
Hope you have all been enjoying the fabulous creations the DT have been sharing here at the blog for this month! always so much inspiration and fab ideas for using the HUGE range of Blank Page Muse stamps! I love learning new techniques and ideas!
Today I am sharing a nice bright Birthday card!


Supplies:
Blank Page Muse Stamp: Happy Birthday
Black Base Card
Watercolour Paper
Brusho Crystal Colours
Water Spritzer
Posca Pen
Embossing Folder + Embossing Machine
White card + Black Archival ink
Colouring medium ie. Copic markers, colour pencils etc.
Tools: scissors, double sided tape, glue


Instructions:

First step is to make our background paper and allow it to dry while we stamp and colour our main image.


Tap "Brusho" crystals directly onto the top flap of the embossing folder. Colours used for this project: red, orange & yellow.


Spritz the embossing folder with water and place your watercolour page inside.


Emboss through your embossing machine and carefully remove the embossed paper from the folder. Allow to dry. Note: if your paper is on the thin side it can tear easily as it is fragile from the water!


Once dry cut your coloured and embossed watercolour piece to fit your base card. Cut slightly smaller so you get a nice border around your embossed piece. Edge your embossed paper with a Posca pen in a complimentary colour.


Next step is to stamp our fabulous BPM Stamps! Stamp the "Happy Birthday" sentiment onto white card, cut out and edge with the Posca pen.


Stamp the "Party" gal with black archival ink onto white card.


Colour your stamped image with your favourite colouring mediums and fussy cut the image.
 Arrange all of your elements onto the card and adhere with glue or double sided tape.
The last step is to give your card to a "Superstar" for their birthday!!!
Thanks yet again for joining me today!!
Have fun stamping!!
Sharon

Here's all the links you need to "stalk" us on Social Media!!!!!

The Blank Page Muse- https://blankpagemuse.com/

Sunday, April 28, 2019

Thanks Art Journal

Hello Crafty Ftiends,

Marie-Christine with you today with a Spring  Art Journal page. Love to do Art Journal creation, I choose a stamp to start and let my imagination do the rest.


BPM Rubber Stamps used:


(Shop now and save! Use code BPMDtMarieChristine2019 to save %15 off your total order!)

Other Supplies

Art Journal

Stencils
Distress Oxide
Masking Tape
Spray Inks
White and Pink Markers 


Divide your page into 3 columns and color with Distress Oxide.
Choose a stencil and add Distress Oxide on it, repeat the same thing with a baby wipe.


Here is the result!

 
Add some background stamps.


Put some more colors on your page with blue ink and stencil.


Adhere some Masking Tapes in the middle.


Stamp the Dragonfly stamp and the word on a watercolor paper. Use spray inks to color them and finish with a white and pink touch color.
Simply stick them the middle to give dimension.


Hope you have enjoyed my tutorial!


Thank you for visiting!


Marie-Christine Denis

Inspiration Team Member


Follow us 

The Blank Page Muse- https://blankpagemuse.com/


Saturday, April 27, 2019

Artist Trading Cards on Watercolor Paper

Hello! Great to see you back for another project using Blank Page Muse stamps.
For this month, I created ATC’s on watercolor paper.


Supplies –
Canson Watercolor paper
Distress Ink in your choice of colors
Ranger Archival ink Jet Black
Lumiere paint or any sparkly paint
Splatter brush and water
Twine
Spackling
Stencils of your choice
Paper dolls or printed images

Using a 9’ x 12” piece of watercolor paper, cut into ATC sized pieces of 2 ½” x 3 ½” then stencil with Distress ink using a sponge, then spritz with water to get a soft look to the ATC.


With the Archival ink and the Correspondence and Background Grunge stamps, lightly stamp over the ATCs for a light texture.


Lightly brush the Lumiere paint with a wet brush on areas of paint on the ATC then splatter with leftover paint.

Ink the edges with Archival ink or Distress Ink in your choice of color.

Stamp the back of the ATC with the Scribble Circles Information stamp.

Using a stencil and spackling, add some texture to the ATCs and when dry wrap twine around the bottom third of the card and tie in place adding some tacky glue to the knot.

Sort through your focal images and decide on which ones to use, ink the edges and glue down with tacky glue.


Add words from the Dear Beach sentiment stamp (I cut this stamp up to use the words in different ways). Attach words with foam tape for some dimension. Add other embellishments as desired and fill out the back of the ATC.


The Blank Page Muse- https://blankpagemuse.com/

Friday, April 26, 2019

Stamping into Clay

Hello! Did you know you can emboss in air dry clay? My favorite clay to work with for this is Delight Clay™. It holds the detail well and it is very light. It actually feels like a marshmallow. This project is super fun and super easy. Grab your favorite Blank Page Muse Stamp and let's get started!


Blank Page Muse stamp used is from: 


Other supplies used:
gesso
Grumbacher watercolor paint
Tsuniko Walnut Ink Spray
decoupage medium
napkin
small canvas
Golden Soft Gel Medium Gloss
Golden Inference Gold Fluid Acrylic
Golden Gel Medium


Step 1: roll out the clay approximately 1/4" thick.  Place your stamp face down and gently press into the clay.


Step 2: Smooth any lines with a damp finger. Set aside to dry.


Step 3: Coat with gesso and allow to dry. Paint with watercolor paints.


Step 4: When dry, spray with walnut ink using a paper towel to dab off excess.


Step 5: Cover your canvas with the napkin, using decoupage glue to stick it down. Set aside to dry.


Step 5: Add some of the same watercolors that you used before to the canvas. Use gesso to push back the bright colors. 


When you are happy, set aside to dry. 


NB. Steps 7and 8 are totally optional. I was going for a faux encaustic look which can be achieved with gel medium.

Step 7: Add a drop of Inference Gold to some soft gel gloss medium. Mix thoroughly.


Step 8: Coat the canvas using a palette knife. Set aside to dry.


Step 9: Use gel medium to stick the clay piece to the canvas.


Here are a few pictures of the finished canvas. 


Thank you so much for stopping by. I do hope you enjoyed this tutorial. Remember to subscribe so you don't miss a post and look us up on social media (links below).
Happy crafting!

Suzette

Instagram Shop-  https://www.instagram.com/blankpagemuse/
Instagram Blog-  https://www.instagram.com/blankpagemuseblog/
Twitter-  https://twitter.com/BlankPageMuse
Pintrest- https://www.pinterest.com/blankpagemuse/boards/