Pages

Pages

Friday, November 30, 2018

Falling Leaves

Cathy here with a Fall card for you. This card reminds me of walking in the woods when the grass is high and the dry leaves just float lazily down to the ground.
Stamps Used:
 Flower & Leaves Border by Pam Bray
 Smaller Tree Leaf by Pam Bray

Other Supplies Used:
White cardstock
Watercolor paper
Distress Oxide ink
Brown inks
Sequence mix
Foam tape
Glue

                                                                     
 Starting with the watercolor paper, create a background using the Smaller Tree Leaf  stamp using distress oxide inks.
Use fall colored inks and smooch them onto a craft mat then spray some water to activate the colors. Press the watercolor paper into the wet ink and leave out to dry. Repeat until you are happy with the results.

Ink the Smaller Tree Leaf   with brown ink and stamp all over the paper. Cut out and set aside.
Take a white card base and stamp  Flower & Leaves Border by Pam Bray with a light brown ink on the bottom of the card. Then stamp it again in a darker brown color ink in different spots on the bottom of the card.
Next arrange the leaves falling from the top of the card at one corner to the bottom of the card in the opposite corner.
On the other side you add your sequence from the top of the card to the bottom of opposite side of the card.

Visit us for more inspiration! 

FB Fan Page-  https://www.facebook.com/groups/blankpagemuse/

Instagram Shop-  https://www.instagram.com/blankpagemuse/

Instagram Blog-  https://www.instagram.com/blankpagemuseblog/

Twitter-  https://twitter.com/BlankPageMuse

Pintrest- https://www.pinterest.com/blankpagemuse/boards/

Thursday, November 29, 2018

Happy Birthday!

Hello Again Blank Page Muse Stamps Fans!!!!
It's nearly the end of November - what a scary thought - you know what comes next month!
Bah Humbug - let's skip Xmas LOL!

Today we are focusing on Birthdays and I've created some colourful cards that you can make multiples of and add to your stash for when you need to grab a card and wish someone a happy birthday!


Supplies:
Blank Page Muse Stamp: Happy Birthday
Base cards - black used here
Piece of card for card front
Paper Towel - "mop up" from ink spraying!
Kraft Coloured Paper or Cardstock
Black Archival Ink
Stencils - use your faves!
Gesso
Scrap of muslin cloth
General tools: scissors, glue, double sided tape, spatula

Instructions:
Start by stamping the Hatter stamp and Happy Birthday Stamps onto Kraft paper using black archival ink. Fussy cut the hat stand and tear out the birthday greeting.


Next prepare your card bases and card fronts. Black cardstock used for the base cards for this project. Cut card fronts slightly smaller than the card base. If your paper towel is several layers thick peel off one layer to use - choose a nice colourful section to use!


Use a flue stick to adhere the paper towl layer to the card front. You can either trim the edges or fold them over neatly and secure with glue at the back.


Using your fav stencil, your gesso and a spatula apply gesso to the whole card front. I like using gesso for this as it allows some of the colour hue from the paper towel to "show" through the white gesso which looks nice and effective.


Once dry adhere the decorated card fronts to the card bases.


Arrange the shredded piece of muslin cloth over the back along with the birthday greeting and the fussy cut hat stand image and adhere to card front.


You now have a couple of lovely birthday cards for someone special! You can adapt any stamps for this style of card. The stamps always look great printed on card with the colour focus being the background! And with Xmas coming what a great idea to whip up a stack of cards - check out the store for all the fab festive stamps you can use!!

 Hope you have enjoyed my step by step cards!
Sharon
 Don't forget to visit us at all of these Social Media Sites for amazing inspiration:

The Blank Page Muse- https://blankpagemuse.com/

Monday, November 26, 2018

Quiet, but not blind

Hi Everyone,
Jess here today. I was starting my project with a fall theme in mind and then I stumbled across my quote stamp.  The colors evoke fall, but the sentiment can work year round!


Blank Page Products used:
Oh darling stamp
I was quiet, but I was not blind
Floral Lace
Large Bird Man


Other Products Used:
Distress Inks
Distress Oxides
Distress Crayons
Distress Markers
Cardstock
Micro Glaze
Archival Ink
Clear Texture Paste
3d Embossing Folder
Ribbon
Adhesive
Stencil
Waterbrush

Using Distress Heavy stock blend together several shades of DIstress Ink.  Spritz with water and dry completely.  Take a tiny bit of Distress Micro Glaze cover most of the background.  Stamp the Floral Lace stamp using Distress Oxide Ink and spritz with water.  Using the micro glaze on most of the background keeps the top layer of ink from blending into the background.  It also keeps some of the intricate stamp pattern, but not all of it.  The look is wonderfully aged and tattered.
Take clear texture paste and a stencil to the background.  Don't worry about it looking perfect.  Imperfect looks better! ONce the paste is dry use Distress crayon to scribble over the paste.  Smudge the crayon using your finger and the pattern pops up adding another layer to your background.
Stamp the Large Bird Man on Watercolor cardstock.  Color him in using a waterbrush and Distress Markers.  Once he is dry fussy cut the image.

To finish the background stamp your two sentiments( Oh darling  and I was quiet, but I was not blind) using archival ink.  Back them with black cardstock and play with placement on your background.  Once you're happy with placement you can glue them down.
Run plain black cardstock through your die cutting machine using a 3d embossing folder.  Take a Distress Crayon and highlight the raised areas.  The slight gilded effect is so gorgeous.  Adhere this piece right under the focal background piece you created.
All that's left to do is layer up your background.  On this card the black is attached to a distressed piece of gold cardstock.  The gold is mounted to a sage green card.  A bit of burgundy ribbon was the finishing touch.
Happy Crafting,
Jess


Thanks for coming by!
Please visit the following for more inspiration!


Thursday, November 22, 2018

Believe in the Magic of Christmas!

Indulge in a little bit of whimzy this Christmas with this tree tag ornament by Monique!


See the full tutorial here.

Thanks for coming by!
Please visit the following for more inspiration!

Wednesday, November 21, 2018

The Beauty of Autumn - CAS Card

Hello,
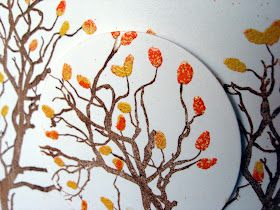
It's Karen, from Art & Soul and I'm here today to share my card on the Blank Page Muse Blog.  Today my card features a nature theme showcasing the beauty of Autumn. I do hope you appreciate its simple elegance and enjoy the simplicity of the CAS card.  I think you'll agree; trees are so versatile!


Directions:

1. Use brown ink to stamp two bare tree images unto white card stock.
2. Stamp a bare tree on another scrap of white card stock.  Use a 2.5" circle punch to cut out a section of branches.
3.  Use a watermark pen to draw leaves onto the trees.  Next, apply both yellow & orange embossing powder to leaves, tap off the excess powder, and heat set.
4. Attach the stamped circular image over the background trees using foam tape.
5. Round two diagonal corners and matte onto orange card stock. Adhere to the cardbase leaving a narrow border.
6. Stamp a sentiment, round the corners, and matte with orange card stock. Snip the end to make a flag shape and attach it slightly overhanging the left edge.


BPM Rubber Stamps:

Other Supplies:
  • brown ink pad
  • watermark pen
  • embossing powder (yellow & orange)
  • heat tool
  • 2.5" circle punch
  • corner rounder punch
  • foam tape 
  • orange card stock
  • card base (5x7")
Blank Page Muse Shop http://blankpagemuse.com/
            Facebook Fan Page https://www.facebook.com/groups/bla...
            Instagram - Shop https://www.instagram.com/blankpage...
            Instagram - Blog https://www.instagram.com/blankpage...
            Twitter https://twitter.com/BlankPageMuse
            Pinterest https://www.pinterest.com/blankpage...
   
To see more from our designer Karen, visit her at Art & Soul.
Thanks for visiting!

Tuesday, November 20, 2018

Fabric Angel Ornament

Adorn your tree this year with this 'peaceful' fabric angel ornament by Karen!

See the full tutorial here!

Thanks for coming by!
Please visit the following for more inspiration!

Monday, November 19, 2018

Fairy Godmother Palace

When I saw the Fairy Queen Palace stamp I had to have it!  I couldn't wait to play with it and color the image!  For my project I decided to pair the Palace stamp with the Fairy-tale Fantasy Figure stamp set.


Blank Page Muse Supplies Used 

Other Supplies Used
Archival Ink - Black, Brown
Distress Watercolors Markers
Water Brush
Wavy Die 
Patterned Paper

Start by Stamping Fairy Queen Palace with brown Archival Ink onto White card stock. 


 Color Image as desired.


Cut from of card with Wavy die. Trim and mat image on patterned paper and attach to inside of card.


Stamp Fantasy Fairy onto white cardstock.  Fussy cut and color image.  


Attach fairy to front of card.  Stamp Greeting from Anime Fairies 2 and mat onto patterned paper and add to card to finish.


Sunday, November 18, 2018

Reindeer Ornament


If you like the look of a natural Christmas, then you'll love making this ornament by Chris! 

See the full tutorial here. 

Thanks for coming by!
Please visit the following for more inspiration!

Saturday, November 17, 2018

Family Memories

Hello Everyone!!
Who can believe it's halfway through November already? Xmas will be her before we know it!


I hope you have been enjoying our November themed month of Family, Fall & Thanksgiving!
Today I am sharing some Sugar Skull tags with my thought process being "The Day of the Dead" and a day of remembrance and celebration of past family members lives.
I hope you like how they have turned out and feel inspired to try something like this yourselves!
Supplies:
Baggage Tags: size used here 6cm x 12cm
Cork Sheet
Black Archival Ink
Cobalt Achival Ink
Matt Chalk Acrylic Paints
Tools: spatula or paintbrush, scissors, glue
Extras: string/twine, ink sprayed muslin cloth scraps
Instructions:

Start by using a spatula or paintbrush and adding a thin layer of various colored chalk style acrylic paints to the tag background.


Once the paint is dry - which won't take long as the thin application is quick to dry - stamp one of the little "floral" stamps from the Sugar Skull set over the tag background using the Cobalt Archival Ink.


Next is to stamp the feature stamps onto the cork sheet. Stamp any (or all) of the Sugar Skulls onto the cork using the Black Archival Ink. Fussy cut the skull.


Follow the same process with the "Memories" stamp but instead of cutting the word out just tear the cork. I love this about the cork sheet - it being pliable enough to tear out images and have the messy jagged look!

Use a fine black pen to draw a border around the edge of the tag for a finished look.

Gather all of your stamped images and extra bits and pieces so you can assemble the tag!

Arrange everything on the tag and then adhere with glue - place the Sugar Skull half off the side of the tag and trim. Tie the string at the top. TIP: you can use the "other half" of the skull for another creation!!!!


Whilst I was making this I stamped and painted enough other bits & pieces so I could make some extras!


Happy Stamping!

Sharon :)

Don't forget to check us out at all of the following Social Media Sites:
The Blank Page Muse- https://blankpagemuse.com/