Pages

Pages

Monday, January 30, 2017

Treasure - Journey - Cherish - Reflections...


Hello Everyone!
Today is my first post as a new DT member of Sin City Stamps and I am excited to share my Altered Playing Cards with you using butterflies from the stamp set "Dandelion Wishes with Butterflies" available now in the Store! There are just so many stamps on this sheet that I will be sharing more creations with you using this set - endless possibilities - and that's what I like with stamps - multiple uses! I have step by step details below for you and I hope you are inspired to try some altered cards yourself!

Supplies List:
Sin City Stamp Set Dandelion Wishes with Butterflies
Playing cards - any size - old or new!
Sandpaper
Gesso
Stencil and Texture Paste
Water Spritz Bottle
Ink Sprays - any colors you like - I used 2 coordinating colors for each card
Charcoal Pencil
Black Archival ink
Markers or Pencils
Scraps of Muslin/Cheesecloth - ink sprayed to match
Colored cotton to match
Words - purchased or computer generated
Glue
General crafty tools like scissors, spatula, tweezers etc.


1. Okay let's get started by 'assembling" your supplies - LOL if you are like me you might add as you are going along! But to start I grabbed what I needed to get the cards prepped and drying and whilst waiting for them I have the items to stamp and color!


2. Firstly I sanded the cards because the ones I have are very "plastic" (is that a word??) and I wanted to give the Gesso something to grab when applied. I am a bit lazy and hate washing paint brushes so I tend to just use my spatula and smear the Gesso over the card - it doesn't matter if it is not all totally covered - I like the any bits showing through just adds to the texture and overall look. Once they dried I used one of my favorite stencils and some texture paste and randomly applied over the cards. I'm working on 4 cards at once - a good way to get multiple items made at once and you can have a production line going!


3. Once the texture paste is dry it's time to get inky fingers - and luckily I have a "bloke's" job so it doesn't matter if I have stained fingers! I used 2 colors on each card to get a shaded type look with some dark and light spots around the texture. I spritzed the cards with water and then ink sprayed and let it run off. I always grab an index card or scrap of card to drip the excess on to - a great way to have a fun colored background for another creation - waste not want not!


4. Whilst everything dries you can be stamping your images, coloring them and fussy cutting them out. I used markers in coordinating colors and various sized butterflies for each card. You will see that I do a lot of fussy cutting - I have a fear of white space so I spend a lot of time cutting all the excess away on my creations!


5. I wanted more definition and depth on the base cards so I used a charcoal pencil to outline the pattern of the stencil and then a cotton bud to smudge it all out and give the shadow look - I always love this sort of effect and the black looks good on the bright colors.


6. We are nearly finished! Assemble all your "bits & pieces" and start to play with the layout. I ink sprayed the scraps of muslin to match the colors on each card plus wound some matching sewing cotton around my fingers to make the circles of fiber. I had some perfect colored little "words" but you can always make your own on the computer as an alternative. Then glue everything onto the cards! I glued the "body" of the butterflies and raised the wings for more of a 3D effect. And we are done!


I love using playing cards as a base to work on - just like an ATC - a little work of art. And what I like about this is you can get quite a few made at once - I'm hoping to join an altered playing card inspirational word swap and we need to make 22 altered cards so this process is a perfect way of getting so many done efficiently! Hope you feel inspired and we would love to see any of your creations shared over at the Facebook Group!

Sharon


Quick Links"
Sin City Stamps Store
Facebook Group
My Blog to see more of what I like to do!

Saturday, January 28, 2017

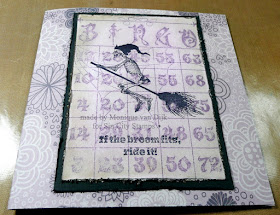
If the broom fits.....


 Hi all, Mo here with a spooky fun card because in my world it's always Halloween :-)

List of Supplies used:
  1. Sin City Stamp set Halloween Bingo  
  2. Sin City Stamp set Skeletons Halloween 
  3. Ink pads- purple, light pink, dark brown and black. 
  4. Black and white cardstock.
  5. Patterned scrapbook paper
  6. Decorative twine
  7. A piece of sisal rope
  8. Halloween charms
  9. A small twig
  10. Thin wire
  11. Blending tool or sponge
  12. Water in a spray bottle
  13. Heat gun
  14. Adhesive
  15. Scissors
  16. Distressing tool or edge of scissors.


See the steps below or click on this link for an instructional video.


1. Use the purple ink to stamp the Bingo onto the white card stock.

2. Cut the bingo card out and use your tool to distress the edges, then add some pink and brown ink with your blender.


3. Stamp the Skellie on the broom with the sentiment.


4. Take apart some of the rope, wet it and dry it using heat gun to straighten the rope.
5. Use the wire to attach the straightened rope the stick. Trim rope to a broom like shape.

6. Use black cardstock to cut out a mat and rough distress the edges.


7.  Assemble the card and add the twine, broom and charms.


Thanks for visiting!


To purchase the stamp supplies used in this project please visit www.sincitystamps.com


For more inspiring paper-craft projects from the Design Team, be sure to follow us on Facebook.

Wednesday, January 25, 2017

Timeless Floral Desktop Calendar


 Hello Ladies,
Welcome to a wonderful new year of crafting!

Today I brought a card which secretly holds a mini calendar.
With a simple crease the card front folds down and transforms to display both the embellished card and the calendar!
This is the perfect gift for anyone with a 9-5 desk job.
My project includes numerous techniques such as stamping and heat embossing onto wood, coloring with chalk, as well as stamping onto transparency for a worry free way to add a sentiment to any project.
.

Let me show you how I did it.

Supplies:
1. Sin City Stamps Inhale...Exhale Art Stamp Set
2. Sin City Stamps Flower & Bird Sketches Art Rubber Stamp Set
3. Sin City Stamps Birds & Clocks Rubber Stamp Set
4. Card base (6"x6")  
5. Paper creasing tool
6. (3) Pattern papers &  (1)  transparency paper.
7. Versamark watermark ink, also pink and black pigment ink.
8. Embossing powder - white
9. Colored chalk
10. A heat gun
11. Embellishments - wooden heart, butterfly, pearls and a mini calendar.
12. Scissors
13. Adhesive and foam tape.
14. Sponge applicator.
15. White cardstock

Directions:
1. Fold the front of the card base in half parallel to the fold and attach a piece of pattern paper to the bottom half of the card.


2. Stamp the flowers along the bottom edge of a piece of pattern paper using watermark ink.

3. Apply white embossing powder, remove the excess, and heat set.

4.Use chalk to lightly color the flowers.
 5. Adhere the embossed paper to the inside of the card.
 Attach the mini calendar to the lower half of the inside of the card. The front of the card will hinge downwards so that the bottom edge of the card front can rest against the top of the calendar that is on the inside.
The calendar will stand upright for display.

6. Using black ink, stamp the clock face onto white cardstock and cut out.


7. Stamp the flowers onto a wooden heart using the watermark ink. 
 Apply white embossing powder, removing the excess, and heat set.
 
Color the wood by applying pink pigment ink directly from the pad and blending with a sponge applicator.


8. Stamp some flowers onto pattern paper, color with the chalk, and cut out the blooms.

9. Use dimensional foam tape to mount some of the embellishments. Adhere the clock, butterfly, wooden heart, & flowers to a piece of pattern paper. Lastly, attach the central embellishment cluster to the front of the card.


10. Stamp your sentiment onto the transparency with permanent black ink.
 Attach it to the lower left corner carefully adhering it discretely underneath other elements so the adhesive is not visible.

 A Closer Look: 

 
Thanks for visiting & happy stamping!


To purchase the stamp supplies used in this project please visit www.sincitystamps.com

For more inspiring paper-craft projects from the Design Team, be sure to follow us on Facebook.

To learn more about our designer Karen, please visit her blog, Art & Soul.

Monday, January 23, 2017

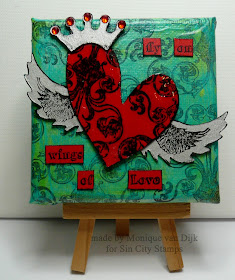
Heart Canvas


Hi Mo here again, almost Valentines day so thought to do a heart canvas for my Sin City inspiration post.

Supplies used:
Sin City stamp set Skeletons Halloween
Sin City stamp set Wing it
Canvas 10 x 10 cm
Tissue paper
Acrylic paint in : Desert turquoise, True Red
Fluid acrylics in Cobalt Teal Hue and Primary yellow
Metallic silver paint
Triple thick gloss glaze
Decoupage glue for napkins
Waterproof stamp ink in black
Heart wings die and machine
Chipboard ( I used a box from a frozen pizza)
Craft mat
Paintbrushes
Baby wipes or wet cloth
Permanent black marker.
Adhesive


1. Paint the canvas turquoise.
2. Die cut the heart, wings and crown from your chipboard.
3. Paint the heart red and the wings and crown silver.
Set aside to dry.


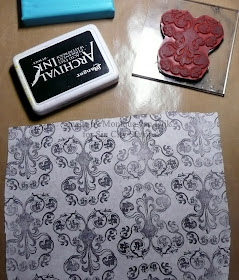
4. Cut a piece of the tissue paper big enough to cover the whole canvas and use a waterproof ink to stamp the Ornate Metalwork look stamp to make the background.
5. Paint the backside of the tissue paper with the turquoise paint to get a brighter color when it is glued to the canvas.


6.Using a paint brush, spread some black paint onto your craft-mat and press the Ornate Metal work stamp into the paint then quickly stamp it onto the heart.
7. Repeat this step using the Wing it set stamps onto the silver painted wings.
8. Clean the paint off the rubber stamps quickly using a baby wipe or wet cloth.


9. Adhere the the tissue paper to the canvas with decoupage napkin glue.

10. Apply a layer of gloss glaze on the heart and let dry

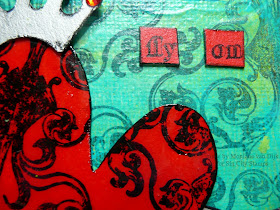
11. Paint a piece of the chipboard with red paint and stamp the sentiment from the Wing it set on it.

11. Cut out the words (as shown above) and use the marker to line the edges black.

12. If you want to add more color to the canvas (as I have done), mix yellow and turquoise translucent paints to achieve a brighter color.

13. Attach all your pieces to the canvas with adhesive.


Thanks for visiting!


To purchase the stamp supplies used in this project please visit www.sincitystamps.com


For more inspiring paper-craft projects from the Design Team, be sure to follow us on Facebook.


Saturday, January 21, 2017

Mini Journal Pages Layout Made Using Moleskine Planner

HelloHello!
It's Kim today and I just wanted to share a mini layout I made using my mini Moleskine Daily Planner. I really love the small, solid book, it just feels great to hold. The pages are thin and smooth, great for writing! ...and inking...


I used all SinCity Stamps and just had fun stamping!
The stamps are from the sets listed here:


The pages of the journal are thin and so smooth! The ink blends nicely to make a very vibrant background. It does tend to bleed through the pages, but I love it anyway! I used mini ink blocks, inked directly to get the patterned section on the right side. The rest was sponge applied and blended.

Have a wonderfully colorful day!
~kim

Monday, January 16, 2017

Carefree & Fearless Card


Hello Ladies,
My name is Karen and today is my first blog post for Sin City Stamps.  I'm thrilled to have been invited to share my creations with you.  To complete my nature inspired friendship card, my project incorporates three different Sin City Stamp Sets.  The sweet little bird and sentiment stamp of hope were perfect to create my encouragement card.
 Let me show you how I did it.

Supplies: 
1. Sin City Stamps -Art Journaling #2 Rubber Stamp Set 
2. Sin City Stamps- Flower & Bird Sketches Art Rubber Stamp Sheet Set
3. Sin City Stamps- Inhale...Exhale Art Stamp Sheet Set
4. White cardstock.
5. Black & brown ink pads.
6. Green & copper ink mists.
7. White gel pen.
8. Colored chalk.
9. A 5"x7"card base
10. Embellishments: paper doily & burlap leaf die cut.
11. Scissors.
12. Adhesive and foam tape.

Directions:
1. Use the black ink to stamp the sentiment in the lower right corner of the card base.

2. Use the brown ink to stamp script randomly over the background.


3. Place the leaf die cut in the upper right corner to act as a 'mask' while you lightly mist it with the green ink spray.
4. Carefully re-position the die cut randomly on the card and continue misting to create three distinct clusters. Set aside the leaf die cut to dry in order to use it later as an embellishment.

5. To create small splatters, remove the spray nozzle from the bottle of copper mist and carefully flick droplets of the ink over the card. Set this aside to dry.

6. Using the brown ink and flourish stamp, to randomly add design onto the card base.
Be sure to overlap the edges of the card.
Next, use a white gel pen to accentuate the dots in the flourish designs.

7. With the black ink, stamp the bird image twice on white cardstock.
Color in one of the bird using chalks and carefully cut out.
Color just the bird's wing on the second image and cut this out.
Attach the bird's wing using foam tape to add dimension.

8. Adhere the bird and leaf die cut to a white paper doily.
To give the doily a distressed and vintage appearance, apply brown ink lightly around the edges with an ink applicator or makeup sponge. 
9. Finish the card by attaching the doily cluster to the card base.
A Closer Look: 

Thanks for visiting!


To purchase the stamp supplies used in this project please visit www.sincitystamps.com


For more inspiring paper-craft projects from the Design Team, be sure to follow us on Facebook.