Happy Friday fellow stampers... It is hard to believe that
this year is almost half over. In the honor
of the fast approaching Independence Day, JULY 4th, I decided to make it
patriotic. For this project I decided to
make a tag and use the metal madness stamp sets that can be purchased from http://www.sincitystamps.com. I hope you
enjoy this project and it was so much fun to make.
Supplies List:
- facade
(surface): #10 and a patriotic sheet of patterned paper that you can use for layering. Mine was patriotic colors (red, white
& blue)
- distress
ink: gathered twig, walnut stain
- archival
ink: cobalt
- embellishments: crinkle ribbon,
jump ring, word band observations, jump ring, brad, metal corners, adornments souvenir star, large numberals #4, and stars
- adhesives: double sided tape and pop dots
- tools: craft sheet, mister,
heat tool, scissors, ink blending tool, ripper and sewing
machine
- stamps
used: Metal Madness Stamps set
Step 1: The
first step in this project is to determine the background; which is the base to
any project for me. First start by
taking a plain #10 manila tag and cover it with a coat of distress ink. I chose to use gathered twig but any color
can be used when completing this effect.
Step 2:
Now that you have the background of the tag started lets then create the water
drop effect onto the surface of that.
Take a water mister and squirt water into the palm of your hand. Then flick the water onto the tag.
Once you have splattered the tag with water take a heating
tool and dry the tag. This will give you
a really cool splatter effect. If you
still have water splotches on the tag you can use a rag (or paper towel) to
blot it off the tag.
Step 3: Then
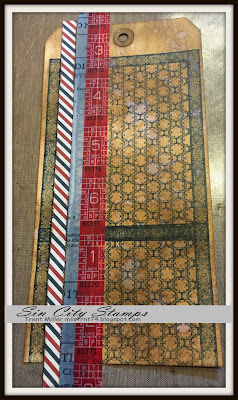
we will take the metal madness background stamp and cover that across the
tag. I chose to use Cobalt archival
ink.
Step 4:
Now we will take washi tape and patterned paper and further develop our background. We will take the patterned paper and cut into
strips. Then using a ripper rough up the
edges of the paper. Using gathered twig
distress ink darken up the edges and apply to tag using double sided tape.
We then will take washi tape and later that onto the tag as
well.
Step 5: In this step we are going to take some
Kraft-core paper and using a sanding block sand down the paper to give it a
worn look. Then I took a picture card from
Idea-ology holiday emphoria that was patriotic. I
centered this into the sanded paper for dimension.
Then using a sewing machine I added a jagged stitch around
the photo to anchor it onto the Kraft-core paper. We will then rough up the sized with a ripper
and add metal corners around the sides for an embellishment. Then place that on the tag using pop dots.
Step 6: Using
a ripper now rough up the edges of the tag.
Then take walnut stain and dirty up the edges.
Step 7: We
are going to continue adding embellishments to the tag and accents as we work to
complete our piece.
Add more embellishments to further complete your project to
your satisfaction.
Step 8: We will finish off the tag by adding ribbon
and an embellishment at the top of the tag.
I dirtied the ribbon with gathered twig to give it a more
aged & worn look
Thanks for checking out my project and if you don’t have the
metal madness stamp set in your stash be sure to add it today. This a must have and great addition for
anyone’s craft stash.
Check out the store today there are such great stamps,
stencils and products that you can chose from that will be great additions to
your home.
Trent-TMCreative


wonderfully done !
ReplyDeleteFabulous, Trent!
ReplyDeleteWonderful!
ReplyDeletelove ove lvoe this!
ReplyDeleteAs always a stunning tag!!
ReplyDeleteLove your tag Trent, stunning!
ReplyDeleteLove it as always!!! A perfect patriotic tag ;)
ReplyDelete