Pages

Pages

Thursday, May 28, 2015

Mixed Media Backgrounds

Hey there!  I hope everyone is enjoying the warmer weather, but where did May go?  Hmmm... it sure does fly by faster and faster.  But today I have a fun, steampunkish, tag tutorial I want to share.  I am using a new (to me) stamp set that I just got from Sin City Stamps using one of my favorite images, hot air balloons.  I have prepared a video tutorial to show you all the fun you can have using all of these products together.  So let's get started.


Supplies:

Sin City Stamps
ColourArte Primary Elements Artist Pigments:
ColourArte Radiant Rain Shimmering Mist:
Gina's Designs Lasercut Chipboard
  • Steampunk 2 Shape Set
  • Word Ribbons 4
Small (2-5/8" x 5-1/4") Ivory Tags (Paper Reflections)
Clear Gesso (Liquitex)
Gum Arabic (Winsor & Newton)
Mini Mister filled with water
Black, Leaf Green Archival ink pad
Tim Holtz Ideaology Spinners w/brad
Vintage Photo distress ink pad

Thanks for stopping by, and I hope I have inspired you to try these great products.  You see how beautifully they work together, stamps, chipboard, and paints, ooh la la!

Have a wonderful, creative weekend!

Barbara

Wednesday, May 27, 2015

A Bit of Sass!


Hello All Lanette Here!

Today I am up sharing a sassy little tag backed full of fabulous color!

Before we get started  lets take look at my finished tag, then I will show you how I made it! :)


Sin City Supplies Used:  Rosette Heart Boarder, Dressforms, Art Journal 3

Other Supplies Used: Art Anthology Colorations & Sorbet, Staz On Ink & Faber Castell Pitt markers, May Arts Ribbon, Tulle, Vellum & a Button.

Now lets look at my process.

I started by adding a bit of color to my background....


To add a bit of texture to my background I just flipped my tag and dabbed it in the over-spray that was still on my craft mat.


 After my first lay of color was dry I added a bit more to my background using a stencil and a lighter color of Colorations spray.


Next I stamped one of the fun Dressform images, using stazon ink.


Then I stampeded the same Dressform on another paper and fussy cut the corset out.
** I did go back and use gold instead of red.


 Next I attached a bit of tulle using my tint attacher.


 A bit mor stamping using the fabulous Rosette Heart Boarder.


 Next I added a bit more movement to my backgrond using a Pit Marker and a flourish stamp from the  Art Journal 3 rubber plate.


Finally to add a bit of texture and sparkle to my tag I used some Art Anthology Sorbet through a stencil.


Put that all togther and add a fun verse stamp from the Art Journal 3 rubber plate and you have one Sassy Little tag!


And just a few details for fun!


Thank you so much for stopping by today!

I hope that I have inspired you to have some inky fun of your own!

Remember to like us on Facebook and stop by the store for all your stamping needs!!

As always feel free to stop by my blog Stacks of Scraps anytime!

Thursday, May 21, 2015

Love Bird card


Happy Friday fellow crafters... I am so excited to share this card DT (Design Team) project for SinCityStamps.  With it being spring time I thought it would be fun to create a project that showcases it.  I wanted to incorporate some form of a heart into my project and a bird.  For this project I decided to make a card and use the rosette heart stamp set that can be purchased from http://www.sincitystamps.com.  I hope you enjoy this project and it was so much fun to make. 
Supplies List:
  • facade (surface): three sheets of card stock measurements of 8.5in by 11in (21.6cm by 28 cm) – a pomegranate, cream and tan sheet.
  • Idea-ology paper stash: Wallflower used a sheet from the 12x12 paper stash
  • distress ink: gathered twig, fossilized amber and tea dye
  • archival ink: watering can, red geranium, potting soil and black
  • sizzix die: Bird Silhouette #660231
  • embellishments: word band and metal corners
  • trimmings: naturals red/cream
  • adhesives: glossy accents, double sided tape and pop dots
  • tools: craft sheet, mister, heat tool, scissors, ink blending tool, ripper and vagabond
  • stencil: Chicken Wire SCS1
  • stamps used: Rosette Heart Stamp set
Step 1: The first step in this project is to take the Pomegranate sheet of card stock and cut it down to 10in by 7in. Then we will fold the card stock to become a 5in by 7in card.
Step 2: Now that we have the base for our 5x7 card we will take the tan card stock and cut it down to be 6 ½in by 4 ½in  in size.
Then we will take the cream card stock and cut it down to a size of 6 ¼ by 4 ¼  in in size.
Step 3: Then take the Sizzix BIGZ Bird Silhouette die (#660231) and cut out the bird using a piece of paper from the Wallflower idea-ology paperstash.  If you don’t have this die use one from your current stash.
Step 4: Now to get started lets then create the water drop effect onto the surface of the cream card stock.  We will first start by taking gathered twig distress ink and cover the face of the paper with distress ink.  Then take a water mister and squirt water into the palm of your hand.  Then flick the water onto the cream cardstock.
Step 5:  Now the fun will be begin by creating our background for the card.  In this step we are going to tape down the corners of the card stock to your craft sheet using tissue tape. 
Then we are going to take the Chicken Wire Stencil and place that centered over the card stock. 


Step 6: Now we will take our blending tool by using walnut distress ink and go over the top of the stencil.  Then peel the stencil from the card stock.  Then we are going to take the ripper and rough up the edges of the card stock.  I then took some trimmings and applied that to the top and bottom of the background (used doubled sided tape).  I ran gathered twig distress ink over the top of the trimmings to grunge it up some.
I then took the bird silhouette and dirtied up the edges and placed this on the card stock using pop-dots.


Step 7: We are going to now using double sided tape attach that to the tan card stock.  Using walnut stain dirty up the edges of the tan card stock.   I then took metal corners and placed them around the base of the card stock.  I then attached that to the pomegranate card stock with double sided tape.
Step 8: We are now going to take the heart stamps from rosette heart stamp set for this step.   Using cream card stock we are going to take the red geranium archival ink and stamp the images. 

I then fussy cut around the images so that I could then dirty them up and place them onto the base of the card.
I also then took a heart embellishment and placed on one of the stamped images.
Step 9: Add more embellishments to further complete your project to your satisfaction. 
Step 10: Final step was to dirty up the edges of the pomegranate card stock with walnut stain distress ink.
Thanks for checking out my project and if you don’t have the chicken wire stencil or rosette heart stamp set in your stash be sure to add them.  These are must haves and great additions for anyone’s craft stash.

Check out the store today there are such great stamps, stencils and products that you can chose from that will be great additions to your home.
Trent-TMCREATIVE

Wednesday, May 20, 2015

Garden Sign

Flowers, I love them! How about you?
 Are you out enjoying the sunshine and feeling the grass between your toes? How about decorating that garden with a beautiful sign decorated with stamps? Yep, stamps aren't just for paper products, they can be used for outdoor projects too!

First I started with a scrap piece of board that I painted with Deco Art's Chalky paint.

Then I created a border around my sign using a black Sharpie.


Next, I used Terri Sproul's Plate of Rubber Stamps "Leaves" to create a background with some green ink, randomly stamping a 3 leaf pattern.

You can also use your stamps as a guide and paint them in like I did with the 2 accent leaves that are on the sides of the quote.

The last thing I did was to attach my sign to the stake after a coat of varnish to make sure it was properly sealed.

Thanks for stopping by!

Monday, May 18, 2015

Graduation Wishes


Hi Chris here and today I would like to share with your this graduation card I made for my nephew with Sin City Stamps and ColourArte Twinkling H2Os and Radiant Gels. For my card I used:

Sin City Stamps: Globes;  Ship; Sequence Waste
Inks: Memento Ink (Tuxedo Black), StazOn (Black)
Distress Inks: Old Paper, Tea Dye, Weathered Wood, Scattered Straw
Distress Markers: Barn Door
Multi Media Paper : Pacon
Gauze Paper : DCWV
Brads, journaling pen, foam mounting tape, water brush, distress tool

To begin this card I started by stamping the Sin City Stamps Globes onto multi-media paper.  Your paper should be about an inch smaller than the size of your finished card.  I then tore the edges of my paper for a worn look.  (Hint: When tearing if you want to see the paper fibers in your tear, tear the paper toward you.  If you want a "neater" tear and no fibers tear away from you. )


I then wrinkled my stamp paper into a ball.  I admit it was hard to crinkle up that stamped image but the result was worth it *wink*

After I straightened out my paper I was left with this...

I then inked the crinkled stamped paper with Old Paper then Tea Dye Distress Ink. I was trying for a wrinkled map look so  I just kept inking til I liked the amount of color.  I then matted my paper onto a piece of gauze paper using brads.  


I then took a piece of scrap paper and painted it with the ColourArte Radiant Gels (Indian Copper) .  If I did this over again I would choose a thicker. sturdier piece of cardstock.  After the Radiant Gels dried I stamped over the background using Sin City's Sequence Waste and StazOn.  


I then matted my stamped Globe paper onto this background piece.  

 I then stamped the Sin City Ship onto my multi-media paper.

After fussy cutting out my image, I started by coloring my image first with ColourArte Twinkling H2Os (Meridian Blue) on the water.  Then colored the flags using my Barn Door Distress Marker.  I then used my water rush to paint the ship using Distress inks using Old paper for the sails, Scattered Straw for the boat trim, and Weathered Wood for the sky.


I added a hand written sentiment and attached the ship to my card using foam mounting tape. For the inside I hand wrote.... Congratulations on completing the first part of your journey into the future.  


Friday, May 15, 2015

Great Things Wall Plaque

Hello dear stamper friends!  This month, the talented Sin City Stamps design team have been sharing some awesome projects using those luscious products from ColourArte.  I combined their beautiful paints with some of Sin City's rubber stamps and die cut shapes.

Today I am going to share a simple but fun wall plaque.
I traced this design onto a piece of thick chipboard and cut it out.
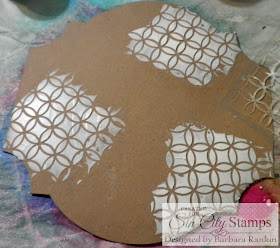
Spread DecoArt Media Modeling Paste through Circle Collage Stencil by Terri Sproul with a spatula.
I applied the paste in three spots, that magic number.  Allow to dry.
Spread more DecoArt Media Modeling Paste through SCS Brick Wall Stencil in three spots, going off the edge of the board.
Once again, allow the paste to dry before proceeding.   You can speed drying time with a heat tool, but be careful or you could get some bubbling.
Spread more DecoArt Media Modeling Paste through a script stencil and allow to dry.
Paint entire board surface with white gesso and let dry.
Spray ColourArte's Shimmering Mists over background:  Honeydew, Ginger Peach, and Snapdragon.  Let dry.
Spray ColourArte's Shimmering Mist Honeydew over the entire background.  It gives the colors a bit of a vintage feel.
Lay out chipboard pieces onto background in a pleasing manner.  Do not glue them down yet.  This is just to give you an idea where to stamp.
Stamp flourishes and crackle background around the base with black archival ink.  Use several sizes of the flourishes to build your own flourishes and extend them.
It does not matter what color your die cuts are because you can make them your own.  First, paint each die cut with a coat of white gesso and let dry.

The chandelier was painted with ColourArte's Mediterranean Blue, edged with Nutmeg daubers.  Then, dimension was added with Peacock Liquid Pearls.
The table was painted with Nutmeg dauber, dabbing over and over, leaving specks that resemble burl wood.  Dimension was added with Platinum Pearl Liquid Pearls.
The spiral staircase was painted with the Nutmeg dauber, then Solar Gold Dauber.  More Nutmeg was added to the stairs.  Dimension was added with Platinum Pearl Liquid Pearls.
Cover the vase with Mediterranean Blue and edge with Nutmeg daubers.  Add dimension with Royal Blue Liquid Pearls.
Cover the lamp base with Mediterranean Blue and edge with Nutmeg daubers.  Cover lamp shade with Bisque Liquid Pearls, applying two coats with your finger and allowing to dry between coats.  Add dimension with Platinum Pearl Liquid Pearls.
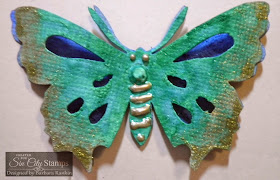
Dab the solid butterfly with Radiant Rain Rich Cobalt, mist with water and dab excess.  Dab top cut out butterfly with Radiant Rain Mallard and edge with Radiant Rain Solar Gold.  Let dry, adhere pieces together.  Add dimension with Platinum Pearl Liquid Pearls.
Cover the dress form with Nutmeg dauber.  Use finger to dab a very light coat of the Platinum Pearl Liquid Pearls over the wire portion, and sponge Vintage Photo distress ink over the wood legs and top.  A bit of dimension was added with Platinum Pearl Liquid Pearls.
Give the frame an antique gold look by first dabbing with Vintage Photo distress stain, dry, then Radiant Rain Solar Gold dauber, dry, then Radiant Rain Nutmeg dauber, dry.


Die cut a frame using two dies sizes from the Spellbinders die set onto a piece of chipboard.
When you separate the pieces, you will have a frame and a center piece.  Save the center piece for another project.
Die cut a single piece of chipboard and tan card stock from the largest rectangle to be used as your backing piece.  Stamp sentiment onto another piece of tan card stock, center frame piece over image and trace around it with pencil.  Cut away excess card stock, as well as the letters "C" and "s", as shown.   These are the pieces you should have.  
Dab vintage photo distress stain over the chipboard frame, leaving dots of color to look like burl wood.  If you do not gesso the chipboard first, the stain will sink right into the fibers wherever it hits first, giving you these awesome color variations.
Dab ColourArte's Solar Gold dabber over the top.
Lightly dab more Radiant Rain Nutmeg dauber over the frame to give it a more vintage look.
Adhere frame over stamped card stock, allowing the letters that extend past the frame opening to be seen.  Adhere the second backing piece of chipboard to the back for stability.  Add some dimensional accents with Platinum Liquid Pearls in each corner.
Adhere all chipboard pieces to the base, as shown.  (Some of the photos show a different framed sentiment, which I ultimately changed to the current one).  Edge base with Chestnut Roan chalk ink.
I used Flower Soft™to make flowers and leaves using floral wire and glue, adhering the little flower particles to the wire.  I then inserted them into the vase in the lower left corner.
I found this little metal bird in my stash and knew I needed it to balance my piece.
Paint bird with white gesso, let dry.  Then paint with Radiant Gels Twilight and Stargazer dimensional paints.  Paint beak with Radiant Gels Emperor's Gold, and dry brush a bit over the bird's wings and tail feathers, as well as the breast.  Dot the eye with a black pen, and an even tinier dot with a white gel pen.
Here are a few more closeups.


Sin City Stamps:
Circle Collage Stencil by Terri Sproul
Brick Wall Stencil
Art Journal 3 rubber stamp plate
Sin City Wings rubber stamp plate
Around the House die cuts
In the Bedroom die cuts
Butterfly and Bee die cuts

Other:
DecoArt Media Modeling Paste
Liquitex white gesso
ColourArte Radiant Rains Mists:  HoneydewGinger PeachSnapdragon
ColourArte Radiant Rains Daubers:  Mediterranean BlueNutmegSolar Gold
ColourArte Radiant Gels Dimensional Paints:  TwilightStargazerEmperor's Gold
Flower Soft™(emerald green, baby pink, lavender)
Liquid Pearls Peacock, Platinum Pearl, Bisque
Vintage Photo distress ink and distress stain
Black archival ink
Chestnut Roan chalk ink
Scrap tan cardstock
Metal bird embellishment

I hope you enjoyed my rather lengthy, but picture-filled project today, and that I may have inspired you to take those die cuts and make them your own.  I think you will love how easy it is to change the look of simple shapes with gorgeous paint products from ColourArte.  With the right products, anything is possible.  Of course, the stencils are fabulous fun for adding texture, and the stamps add that extra bit of flair.

Have a wonderful week, and stay crafty, my friends!

Barbara